Things You'll Need
T-shirt
10-15 large rubber bands
Newspaper
Latex gloves
12 oz. Squeeze bottle
Fabric dye
Non-ionic detergent
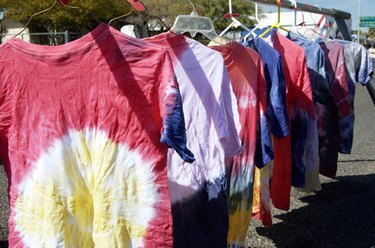
Tie dyeing, which is the twisting, tying and dying of fabrics, has been found in many cultures, including India, China, Peru, Bali, Senegal and Benin. Though the earliest recorded use of this surface dying technique was in Peru in around 500AD, it didn't gain popularity in the United States until the late 1960s, when it became associated with hippie culture. There are many ways to twist and knot a piece of fabric, with each technique producing a different effect. The marble effect is obtained by scrunching the fabric, creating the tightly rippled dying surface that produces the pattern.
Step 1
Lay the t-shirt out on a non-porous surface like a utility table with a stainless steel or plastic table top. The marbling effect is achieved through intensely rippling the surface of the t-shirt. Therefore, working on a relatively slick surface will make scrunching easier.
Video of the Day
Step 2
Scrunch the t-shirt, starting at the center, below the neckline. The marbleizing of the t-shirt is the end-result of the proper folding technique. Hold the hand in a claw-like formation and gather the shirt, bunching small sections at a time. Continue crimping the t-shirt in sections, until its entire body and sleeves are tightly bunched together. Once the shirt has been successfully gathered, it should be circular in shape.
Step 3
Secure the gathered t-shirt by binding its edges, one side at a time, with rubber bands. Once the periphery of the shirt is fastened in place, the rubber bands can be stretched across the length and widths of the bunched up shirt. Stretching the bands across the shirt before securing the edges could lead to the shirt shifting and losing its shape. Ten to 15 rubber bands should be sufficient, depending on the size of the shirt.
Step 4
Place the shirt on several sheets of newspaper, which will help absorb excess fabric dye during the coloring process. Newspaper is used only after the shirt is gathered, because a papered surface can create more friction than an uncovered one. Thus, it might be more difficult to get the level of scrunching necessary for the marble tie-dye effect if the table is lined from the beginning.
Step 5
Make sure hands are protected with latex gloves, before handling the dye. Then, use a squeeze bottle full of the fabric dye to drench the surface of the t-shirt. Traditionally one bottle is used in the marbling technique, but more colors can be introduced, if desired. When one side is completely covered, flip the shirt over gently, and cover the other side with the remaining dye.
Step 6
Leave the shirt to dry, without unbinding the rubber bands. This process can take up to 24 hours depending on the density and size of the shirt. Smaller, thinner t-shirts can take less time than larger, bulkier tops. To make sure the shirt has sufficient drying time, wait 24 hours before unraveling.
Step 7
Wash the dried t-shirt in a machine, using a non-ionic detergent. Non-ionic detergents are a less reactive cleansing agent used in the tie dying process to help remove any excess dye. Fill the machine with cold water and add a tablespoon of detergent if only one shirt has been dyed—and up to 1/4 cup for a full load of shirts. Untie the shirt and add it to the sudsy water, allowing it to wash the entire cycle. If the water is clear in the rinse cycle, then all the excess dye has been removed. If not, repeat the washing process.
Step 8
Dry the t-shirt, by either hanging or machine drying it. Machine drying can help the color set faster, a process that can also be achieved by line drying.
Warning
Do not to tie dye on a porous surface, such as wood, because it could absorb the dye’s color—permanently coloring the wood or altering its finish.
Video of the Day