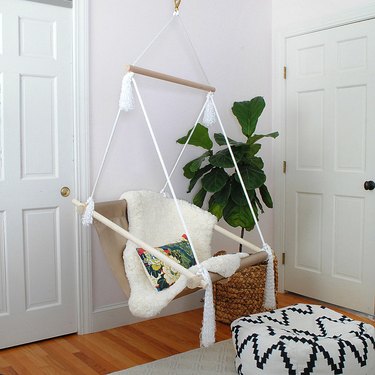
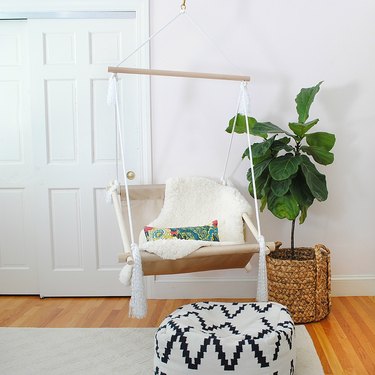
Though not many of us have two trees perfectly placed to allow for a traditional hammock to stretch between them, you can still get the same laid-back vibe with a hanging hammock chair. Perfect for indoors or out, this DIY is easier than it looks.
Things You'll Need
2 yards faux leather
Scissors
Fast-grab glue (recommended: Aleene's)
Sewing pins
All-purpose thread
Sewing machine
2-inch wooden dowels or two 3-by-3 boards, 3-feet long, 2
1 1/4-inch wooden dowels, 3-feet long, 3
Miter saw
Clamps
Electric drill
1 1/2-inch Forstner bit or spade bit
5/8-inch Forstner bit or spade bit
1/16-inch drill bit, plus larger for ceiling hook
1-inch screws, 4
Stud finder
Large eye hook
Pliers
Spring-loaded fixed eye hook (fixed eye should be about 3/4-inch in diameter on the inside)
Heavy-duty braided rope, 50 feet long (7/16-inch thick recommended)
Step 1: Cut and Glue the Faux Leather
Cut the faux leather into two rectangles, 27 inches wide and 55 inches long each. Lay one of the rectangles wrong-side up and run a line of fast-grab glue down each of the four sides. Lay the other rectangle on top, right-side up and positioned to cover the other rectangle exactly, and press the edges together to adhere.
Video of the Day

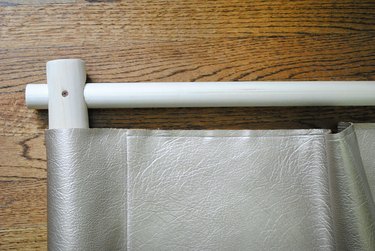
Step 2: Fold and Sew Pockets
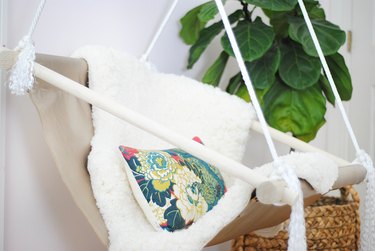
Take one of the shorter sides of the leather and fold 5 inches of it over. Pin it in place, and then sew a seam with straight stitch (any length stitch is fine) across the bottom of the folded fabric to make a pocket for hanging. Repeat on the other short side, making sure that the folded portions are both on the same side of the leather.
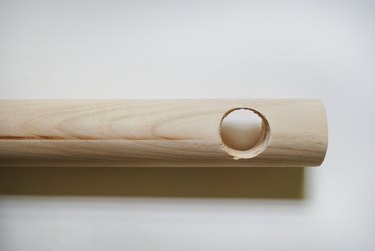
Step 3: Cut and Drill the Dowels
Use a miter saw to cut each of the 2-inch dowels or 3-by-3s to 34 inches. Cut one of the 1 1/4-inch dowels to 34 inches as well (leave the other two at 36 inches). Clamp one of the 2-inch dowels to a sturdy surface. Use the 1 1/2-inch Forstner or spade drill bit to carefully drill a hole through the center of the dowel, 1 inch from the end. Repeat at the other end, and then do the same with the other 2-inch dowel. Use the 5/8-inch Forstner or spade bit to repeat for the 1 1/4-inch dowel that was cut to 34 inches.
Tip
Clamp a scrap piece of plywood under the dowels being drilled to reduce splintering. When choosing between a 2-inch dowel or 3-by-3 for this project keep in mind that the 3-by-3 will be easier to drill through because of its square shape.
Step 4: Assemble the Chair
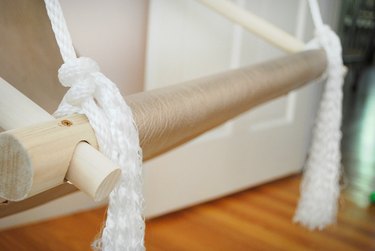
Slide a 2-inch dowel through each pocket in the leather, and then slide the 1 1/4-inch dowels that are 36 inches long through the holes that have been drilled in the 2-inch dowels. Adjust them so 1 inch sticks out through the holes at each end. Drill 1/16-inch pilot holes through the 2-inch dowels into the 1 1/4-inch dowels below, and then drive screws through the pilot holes to attach the two dowels together.
Step 5: Mount the Hanging Hook
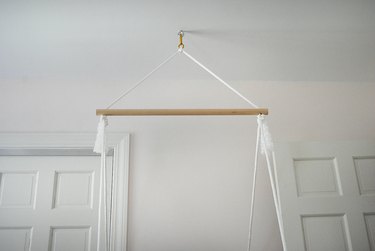
For stability, it's very important that the hook on which the chair will hang be screwed into a wood joist. Use a deep stud finder to locate a joist in the ceiling, and mark its location with a pencil. Drill a pilot hole over the mark with a drill bit a little smaller than the diameter of the screw portion of the large eye hook. Start screwing the eye hook into the pilot hole with your hands, and then use pliers to twist the eye hook all the way in.

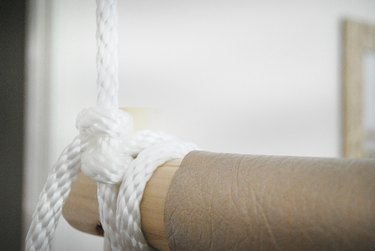
Step 6: Tie the Front Ropes
Cut two pieces of rope to 72 inches each. Wrap one piece of rope twice around the bottom 2-inch dowel, between the 1 1/4-inch dowel and the leather, leaving about a 12-inch tail hanging down (this will become the decorative tassel that hangs off the bottom). Secure by tying two knots: a simple slipknot works well (tutorial here for reference). Repeat with the other piece of rope and the other bottom corner of the chair. Leave the other ends of the rope loose for now.
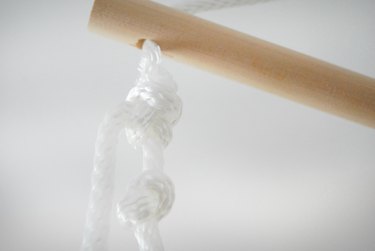
Step 7: Tie the Back Ropes
Cut a piece of rope to 108 inches. This will be enough for a 9-foot ceiling or shorter. Allow more rope length for ceilings taller than 9 feet. There's no formula to follow for the rope length, but it's better to err on the side of too much rather than too little.
Take one end of the rope and wrap twice, leaving about 12 inches of rope hanging loose for a tassel, then tie a double knot around one side of the top 2-inch dowel, exactly as was done with the bottom 2-inch dowel in Step 6.
Measure 26 inches of rope up from the double knot, and then tie a single knot. Check that there are still 26 inches of rope between the knots. Thread the free end of the rope through one of the holes in the 1 1/4-inch dowel.
Then take one of the free ends of the rope that was tied to the bottom 2-inch dowel and measure 38 inches. Use that rope to tie a double knot around the top rope, above the single knot, leaving 38 inches of rope between the knots. Trim any extra rope from the double-knotted bottom rope, and then slide the two knots from the top rope and the bottom rope together to make them appear as one.
Step 8: Determine the Hanging Height
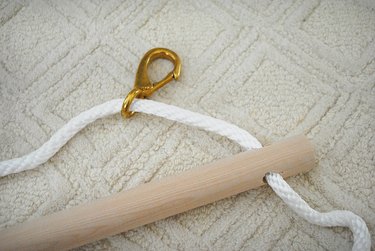
Slip the end of the rope that has been knotted and threaded through the 1 1/4-inch dowel through the eye of the spring-loaded hook. Hold the chair up to determine how much rope is needed from the ceiling hook to make the chair hang at the right height. Then tie a single knot under the hook to anchor that spot.
Step 9: Repeat the Knots
Repeat the knot measuring and knotting process outlined in Step 7 for the remaining side, then clip the spring-loaded hook onto the eye hook in the ceiling.
Step 10: Unravel the Loose Rope
Unravel the loose rope ends to give them a tasseled look.
Try Out Your New Chair
Sitting in something suspended from the ceiling for the first time can feel a little scary, but as long as the chair has been mounted into a stud, have no fear. Your chair will be secure and you can swing, rock or just sit still to your heart's content.
Video of the Day