
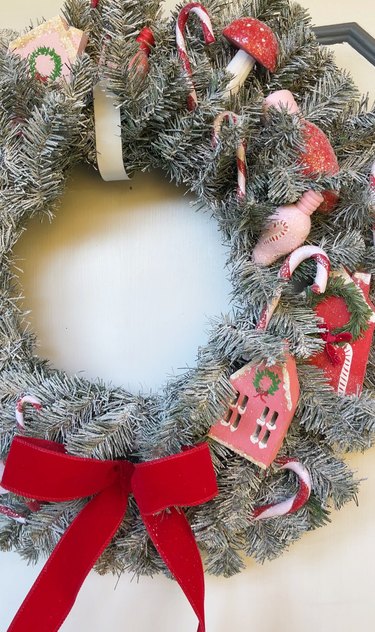
There's no time like the holiday season to get a little (OK, a lot) crafty. This year, we're all about the adorable and whimsical wooden house wreaths at stores like Anthropologie, Pottery Barn and Target. So, naturally, we decided to craft our own version—but with a fun "candy cane village" twist. This DIY Christmas craft, which doubles as beautiful home decor, offers a festive way to get in the holiday spirit while providing a more affordable alternative to store-bought holiday wreaths.
If you're feeling the itch to make your own seasonal decor, we'll walk you through making a Christmas candy cane wreath with hand-painted wooden figurines, candy-cane-shaped polymer clay and a whole lot of glitter.
Video of the Day
Video of the Day
Things You'll Need
Snow spray (aka flocking spray)
Floral wire (optional)
Acrylic paint in white, red, light pink, hot pink, tan and green
Painbrushes
Paper towels
A sheet pan and silicone baking mat you don’t use for food
How to make a Candy Cane Wreath:
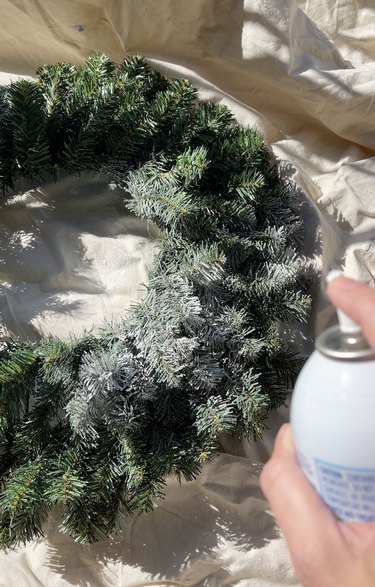
1. Spray wreath with fake snow
To give the spruce wreath frame a snowy feel, a can of fake snow works winter wonders. Before applying flocking spray, treat the wreath to some sprucing (see what we did there?) by pulling the branches outward and straightening each one.
Once the wreath has a nice shape, place it on a painting drop cloth or old sheet that you don't mind getting paint on and spray it with fake snow. For this step, add as much or as little fake snow as you'd like.
Tip
If you prefer a pop of greenery in your wreath, add a light coat of fake snow, allowing it to dry and then adding more to areas that need extra coverage.
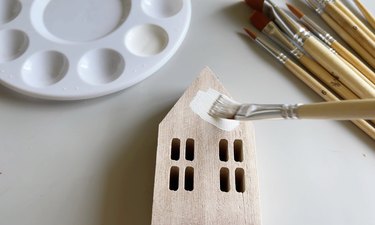
2. Prime wood figurines
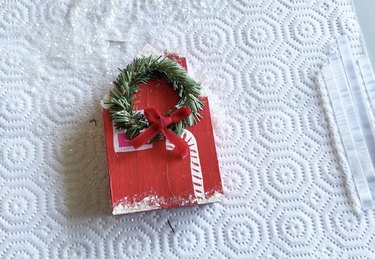
While the wreath dries, it's time to prep and prime the wood figurines with white acrylic paint. For this wreath, we used a combination of wooden mushroom and light bulb ornaments found in-store at JOANN (shop similar mushrooms at World Market or Oriental Trading and light bulbs at Woodpeckers Crafts), a few unfinished holiday houses left over from another craft (shop similar houses at Hobby Lobby) and an 8-inch unfinished nutcracker.
Tip
Want to dress up your wreath even more? Consider adding wooden snowflakes, poinsettia flowers, pine cones and other small items throughout the wreath.
Before priming, remove any ribbons, screws or other hanging mechanisms from the ornaments. Next, give each figurine one or two coats of white acrylic paint. If the figurines are not unfinished wood and are pre-painted, they might require two or three coats depending on the color. Give the figurines time to dry before moving on to the next step.
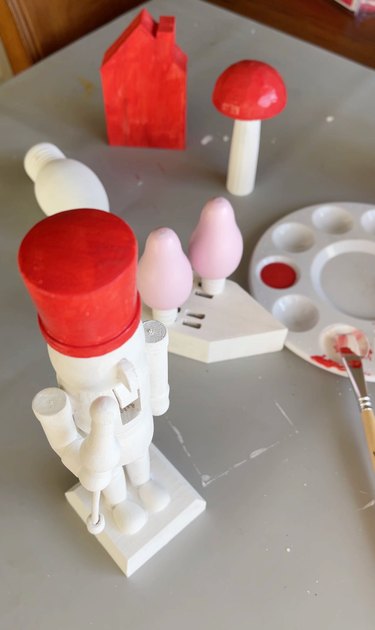
3. Paint wood figurines
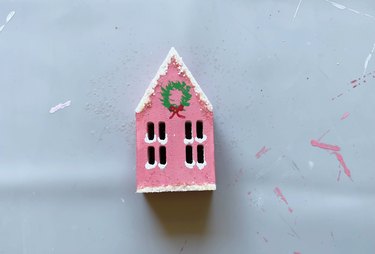
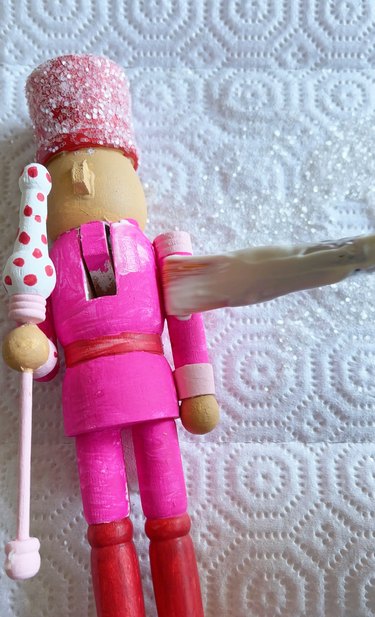
Now it's time to decorate! For the candy cane wreath, I went with a red, pink and white theme. I painted each house, bulb, mushroom and nutcracker with a combination of bright scarlet, soft rose, hot pink and snowy white, but you can opt for any color scheme.
Start by giving each figurine base coats of color. For example, I painted each house a solid color, the mushroom tops and stems a mixture of corresponding colors and each part of the nutcracker a different color. Once coated, set the figurines aside to dry.
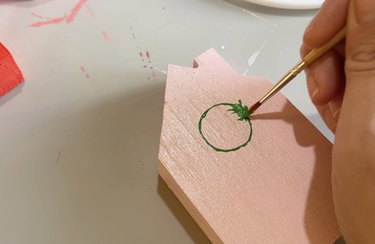
4. Add details to wood figurines
When the wood houses are dry, dip a thin paintbrush into green paint and draw a circle on top of the house to create a wreath. On top of the circle, add small paint strokes in different directions to create the wreath's leaf detail. Then, go in with white paint and create a scalloped look at the top of the roof and base to mimic snow.
It's OK if this is a little messy—it serves as a base coat and will eventually get covered with glitter. While this dries, add any other details you might want, like a door, window or a large candy cane at the doorway. Round it out by using red paint to add a small bow at the bottom of the wreath.
For the mushrooms, have fun with different patterns. For two of my mushrooms, I stuck with a more traditional look using speckles and polka dots. For my third mushroom, I brought the candy cane theme to life by drawing a red swirl as a guide and retracing with a thicker line of paint.

The nutcracker likely won't need much detail beyond a painted base coat, but if you'd like to add some extra touches, create candy cane swirls on his outfit or give him eyes, rosy cheeks and a mouth. I prefer a more minimalist look and left my nutcracker in solid colors.
Once the details are finished, give the figurines time to dry. To speed things up, try placing them outside in the sun (weather permitting, of course).
Tip
For extra holiday pizazz, I took a piece of a Christmas tree branch that I had left over from another project to create a miniature wreath on one of the houses. This adds nice variety next to the painted details. If you don’t want to make your own, some Etsy shops sell miniature Christmas decor wreaths for dollhouses.
5. Sprinkle glitter on figurines
Lay down a piece of paper towel in your workspace—this will be used to catch excess glitter, which can be reused during the bedazzling process. Take a paintbrush that you don't mind getting ruined with paste and use it to apply a layer of paint to the areas with painted snow. Then, sprinkle clear glitter on these areas, shake off the excess and set them aside to dry while working on the other figures.
Add glitter to your mushrooms by painting their top and rolling them in excess glitter on the paper towel. If you want some extra sparkle, pinch the glitter and sprinkle it on by hand. I wanted to create dimension on the mushrooms, so I added glitter to the tops and left the stems plain.

Glitter the nutcracker to your heart's content. Since I went with a more basic solid look, I chose to add glitter all over—minus the face—for a dressed-up vibe. Clear glitter adds a more transparent look, but a glitter-free design is just as pretty.
6. Make polymer clay candy canes
I wanted to add a different material to the wreath for more dimension, so I opted to make candy canes from polymer clay. If you prefer not to work with oven-bake clay, I recommend purchasing wood candy canes and painting them to resemble other figures. If you want to try your hand at sculpting, here's how to make polymer clay candy canes.
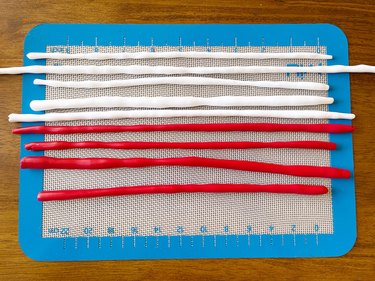
Start by preheating the oven based on the polymer clay instructions (mine said 275°F, but some brands vary). While the oven warms, break each section of polymer clay (there should be four in each pack) and roll them out with your fingers so that they look like little red and white snakes. You can play around with thickness here, making some thick and others thin—just be sure each red has a matching white in the same or similar thickness.
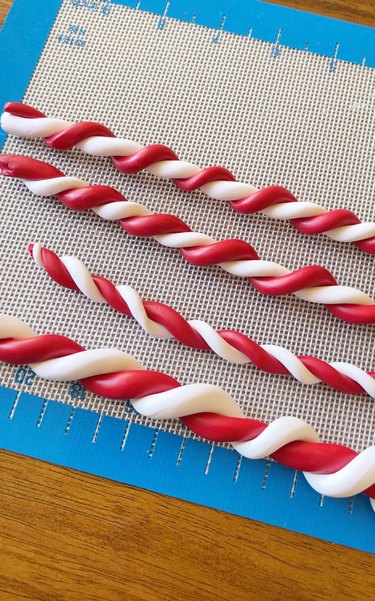
Next, wrap the red and white rolls in a twisted design. To do this, I pinched both colors together with my left pointer finger and thumb and then used my right thumb, pointer finger and middle finger to spin them around each other. Once you have a twist, lay the roll back onto your workspace and roll the colors into each other, applying light pressure to combine.
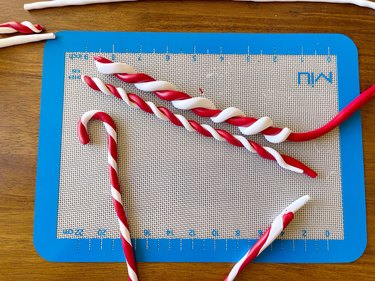
To form candy canes, cut out a variety of lengths (or the same lengths if you prefer more symmetrical candies) and place them on a silicone mat and baking sheet. Shape each with a hook at the top and make sure the ends are straight. Then, cover in a sheet of foil to keep the tops protected while baking and bake for 25 to 30 minutes depending on the clay instructions.
Tip
Use a silicone mat and baking sheet that you don’t cook with. Although it is nontoxic, polymer clay is a plastic-based clay, and it’s best to keep your craft supplies and cooking supplies separated.
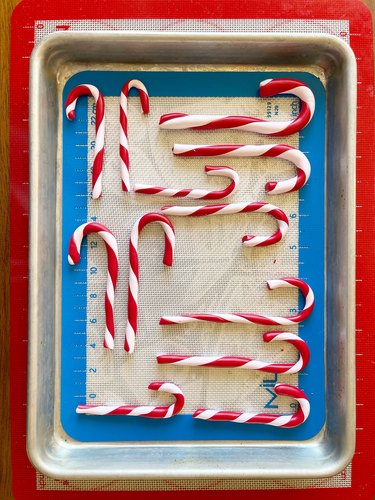
After removing the candy canes from the oven, allow them to cool down for about an hour. Then, add a thin layer of paste or glue to the tops and sprinkle glitter over them to finish.
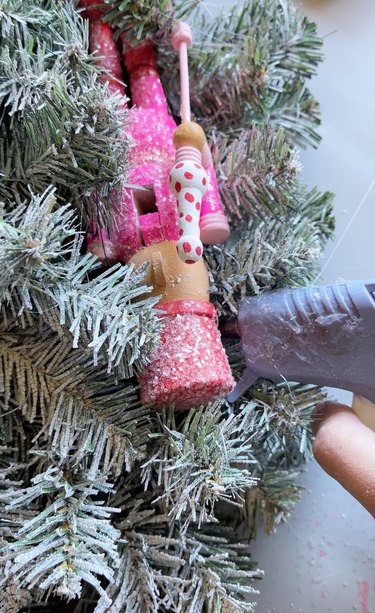
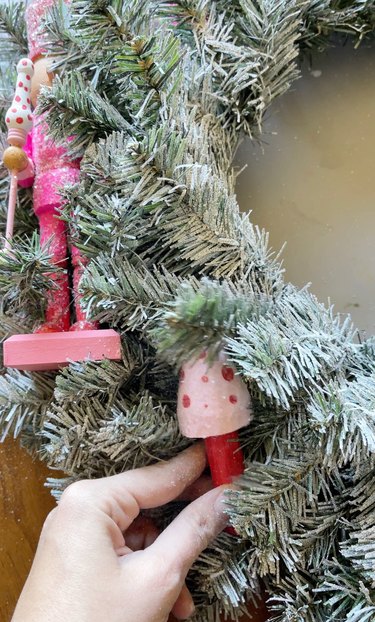
7. Attach figurines and candy canes to wreath
This candy cane wreath comes to life with the adorable glistening figurines. To attach them to the wreath frame, hot glue a long piece of floral wire to the back of each and wrap the wire around the form to secure it. Alternatively, place them onto the wreath and secure them to the branches with hot glue.
For added glitz, incorporate tinsel or shimmering round ornaments in red, white and pink throughout the door wreath.
Tip
The spray snow is messy and sheds while attaching to the figurines. I recommend completing this step on a drop cloth or atop newspaper for a quick and easy cleanup.
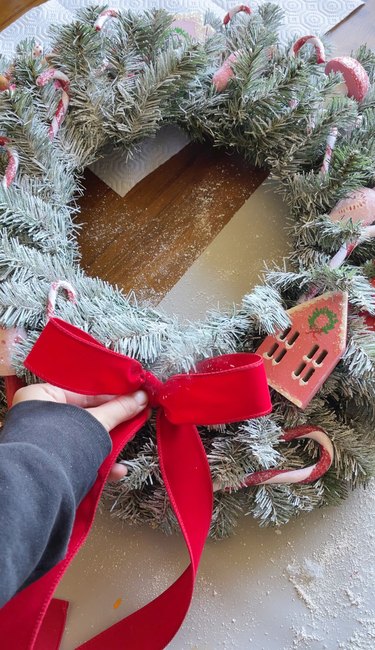
8. Transform a piece of ribbon into a bow and attach
For a finishing touch, attach a large bow to the wreath using red velvet wired ribbon. I went with a simple bow style using two standard "bunny" loops—just like tying a shoe! If you're confident in your bow-tying abilities, try a classic Christmas bow or a voluptuous floral bow.
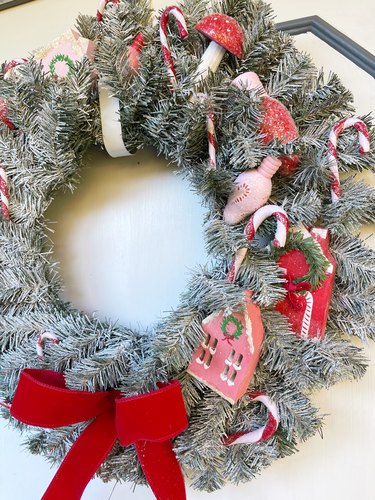
9. Hang the wreath
It's time for the grand finale! Hang your wreath on a front door (using a wreath door hanger), above a cozy fireplace or in a festive entryway. For a more rustic feel, you could even hang it in the center of a large square wall basket (and use red burlap or a linen candy cane ribbon instead of the luxe velvet).
You'll be decking the halls with glitter and whimsy before you know it. May your crafting be as joyful as your holidays!