Vinca (Vinca minor), also known as dwarf periwinkle, common periwinkle and creeping myrtle, covers the bare spots in partial shade locations. Hardy in U.S. Department of Agriculture plant hardiness zones 3 through 8, transplanting vinca minor is relatively easy. The dark green foliage and light, lavender-blue flowers add visual interest under trees where other ground covers may struggle.
About Vinca Minor
Video of the Day
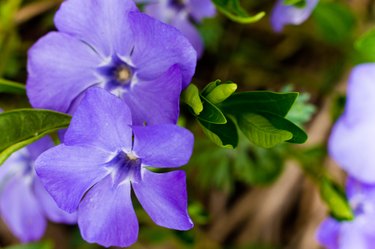
Vinca originated in Europe and southern Russia. The evergreen 1 1/2-inch-long leaves provide a dense mat of foliage over its trailing vines. The five-petal, 1-inch-wide flowers appear from late spring into early to midsummer. Each plant grows 6 inches tall and spreads up to 36 inches wide.
Video of the Day
While the species plant features dark green foliage and lavender blue flowers, its cultivars feature foliage ranging from creamy white to white or yellow and green variegated. Some cultivars have white, reddish lavender or purple flowers.
Use caution when planting vinca. Wherever a leaf node touches the soil, the plant will root and send out more vines. While it is an attractive ground cover that can help stabilize slopes and cover bare soil over the bulb bed, it can be invasive and spread into nearby fields, meadows and woodlands. Use concrete borders and other hardscape to contain vinca. Edge it regularly to keep it from creeping outside the landscape and dispose of the trimmings in the trash.
Preparing the Garden Bed
Before transplanting vinca minor, prepare the garden bed by digging in 2 to 4 inches of compost. While vinca tolerates rocky and dry soils, it prefers an organically rich, moist soil. Dappled or partial shade is best. Although vinca tolerates full sun, the bright light affects the plant's ability to convert light to energy by photosynthesis and damages the chlorophyll. This turns the leaves yellow, or chlorotic, and slows the plant's vigorous growth.
Remove rocks, sticks and plant debris and then rake the soil smooth. Dig planting holes 8 inches apart for quick coverage or 18 inches apart to cover a large area. Fill the holes with water and allow them to drain before transplanting vinca vines.
Transplanting Vinca Minor
Plant the rooted cutting or container-grown plant at the same level as it was in the grower's pot. Loosen the soil around the edges of a root-bound plant and trim encircling roots with scissors or pruners sterilized in rubbing alcohol or Lysol before transplanting a vinca vine. Backfill with the excavated soil and tamp gently. Water thoroughly to settle the soil and add more dirt or compost as needed to fill in around the root ball.
Caring for Vinca Minor
Wind a soaker hose or drip watering system amid the vinca plants to provide water without wetting the foliage. Cover the hoses with mulch, pulling it back 4 inches from the vinca's stem. Arrange the vines over the mulch. Water weekly or when the soil under the mulch is dry to the touch.
Fertilize in spring with a 10-10-10 slow-release fertilizer according to the package directions. Always water after fertilizing. If the vinca begins to look scraggly, shear the plants at 2 to 4 inches above the soil, or in large plantings, set the mower at its highest setting and mow over the vinca to encourage new growth.
Propagating Vinca Plants
Because vinca plants root at the leave nodes, you can divide the plants when they get too crowded. Cut the vine between the parent plant and the rooted node with sterilized pruners. Dig up the rooted section and move it to a new location in the garden or a flowerpot. Water regularly until the vinca is established in its new home.
Alternatively, take tip cuttings in late spring. Strip the leaves off the bottom two thirds of the stem and insert it into moist planting mix. Put the pot and cutting in a plastic bag or cover with a glass or plastic cloche. Keep it in a warm location in bright, filtered light until new growth appears.