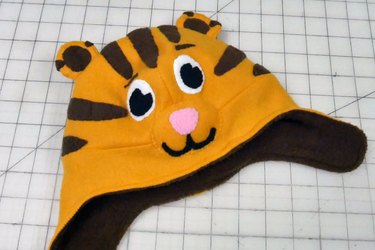
This cozy fleece hat is easy to make, even if you don't have a ton of sewing experience. It looks like Daniel Tiger, so you won't have to bribe your child to wear it. And, paired with a red hoodie and matching gold pants, it tops off a darling costume!

Things You'll Need
1/4 yard golden fleece
1/4 yard brown fleece for lining
Scraps of white, black and pink fleece or felt
Colored thread
Step 1: Pattern
Print and cut out both patterns: the Daniel Tiger face and the hat pattern. Pin the hat band piece to the fabric along the fold following the pattern markings. Pin the hat piece also, matching the stretch of the fabric to the markings on the pattern. Cut out hat band, hat piece and ears from the golden fleece.
Video of the Day
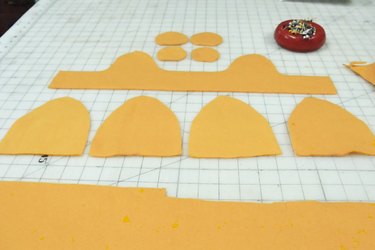
Cut out the hat band and hat pieces from the brown lining fleece.
Step 2: Sew Hat
Match two hat pieces, right sides together and using a 1/4 inch seam, stitch from the base to the tip of the hat on one side.
Tip
Use a narrow zig-zag stitch to sew all seams to maintain the stretch of the fabric.
Repeat with the next two pieces.
Sew the inside ear to the outside ear matching dots. Repeat for the other ear.
On one of the hat sections, pin the ears into position on the right side of the fabric based on the diagram and top with the second hat section, right side down. Sew in place.
With right sides together, stitch the open ends of the hat band together with a 1/4 inch seam. Again with right sides together, pin the hat band to the main hat matching the back seams and stitch all the way around.
Step 3: Attach the Face Pieces
Tip
Because the face pieces are so small, cut them out as you work rather than cutting all of them at one time. Also, if the hat is for short term use, such as for a costume, you can use fabric glue to place the face pieces.
Cut out each piece from scraps of fleece or felt and hand stitch them to the hat following the diagram on the pattern. Use thread or embroidery floss in a similar color. The loft of the fleece will conceal the stitches so you don't need to be an expert at embroidery.
Stuff a little polyester fiberfill into the muzzle and stitch closed.
Step 4: Finish the Hat
Assemble the brown lining fleece following the method used previously to create the hat. With right sides together, match the center back seams of the lining hat with the appliquéd hat and pin in place. Match seams and pin the hats all the way around. Stitch together, leaving an opening at the center back to turn the lining. Turn right side out.
Press the seam turning the open edges inside and pin in place.
Top stitch all the way around with a long straight stitch.


Video of the Day