Leaving out a treat of milk and cookies for Santa to enjoy on Christmas Eve is a timeless tradition that adds to the magic of the season. It's especially fun when you have a decorative milk for Santa bottle, which could be a prop for festive photos, a holiday decor item or a functional bottle for serving Santa his drink of milk. As a DIY project, making Christmas glass milk bottles is quite straightforward and only calls for a few easy to find items. All it takes is a clear glass bottle, either purchased or recycled, some paint and your choice of methods: decor only or food-safe.
Things You'll Need
Clear glass bottle
Acrylic, chalk or enamel paint
Paintbrushes
Paint marker (optional)
Christmas ribbon
Rubbing alcohol or white vinegar
Video of the Day
Christmas Glass Milk Bottles for Decor Only
If you're not going to use your Christmas glass milk bottle to serve milk to Santa or to anyone, then it's safe to use regular acrylic paint. You can also use chalk paint for a matte finish if you prefer. With a decor-only milk for Santa bottle, there's no need to cure the paint. Note that this type of painted bottle shouldn't be washed in water; just wipe it with a damp cloth if needed.
Video of the Day
Step 1
Wash the glass bottle with hot soapy water. Rinse it and let it dry thoroughly before continuing.
Step 2
Pour approximately 1 to 2 tablespoons of white acrylic or chalk paint into the bottom of the glass bottle.
Step 3
Slowly tilt and rotate the bottle so that the paint swirls across its inside surface, leaving a thin coat of paint behind. Swirl the paint inside the bottle until it has coated the whole bottle up to at least 1 inch below the top. Add more paint a small squeeze at a time if necessary. It should resemble a bottle filled with milk.
Step 4
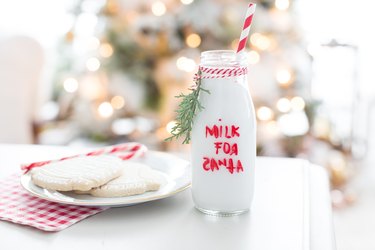
Use a fine paintbrush with a contrasting color of paint – red is great choice – to add lettering to the outside of the bottle. Alternatively, use a paint marker. Write "Milk for Santa" on the bottle or any other message or design you like.
Step 5
Let the paint dry completely, which could take up to 24 hours or more. Tie a small Christmas ribbon around the neck of the milk bottle and put cookies on a plate next to it for a whimsical display.
Food-Safe Method for a Milk Bottle
A food-safe milk bottle to go with real cookies for Santa needs to be made with enamel paint intended specifically for use on glass. These types of paint require curing in the oven following the manufacturer's instructions, which makes the paint safe for use with food as well as hardwearing and washable. The paint for a food-safe milk for Santa bottle needs to go on the outside of the bottle only.
Step 1
Wash a clear glass bottle in hot, soapy water. Rinse it and allow it to dry. Next, wipe down the outside of the bottle with a cloth dipped in rubbing alcohol or white vinegar. Wait for the bottle to dry completely before continuing. The alcohol or vinegar makes sure there are no oils or smudges on the glass, which can prevent the paint from adhering.
Step 2
With a medium paintbrush, apply a thin coat of white paint all over the outside of the glass bottle. Stop at least 1 inch below the rim. Wait for the paint to dry and then add another coat. Continue applying thin coats of white paint, letting each one dry before adding the next until the paint appears opaque and looks like milk.
Step 3
Write "Milk for Santa" or any other message or design over the white paint once the final coat is fully dry. Use a paint marker or a fine paintbrush to add the lettering.
Step 4
Cure the painted bottle following the paint manufacturer's instructions. This will generally mean placing the painted bottle in a hot oven for a certain amount of time and allowing it to completely cool in the oven for several hours.
Step 5
Tie a ribbon around the neck of the milk bottle, put cookies on a plate next to it and leave the treats out for Santa on Christmas Eve.