
There's major satisfaction in doing simple things really, really well. In the culinary world, the omelet (or omelette, if you prefer the French spelling) is one of those "simple but spectacular" dishes. It's uncomplicated in its fundamentals, but you can style it as a hearty, rustic dish or one that's refined and elegant. There's plenty of room to get creative.
Of course, omelet-making might feel intimidating if you don't have loads of experience. But at the end of the day, you're still simply frying eggs—and most of us can manage that. To boost your omelet confidence, we'll walk you through the basics, including breaking down the two main omelet styles and sharing top techniques. Egg-cellence awaits!
Video of the Day
Video of the Day
A Quick Omelet Overview...

Let's get this out of the way right from the start: Omelets aren't one dish but several. The basic idea is constant—beaten eggs cooked in a skillet—but the end results are unmistakably variable depending on your method.
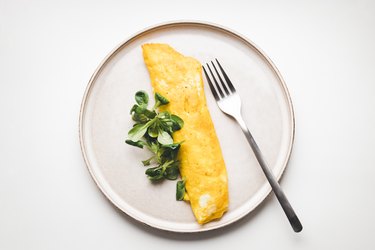
The omelet you're likely most used to is what's generally known as an American-style omelet, which is lightly browned on the outside, folded in half and often filled with add-in ingredients. (The French call this a country-style omelette.) The other is a classic French omelette, which has no browning at all and is typically served with minimal fillings or no fillings at all. (There are many international versions, as well, but we're not going to look at those today.)
Which one's better? There's no right or wrong! The folded country-style omelet is generally easier and feels more like a meal because of add-ins (which can be pretty substantial), while the classic French omelette appears more refined. Neither variety is especially difficult, though a perfect French omelette requires a smidge of finesse that comes with practice.
Tip
For the purposes of our article, we’re referring to standard large eggs you’ll find at most stores. If your eggs are larger or smaller, adjust instructions accordingly.
Part 1: American-Style Omelets
1. The Basics

We'll start with the American-style/country-style omelet, partly because it's the type that most people are familiar with and partly because it's less complicated to execute. Unlike the tricky folding maneuver used for a French omelette, you'll simply fold this one in half. Not only is the technique simpler, but you'll be able to include lots of add-ins to create a heartier meal, whether you serve it in the morning, at brunch or as "breakfast for dinner."
American-Style Omelet Recipe
Start by preparing fillings (we’ll circle back to these in a minute) because, aside from fresh herbs, most will need to be cooked ahead. Once the fillings are ready and you’ve wiped out your pan, here’s the process:
- Whisk eggs together until thoroughly mixed, then add a pinch each of salt and pepper. Some omelet recipes call for a splash of milk or cream or a spoonful of water. Milk or cream will make your omelet richer, while water will make it fluffier.
- Heat skillet to just above medium. Melt butter in pan and let it foam up and develop a hint of brown (or just use oil, if you prefer). Swirl pan so entire surface is covered with butter or oil, then pour in egg mixture.
- Using back of your fork or a spatula, push cooked parts of egg from edges into middle, then tilt pan so liquid eggs run back into newly bared part of pan. Do this a few times, then leave eggs along for a few moments so they’ll set and brown slightly.
- Spoon fillings over one half of omelet, then top with shredded cheese if desired.
- Fold bare portion of omelet over toppings and slide it from pan to plate. Top with whatever garnishes you like—or grab a fork and dig in!
2. American-Style Omelet Add-Ins

Add-ins are the fun part of omelet-making. In fact, most omelet recipes boil down to a couple eggs and a list of add-ins that sometimes share a theme. One key to successful omelet-making is cooking add-ins ahead of time. Your omelet will cook in just moments, and that's simply not long enough for most filling ingredients to be done if added raw. Instead, you'll want to sauté ingredients ahead of time—we're looking at you, crispy bacon and tender veggies!
There aren't any add-in rules other than selecting items you truly like and that will physically fit into an omelet (and even that's flexible, because if you overload your omelet you can just finish it in the oven and call it a frittata!). That being said, there are some well-proven ingredients and combinations to consider.
À la carte add-ins include:
Meats, poultry and seafood: Breakfast meats including bacon, ham and sausage are the obvious choices here, but get creative! For a flavorful dish, try non-breakfast sausages (bratwurst, smoked sausages, kielbasa, chorizo) or add a seafood twist with cooked salmon, smoked fish, crab or lobster. Even leftover rotisserie chicken or your holiday turkey can work for an unconventional omelet.
Vegetables: Anything in the onion family works well in an omelet, from garlic and chives to green onions, shallots, sweet onions or just plain ol' yellow onions. Looking for a jolt of spice and fresh flavor? Consider green bell peppers or red peppers, shishitos or Anaheims and even hot peppers for an extra kick. Cherry tomatoes, diced tomatoes or lightly rehydrated sun-dried tomatoes add a nice acidity. Hearty omelets can be loaded with spinach and other leafy greens—along with steamed broccoli, cauliflower or asparagus.
Cheese: There's nothing better than a simple cheesy omelet, but don't limit yourself to classic cheddar! Other melty cheeses like provolone, Gruyère or Swiss are fantastic options, and soft-ripened Camembert or Brie melt especially well. If you have only non-melty options like pungent feta and goat cheese on hand, don't count them out! These cheese types will stand up well against flavorful add-ins. Even cheeses like Halloumi or paneer—which are famous for not melting—can create a tasty contrast with soft-textured vegetables.
Mushrooms: Ordinary button mushrooms are good in omelets, but premium mushrooms are extra special. Morels, chanterelles, porcini and oysters (to name just a few) all bring a little something extra to an omelet. When fresh varieties aren't available, rehydrating a few dried wild mushrooms and adding them to plain button mushrooms are a good way to boost flavor.
Omelet Add-In Combos
Common combinations of add-ins include (but are definitely not limited to):
- Steamed broccoli florets with cheddar
- Onions, ham, diced bell peppers and cheddar (aka Denver or Western omelet)
- Spinach sautéed with onions and garlic with provolone or fresh goat cheese (sometimes called a Florentine omelet)
- Sautéed onions and a few slices of smoked or cured salmon (a New York omelet)
- Spinach and mushrooms
Part 2: French-Style Omelettes
1. The Basics
Reading a traditional French omelette recipe can be intimidating. You're supposed to crank them out in a few seconds of frantic activity without browning the butter or—even worse—the omelette itself. To make things even more interesting, French omelettes are traditionally meant to be cooked over high heat, with the chef (that's you!) controlling how quickly eggs cook by moving the pan on and off heat.
Sound overwhelming? Never fear. The first thing you should do is turn down your burner a bit. That frantic high-heat method originated back in the days of coal- and wood-fired ranges, when cooks adjusted to the heat instead of adjusting the heat itself. This method is simply not necessary anymore—and it's much easier if your burner sits at medium heat or just slightly on the hot side of medium. You'll want a pan that's perfectly nonstick, as well. Test-drive with scrambled eggs. If they stick even the slightest bit, opt for a different pan.
French Omelette Recipe
First, set down your nonstick skillet to preheat at that just-higher-than-medium temperature. Next, whisk eggs with a fork until they’re nicely blended and there aren’t any long, thick strands of egg white visible. Add a pinch of salt and pepper if desired. (Purists use white pepper so it won’t show in the finished omelette, but that’s up to you.) Once the pan is hot, add a pat of butter.
After this, everything happens quickly, so read through the steps before diving in.
- Swirl pan as butter foams and melts so the whole surface of skillet is covered.
- As soon as butter stops foaming but before it starts to brown, pour in eggs.
- Shake pan vigorously as eggs begin to set in hot butter. With your other hand, use back of fork to stir egg gently in circles. These two motions create very small and delicate “curds” of cooked egg. Keeping the egg in motion helps prevent browning. It’s a bit like patting your head and rubbing your belly at the same time, so it takes some practice to do it smoothly—but that just means you’ll get to cook and eat a lot of omelettes!
- Once there’s a layer of cooked egg along skillet and the remainder of uncooked egg has begun to thicken (but isn’t yet set), angle pan away from handle and give it a couple of shakes so eggs slide to edge of pan (you can bang it on the counter or a cutting board, if necessary, to move eggs). Use your fork to fold farthest edge back into middle and create your first fold.
- Now comes the tough part. Put pan down for a moment and change your grip so you’re holding skillet’s handle underhand (wrist facing up) with your thumb pointing away from pan. Take plate in your other hand, then tip skillet so omelette slides out and rolls over. You should have a neatly rounded oblong, like a fat cigar, and the seam where the folds meet should be on bottom.
If you don’t get the classically neat appearance on the first try, don’t sweat it. Few people nail this technique consistently on the first few tries—even aspiring chefs—and you can always just use a fork or gloved hand to straighten and neaten the omelet.
The outside of a classic French omelette will be completely set but still delicate, while the inside will be soft, moist and barely set. This is how it’s supposed to be!
2. French Omelette Add-Ins

With classic French omelettes, unlike country-style/American-style omelets, restraint is key. Focus typically remains on eggs rather than fillings, but if a plain egg omelette isn't your thing, there are canonical additions. A common add-in, for example, is a simple handful of fresh herbs whisked right into eggs. This could be an omelette with a handful of chives or a traditional tablespoon of mixed parsley, chives, tarragon and chervil (aka omelette aux fines herbes). A few extra herb shreds can even be added on top as a garnish.
If you want more substantial fillings such as mushrooms, spinach or your favorite cheese (or all three!), don't try to add them to the omelette while it's in the pan. French omelettes are delicate and the folding process requires concentration. You won't want to complicate it by trying to incorporate fillings. Instead, turn the omelette out onto your plate, then make a careful slit down the top as you would with a baked potato. Spoon fillings into the opening. This still makes for an elegant presentation, and you can serve more of the filling ingredients separately at the table if you wish.
Now that you've got the lowdown on all things omelet, it's time to get cooking! Make a list of your favorite ingredients, decide which style to tackle first and whip up the omelet of your dreams. You'll be feeling like an egg-spert in no time!
Omelet Pans 101
To make the perfect omelet, you're going to need a great pan.
The classic pan seen in restaurant kitchens a generation ago (and still seen in France) is made with carbon steel. Like cast iron, it becomes nonstick only after it’s well-seasoned. Most restaurants now use pans with nonstick coatings, which won’t last a lifetime but are easier to care for. At home, a nonstick pan will hold up for only a year or two of constant use before it develops sticky spots, after which it’s not useful for omelets. Plan to replace nonstick pans regularly, or have one special pan that’s used only for omelets and nothing else.
At home, use what you’re comfortable with. Nonstick is fine—even relatively cheap and lightweight nonstick. Carbon steel is good, or even cast iron if it’s well-seasoned and you have enough forearm strength to handle with ease. Just pick a pan with gently curved sides wherever possible. You’ll find it a lot easier to slip your omelet from pan to plate.
As for size, an 8-inch pan is about right for a 2-egg omelet. A 9- or 10-inch pan is ideal for a 3-egg omelet (or 4, or if you’re making a big one to share). Don’t be tempted to make jumbo omelets in a big pan if you’re serving lots of people. These are harder to manage and—because small omelets cook more quickly—you’re usually better off cranking them out one after another.