Things You'll Need
Sandpaper
Tack cloth
Shellac
Container
Denatured alcohol
Paintbrush
Shellac is an all-natural substance created from tree resin. Available in natural amber, orange, garnet or blonde finish, use shellac to seal the finish on your craft projects. Apply it to plaster, decoupage, various metals, bamboo and other craft materials. Use it on toys, models and wreaths to seal and protect painted and natural finishes. With proper preparation and application, shellac will add protection to your finished craft project that will not yellow or darken over time.
Step 1
Prepare the craft project surface. Use a fine grade of sandpaper to smooth the surface, if needed.
Video of the Day
Step 2
Wipe the surface with a tack cloth to remove dust.
Step 3
Pour a small amount of shellac into a small container. This will reduce contamination of the can and air bubbles in the shellac while repeatedly dipping the brush into it.
Step 4
Add denatured alcohol to the shellac and mix with a wooden paint mixer. Stir gently to avoid creating excessive air bubbles. Check specific manufacturer's recommendations for proportions for thinning shellac with denatured alcohol.
Step 5
Dip the paintbrush into the shellac, filling only half of the brush. Use a 2-inch natural bristle brush. Lightly tap the brush against the side of the container to eliminate excess. A light tapping will eliminate air bubbles in the shellac as well as any excess.
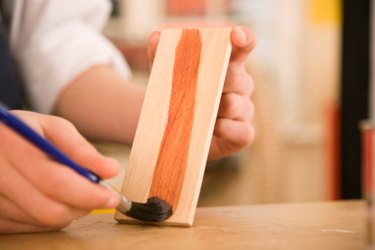
Step 6
Apply the shellac with single, even strokes along the entire length of the object. Avoid making short, choppy strokes or over-brushing the surface and do not go back and forth with the brush. For wood craft surfaces, such as frames or plaques, follow the grain of the wood.
Step 7
Let the shellac dry at least one hour. Do not go back over any missed spots once the shellac becomes tacky. A second coat will fill in and blend these areas.
Step 8
Apply a second coat, if needed, after lightly sanding the surface. Sanding will help the next coat of shellac adhere. Apply a second coat to blend in areas missed in the first coat or to objects that will be subject to wear. Allow the second coat to dry for several hours before using the object.
Tip
Use aerosol shellac for surfaces that are difficult to paint on with a brush. Apply several light coats, allowing drying time and light sanding in between, according to manufacturer's directions on the can.
Shellac can also be applied with a soft cloth folded into a pad. Avoid over wiping.
Objects that will be subject to excessive wear may need a third coat of shellac.
Warning
Use a high-quality natural bristle paintbrush to apply shellac. Foam brushes will disintegrate and synthetic brushes will leave excessive brush marks.
Video of the Day