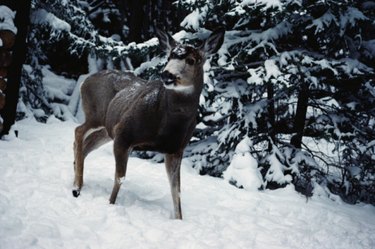
Deer sculptures serve multiple functions, as a decoration for the home, target practice for bow and arrows or a child's school project. Likewise, deer sculptures come in many different looks; one could be cartoonish and reminiscent of Bambi, life-sized and realistic, or small enough to fit in the corner and accent a wilderness-themed living room. The easiest way to make a deer sculpture at home is using a frame of chicken wire covered in papier-mache.
Video of the Day
Things You'll Need
Brown Paint
Newspaper
Cardboard
Large Mixing Bowl
Wire Shears
Black Paint
Chicken Wire
Duct Tape
The Frame
Step 1
Model the legs and hooves in chicken wire. This part will be much easier if you have some large photos of deer or even an existing sculpture or toy of a deerlike animal, such as a horse. The wire should be cut and rolled into tubes the size that you want the legs to be. Use the duct tape to make the wires stay in place. To mold the wire into a more realistic leg shape, fold it in at the bottom to make a calf, and bend it slightly in the middle to represent a knee. The hooves can be shaped by a simple flare out at the bottom. Use the duct tape to hold these modifications in place.
Video of the Day
Step 2
Construct the body frame from wire. This part can be started in way the same as the legs. Roll the wire into a large tube, roughly the size that you want the body to be. It should be the same thickness, but longer than the actual body, because a lot of the wire will need to be used in forming the neck and hind parts.
Step 3
Use the clippers to make incisions around the wire on the hind end. Fold those pieces inward so that the wire forms a rounded, closed hindquarter. Tape the pieces together.
Step 4
Make two incisions, on the neck end, with the wire on either side. The top portion should be bent so that it rises and tapers slightly. The bottom portion should rise to meet the top, so that the two parts rise up together like a deer's neck. Tape these two pieces together so that they are sturdy.
Step 5
Tape the legs to the structure after the large piece has been modified to resemble a deer's body. Use a little tape to tack them together at first. Stand the deer up to ensure it is able to stand straight on its own. After it has been adjusted so that it can stand straight on its own, strengthen the connection between the legs and body with more tape.
Step 6
Construct the deer's head. The main portion is mainly a long snout and can be accomplished with another rolled and taped portion of chicken wire. At this stage you do not need to worry about the antlers or ears. After the tube is made and held in place with tape, squish the end into a taper to represent the nose. The other end should flare up to provide a space for the eyes. This process can be rough, as the final details will be smoothed out using papier-mache.
Step 7
Place the head on the neck, get it at the right angle according to your own aesthetics, and tape profusely to ensure that it stays attached.
Step 8
Cut out antler shapes from the cardboard according to your own aesthetics. For a yearling, small nubs will suffice. A doe does not require antlers; a buck's anters should be larger. If you are making a buck, don't make the antlers too large. They will add quite a bit of weight to the head and neck.
Step 9
Tape the antlers to the top of the head, near the back. After the body frame is finished, check every taped connection to ensure that it will hold and not fall over.
The Flesh
Step 1
Make the papier-mache paste. In a large bowl, mix 3 cups water with 3 cups flour. Stir until all of the lumps are gone. This process likely will need to be repeated as you use up the paste on your deer. Rip the newspaper into a large pile of strips.
Step 2
Dip some strips of paper into the papier-mache mix so that they are covered. Start at the bottom by wrapping the strips around the legs.
Step 3
Pay close attention to your deer photos or models. At this stage, the shape of the deer's musculature is being flushed out. Haunches can be made thicker by applying extra amounts of papier-mache. Smooth it all out with your hands, and add lots of strips to the connection between legs and torso to ensure stability.
Step 4
Wrap papier-mache around the torso in the same manner as the legs. A tail can be created by squishing some strips into a small nub on the hind end.
Step 5
Wrap a large layer of papier-mache in the area where the head attaches to the neck. The head will have more paper on it than other parts, as it will need to be used to define the features of the face as well as the antlers. Add extra paper around the neck to ensure that the head stays on. This stage would be a good point to take a break and let the paper dry, so that everything is sturdy while you work on the head.
Step 6
Wrap papier-mache around the head in the same manner as the rest of the body. The forehead will need a larger portion of paper to make it stand out, as will the cheeks on the side. The very tip should be formed into a nice round nose according to your own taste and the features of the models or pictures that you are following. Ears can be formed with small nubs in the same fashion as the tail.
Step 7
Wrap the papier-mache around each antler so that the tips become round looking. Take a break and let the entire statue dry before painting.
Step 8
Paint the statue to your liking. A medium-sized brush can be used to go over the body, with a smaller brush to fill in the cracks and bumps in the papier-mache. The paint for the antlers can be mixed with a little gold or white to make the antlers a different hue than the rest of the deer. The hooves, eyes, and snout should be painted black.
Tip
Many varieties of deer feature black stripes or white spots; add these features with white and black paint for a touch of realism.
Warning
Do this project in a garage, outside or with newspaper on the floor to keep papier-mache from getting all over your house.