Things You'll Need
Building Permit
Stud Sensor
Hammer
Circular saw
Electrical tools
Drywall hatchet or saw
Lumber
Simpson type ties
How to do House Remodeling With a Flush Beam
During your next home improvement room addition, build an 8 foot ceiling between the two rooms so they appear to be one room. The way to do this is to use a flush beam. This will give you a much better pass-through, one that's 8 feet high with a continuous ceiling between your new addition and the existing room. This article will show you how you can do this by hiding the load bearing beam in the attic without having to call the builders.
Video of the Day
Step 1
Get a building permit from your city hall.
Step 2
Determine where in the wall you want the new opening.
Step 3
Use a metal detector or stud sensor to determine what is behind the drywall. You will have to look for things such as electrical wires, gas pipes, water pipes, and drain pipes.
Step 4
Locate and mark where all the studs are in the cutting area, the area you will be working in.
Step 5
Turn off the electrical power and use a drywall hatchet to cut holes between studs. This will allow you to find items of interest. Be careful not to hit anything hiding in the wall: pipes, wires etc.
Step 6
Reroute any wires and pipes that you find in the wall. Run them up and through the attic or down through the basement.
Step 7
Build a temporary 2x4 support for the ceiling, on both sides of the wall that you are making the pass-through on. you will need about four 2x4 studs for each ceiling that you are supporting, depending on the size of your span. Don't put too much pressure when you stand up the temporary supports or you will crack the ceiling plaster. Make it fit just right.
Step 8
Calculate what size beam you will need for the size pass-through that you are making. For example:
A beam spanning over a 6 foot wide pass-through will need to be made of 4"8" lumber and be about 8 feet long. It can be loaded with about 5,000 pounds of equally distributed weight.
A beam spanning 12 feet will need to be constructed of 4"x14" lumber. A beam this size can be loaded with about 10,000 pounds of equally distributed weight.
If you do not have a two story house and need less weight carrying capacity for your beams, then you can use smaller size beams.
The best way to calculate your project is to determine the size of your span and what type of house you have and take this information to a structural engineer, he can give you all of the calculations and drawings you will need to meet your city building codes.
Step 9
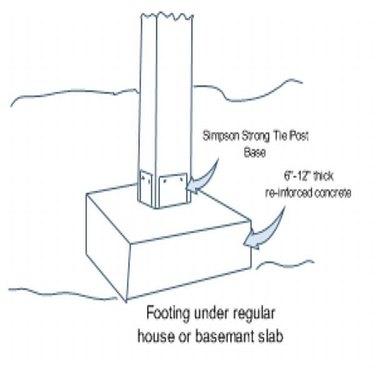
Install double or triple studs in the wall to support the ends of the beam. Depending on the overhead load and type of foundation you have, you may have to pour a supporting pier foundation under your slab, in the crawl space under your house or under the basement floor slab.
Step 10
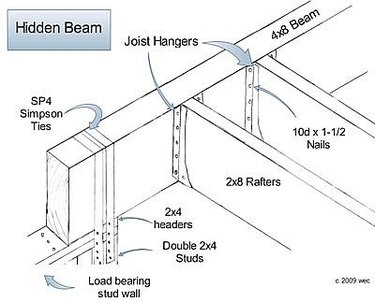
Prepare the attic. Now that you have the vertical supports for the beam and the temporary ceiling walls in place, you can start to cut off the ends of the ceiling joists. Cut just enough to make space for the beam between the joists of the two rooms. You want the joists to fit flush against the new beam, in the new joist hangers.
Step 11
Place the new flush beam over the wall top plate, fit it between the joist end that you just cut in the previous step.
Step 12
Secure the ends of the new beam to the wall by toe-nailing and strapping with Simpson Ties.
Step 13
Place a joist hanger under the end of each ceiling joist and nail to the new beam and joist.
Step 14
Remove the temporary walls that are supporting the ceiling in both rooms.
Step 15
Cut the top plates of the wall flush with the king stud, near the ends of the new beam, make sure you leave about 6" of support for the new beam to bear on.
Step 16
Cut the sole plate of the wall flush with the king stud. Remove the studs and plates from your new pass-through.
Step 17
Installing a hidden beam flush with the ceiling will really open up your new room and make it seem like a continuous part of the house. You will have an uninterrupted ceiling and much better air circulation between rooms. It's a large project, to be sure, but well within the scope of the do-it-yourself re-modeler.
Tip
You can make a 4x beam by using two 2x lumber beams.
Warning
Make sure you get a building permit from your city. Cut all power, gas and water before cutting into the wall.
Video of the Day