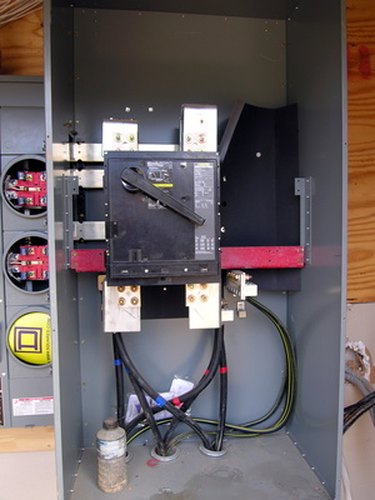
Things You'll Need
Electric generator
Wire
Wire cutters
Wire strippers
Transfer switch
Screwdriver
Screws

Wiring your breaker box so that it can be attached to a generator in the event of a power outage makes good sense if you live in an area that is prone to losses of power. It is important that you get the wiring correct so that the generator and the utility company will never be trying to power your house at the same time. When attaching a generator to your main circuit panel, you need to install a transfer switch between the two power sources so that only one can send electricity through the panel at a time.
Step 1
Turn off all electrical power entering the house. This will require shutting off the electric service at the meter box. The cover of the main service panel will need to be removed by extracting the screws that hold it in place with a screwdriver. Use the screwdriver to loosen the screws on the main breaker that hold the two black wires coming from the electric meter. Pull these wires loose and out of the breaker box. Leave the white wire from the electric meter attached to the neutral bus in the breaker bus.
Video of the Day
Step 2
Open the hinged cover on the transfer switch. Use screws to attach the transfer switch to the same wall as the breaker box. This switch should be within a few inches of the breaker box. Push the wires from the meter box into the transfer switch box. Slide the ends of the wires under the lugs near the top of the box. Tighten the screws to hold the wires firmly in place.
Step 3
Push the three wires from the generator into the bottom of the transfer switch box. The two black wires, or in some cases one black and one red wire, need to be inserted under the screws near the bottom of the transfer switch box. Tighten the screws to hold the wires. Pass the white wire from the generator through the transfer switch box and out the port and push it into the breaker box.
Step 4
Measure the distance from the center of the transfer switch box to the center of the breaker box. Add about 6 inches to this number and cut two pieces of black wire to that length with wire cutters. Strip about 1 inch of insulation from each end of both pieces with wire strippers.
Step 5
Slide one end of each of these wires under the lugs in the center of the transfer switch box and tighten the screws. Push the wires through the port and out of the transfer switch box and through the port on the breaker box. Slip the ends of the black wires into the notches on the main breaker and tighten the screws.
Step 6
Loosen the screw on the neutral bar lug where the white wire from the meter is attached until the lug is loose enough for the white wire from the generator to be pushed inside. Tighten the screw onto both wires until the wires are secure. Close the cover on the transfer switch and reattach the cover to the breaker box to finish the installation. Turn the power back on at the electric meter box. Push the handle on the transfer switch up for utility power or down for generator power.
Warning
Shut off all of the power entering the house before disconnecting the breaker box to attach the transfer switch.
Video of the Day