Things You'll Need
Drill
Steel-cutting drill bits
Phillips screwdriver
Stepladder
Putty knife
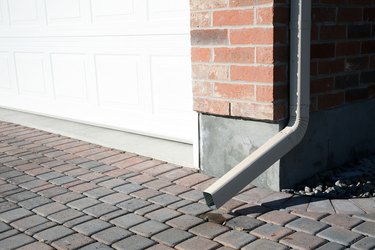
Rain downspouts direct the water that collects in your gutters away from the house. When the rain downspout is rusty or leaky, it requires replacement. Removing a rain downspout to replace with a new one requires disassembling the old one. Inspect the rain downspout for all connection points. The main spout usually connects at any elbow. Longer downspouts also may have a connection in the middle, connecting two straight lengths. To avoid damaging the gutter or house, it is best to remove the downspout in pieces.
Step 1
Drill out the rivets connecting the bottom elbow to the downspout with an appropriate-size steel cutting drill bit. Place the tip of the drill bit over the center indention on the rivet head, and drill all the way through the rivet. There is usually rivets on each side and on the front of the downspout. Pull the lower elbow away from the downspout.
Video of the Day
Step 2
Remove the screws that secure the lower downspout strap with a Phillips screwdriver. The strap is the thin metal piece that surrounds the downspout and connects to the wall of the house. Most straps connect to the wall with screws driven into plastic sleeves. Remove the strap from the wall.
Step 3
Place a stepladder by the downspout and look for any connection points between the downspout and the upper elbow. Drill out any rivets at these connecting points with the drill, and pull the lower half of the downspout away from the upper half. Remove the upper downspout holding strap as you did the lower holding strap.
Step 4
Disconnect the downspout from the upper elbow, using the drill to drill out the securing rivets. Pull the rain downspout away from the upper elbow. Drill out the rivets connecting the upper elbow to the connector on the bottom of the gutter. Pull the elbow away from the connector.
Step 5
Remove the sheet metal screws securing the connector to the gutter with a Phillips screwdriver. Reach into the upper part of the gutter and insert a putty knife between the seam of the connector and the gutter. Work the putty knife through the caulking that secures the connector to the gutter. Pry the connector out of the gutter with the putty knife.
Video of the Day