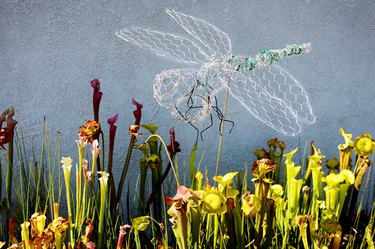
Make a dragonfly sculpture out of chicken wire for a decorative garden accent. A dragonfly is relatively easy and inexpensive to make, and it can be "accessorized" in any color palette you choose. Install it by a pond, pool or aquatic garden for extra charm.
Things You'll Need
Video of the Day
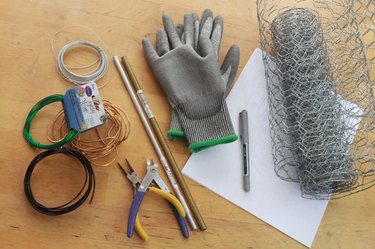
- Pen and paper
- Photo of a dragonfly (or an animal of your choice)
- Protective no-cut gloves
- 1-inch mesh chicken wire, 1 roll measuring 24 inches by 8 feet
- Wire or tin snips
- Needle-nose pliers or similar jewelry wire-manipulation tool
- Safety glasses
- Gardening wire, silver
- Decorative jewelry wire in a variety of gauges and colors
- Metal tubing (for installation)
Video of the Day
Note: For decorative jewelry wire, 14-gauge black, 10-gauge gold and 16-gauge green wire were used in this project.
Create a Sketch
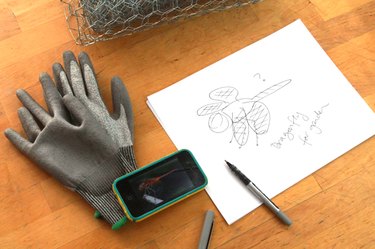
Sketch a dragonfly on paper. It doesn't have to be a detailed drawing -- just the overall body shape. If you are not completely familiar with the shape, first look online and in books for examples. Work on a clean, level, well-lit surface that is inaccessible to pets and small children.
Section Out the Wings
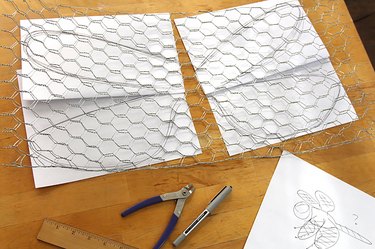
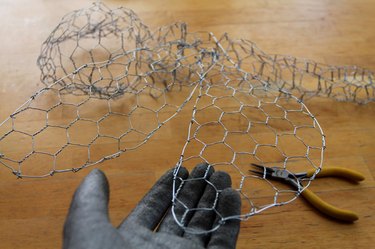
The overall size of the sculpture is dictated by the wing size of the dragonfly. If you draw four dragonfly wings -- the two upper/elongated oval wings and the two lower/wider wings -- on four separate pieces of 8 1/2-by-11-inch printer paper, you can slide each sheet of paper under an un-rolled length of chicken wire. Wear the protective, no-cut gloves when unrolling the chicken wire. Also, chicken wire is often a bit greasy, so cover your work surface.
Cut Out the First Wing
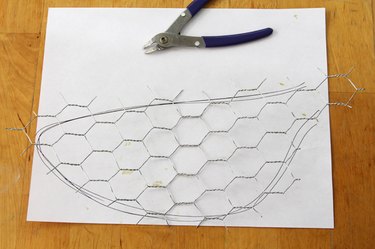
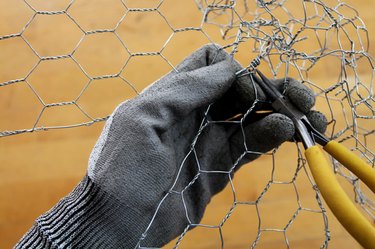
Wear the no-cut gloves and use wire snips to cut around the wing shape, providing an extra 1/2-inch border to work with. Use caution as you cut the chicken wire with the snips, as small splinters of wire can occasionally go flying. Pick up any metal scraps that fly away as you work.
Wrap the Wing
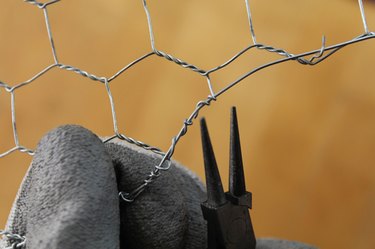
Using a roll of silver garden wire and needle-nosed pliers or a round-tipped jewelry manipulation tool, wrap the garden wire into the cut ends of the chicken wire so that no sharp pieces of the cut mesh protrude. This will also give the wing a nice outline. Refer back to your original wing sketch as you continue wrapping the wire around the perimeter of the cut wing.
Create a Connection Point
Once the outline of the wing is done, continue the garden wire to form a 2-inch loop at the point that will connect the wing to the body.
Cut Out a Second Wing
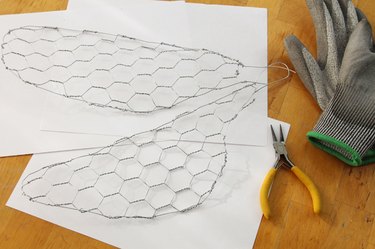
Cut out and wrap the second wing in the same manner as you wrapped the first. Leave a 1/2-inch border of chicken wire as you cut out the shape, and then wrap each cut piece of chicken wire into the silver wire until the wing is fully outlined. Be sure to create a connection loop like you did with the first wing.
Cut out the Remaining Two Wings
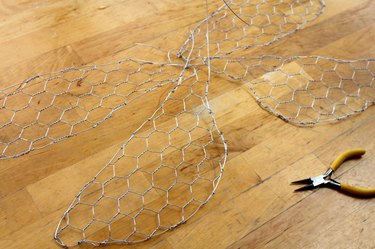
Make a matching set of the first two dragonfly wings using the same techniques so that you end up with four total dragonfly wings.
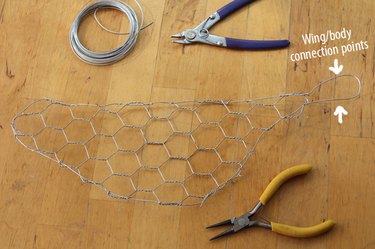
Make the Body and Tail
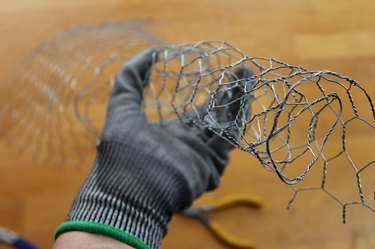
Based on the proportions of the wings, the measurements for the dragonfly body are roughly 14 inches wide by 24 inches long. Roll the narrow ends of the chicken wire together in both gloved hands to make a long narrow body. At one end, wrap the chicken wire tightly to make the tail of the dragonfly. As you roll up the chicken wire, tuck the cut ends inward so that the sharp points are at the core of the tail.
Shape the Head and Thorax
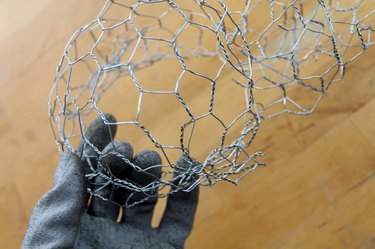
After shaping the tightly-wrapped tail, sculpt the thorax of the dragonfly by bending a tapered, but somewhat bulbous shape into the chicken wire mesh about 6 inches from the tail-end. The thorax bubble is about 8 inches long. The head is slightly larger than the thorax, but it's also about 8 inches in length. Press a gentle slope into the "forehead" area. At the base of the head, squeeze the cut ends of the chicken wire and gently tuck them inward. Compress the area between the head and thorax to create definition.
Tweak the Shape
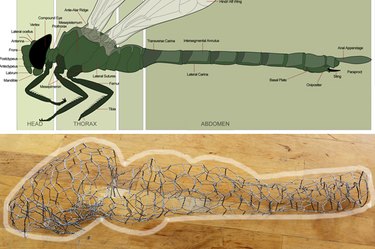
Refer back to the drawing/images of dragonflies as you work to ensure that the general head, thorax and tail shapes are accurate. If the tail looks proportionally too short, you can use a 6-by-6-inch scrap of chicken wire and wrap it into the tail to add length.
Attach the Wings
Using the needle-nose pliers and the extra 2-inch loops of wire at the base of each wing, begin incorporating the wing loops into the thorax of the dragonfly by tightly twisting the wire around the thorax body mass. Repeat this step until all four wings are secure.
Tighten Things Up
Before adding any final touches or embellishments to the sculpture, look over the entire piece. If you see areas that need tightening or greater structural integrity, use the needle-nose pliers to tighten the existing wire, or cut small segments of the garden wire and wrap it tightly around areas that need it.
Add Embellishments
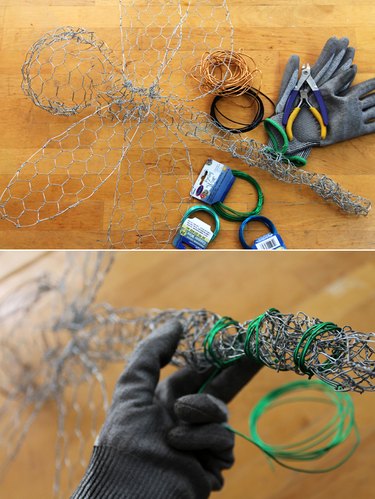
When the basic dragonfly shape is complete, assemble the snips, pliers and an assortment of soft and colorful jewelry wire to add accents to the sculpture. For a colorful accent on the body, use 14-gauge green wire and wrap the tail and thorax multiple times, running the wire along the underside of the sculpture while working up the body toward the thorax. Bend six pieces of 7-inch,14-gauge black wire into leg shapes and wrap them into the base of the dragonfly between the head and thorax.
Make the Eyes
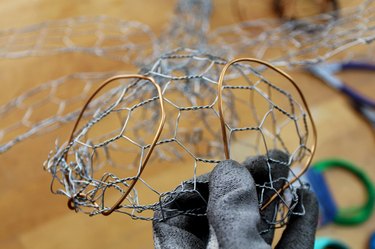
Gently curve two long lengths of gold 10-gauge wire into ovals. Attach them to the underside of the face using pliers. The contrasting metal makes a nice accent.
Give Your Sculpture a Home
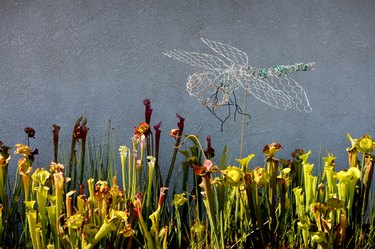
When you're ready to install your sculpture, first string a long length of wire through the thorax of the dragonfly so you can hang it. If achieving the proper balance is tricky and the dragonfly is moving too much, use a long length of metal tubing to install the dragonfly in the ground. Insert one end of the metal tubing into the thorax mesh and tighten a mass of the mesh around the tubing with pliers. If desired, insert the opposite end of the tubing into a plant pot so the dragonfly can fly undisturbed.
Tips & Warnings
- Wear safety glasses and a protective apron.
- Wear closed-toe shoes and long sleeves, especially if this is your first time working with chicken wire.
- Scraps of chicken wire can be extremely dangerous and painful for little ones, so work in an area that is inaccessible to pets and small children.