The popularity of ball-jointed dolls has risen sharply in recent years, largely due to a trend toward stylized customizable dolls among adult collectors. True to its name, a ball-jointed doll is a hollow doll made up of separate body and limb parts that connect in movable ball joints. The doll is strung together with elastic that runs through the limbs and up the torso to connect to the head, allowing the collector to pose and stand the body. The most well-known modern ball-jointed doll types are the tall Asian ball-jointed dolls created by companies like Volks and Luts, and the Western fashion dolls created by Tonner. Many ball-jointed doll enthusiasts also create their own designs based on the aesthetics of the Asian and fashion doll markets.
Video of the Day
Things You'll Need
Vapor Respirator
Rubber Bands
Mixing Cups
Sculpting Tools
Legos Or Pieces Of Cardboard
Sketchpad And Pencil
Silicone Rtv Rubber And Catalyst
Polyurethane Casting Resin And Catalyst
Stirring Tools
Tinfoil
Super Sculpey
Wooden Craft Balls
Small S-Hooks
Razor Blade
Sandpaper
Latex Gloves
Elastic String
Drill And Tiny Bits
Safety Goggles
Mold Release Agent
Water-Based Clay
Oven
Creating the Template
Step 1
Draw out a to-scale design for your doll and write the measurements beside your sketch. Make sure to draw the pieces for the head, torso with attached neck, upper arm, lower arm, thigh, calf, foot and hand. Make sure to draw out a separate skull cap for the head.
Video of the Day
Step 2
Design the joints for the shoulders, knees, hips, elbows, ankles and wrists. Ball joints are generally made like human ball joints, by adding a ball-shaped piece to one end of a limb, like an upper arm, and a matching hole to the part of the body it joins, like the shoulder part of the torso. For the neck joint, make the top of the neck rounded and create a hole at the base of the head into which the neck fits. Also create a small protrusion at the middle of the inside of the skull cap, so that you can attach a hook there.
Step 3
Create general shape copies of each of your body part designs out of tinfoil. You can lay the tinfoil pieces against your drawings to make sure that they match. Over the tinfoil, apply a thick layer of Super Sculpey clay so that the tinfoil does not show through. Do not worry about creating the hollow space inside the doll yet, but make sure that the joints are articulated.
Step 4
Sculpt the clay pieces so that your doll has the look that you want. Make sure that all parts are the proper measurement and that the ball joints fit into the sockets, and sculpt the face that you want the doll to have directly onto the head. If you would like your doll to have removable eyes, you will need to know what size doll eyes you want to use. Create eye sockets that are slightly smaller than this size.
Step 5
Bake the Sculpey at the time and temperature listed on the box. When the doll parts have cooled, sand them down until they are smooth, so that the mold does not pick up any imperfections.
Creating the Molds
Step 1
Create a core mold by first making a two-part mold for each body part. To make a two-part mold for the torso piece, cover the back half of the torso in a thick slab of water-based clay, so that it looks like it is sitting inside half of a box. At the open ends of the torso, build up a slight rise so that you can later attach your core pieces there.
Step 2
Add a tall wall around the clay, using Legos or pieces of cardboard to create a molding box. Press small wooden craft balls into the clay around the torso to create keying depressions. Mix together the silicone RTV rubber, following the packaging directions, and pour it into the box. Let the silicone cure for at least 12 hours, then open the box and flip the mold over.
Step 3
Remove the water-based clay and wooden balls from the torso piece, leaving the slight rise for the core pieces, and coat the silicone with a mold release agent. Replace the molding box and pour silicone into it again, covering the back of the torso. Let it cure, then take the molding box apart and open the mold halves. Remove the torso piece and cut a hole in one end of the mold with the razor blade.
Step 4
Let the mold cure further for three days. On the inside of the mold halves, apply water-based clay to all areas you would like the resin to fill. The parts you do not fill will become the core mold, so that your doll can be hollow. Strap the mold halves together with rubber bands. Do not leave any space between the clay in each half, or the new silicone will stick to the old.
Step 5
Coat the rest of the silicone with a mold release agent and pour a new batch of silicone into the mold. Let it cure for 12 hours, then take the mold apart and remove the new core mold. Wash all mold pieces thoroughly. Repeat this process for each doll part.
Casting the Doll
Step 1
Prepare a casting area in a well-ventilated room. Wear a vapor respirator, latex gloves and safety goggles when working with the resin, and cover all surfaces with plastic.
Step 2
Strap the mold halves for each part together, including the core molds, and mix up a batch of polyurethane resin. Pour the resin into the molds and let it cure for a full day, then take the molds apart and remove the resin pieces.
Step 3
Sand each doll part smooth while holding the piece underwater, to avoid creating toxic dust.
Step 4
Drill holes in the ball joints, so that the cavities inside the limbs can be reached. Drill a hole through the protrusion in the skull cap and slide an S-hook through the hole.
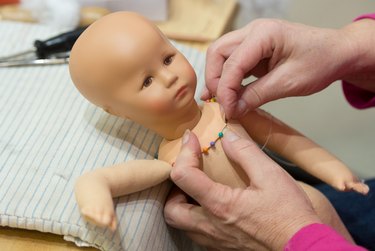
Step 5
Run elastic string through the limbs and into the torso, ending at the S-hook in the head. You can find diagrams on different ways of stringing ball-jointed dolls in the links in the Resources section.