Things You'll Need
Plastic cups in 3 to 4 sizes
Scissors or utility knife
Balloons
1 cup flour
6 cups water
1-inch wide strips of newspaper
Paint, acrylic or tempera
Paintbrushes
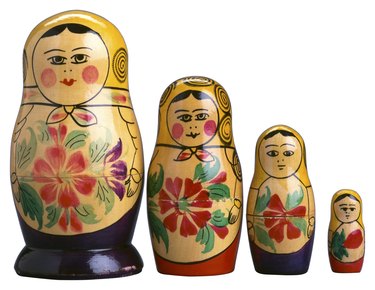
Russian paper mache dolls are made of carved wood or wire covered in paper mache and then painted. These dolls can be nesting dolls, where smaller dolls fit into larger dolls, or just large, thin dolls with painted faces. Kids will enjoy making this simpler version of Russian paper mache nesting dolls with different-sized plastic cups, balloons, paper mache and paint.
Step 1
Line up three or four plastic cups, upside down, and poke a hole in the bottom of each one with scissors or a utility knife.
Video of the Day
Step 2
Blow up one balloon for each doll's head. Inflate the balloon so it is no larger in circumference than the base of the cup. Tie the balloons off and insert the tied end in to the hole you poked.
Step 3
Boil 5 cups water in a saucepan. Add 1 cup flour to 1 cup cold water and make a paste in a bowl. Add this paste to the boiling water and simmer for 2 to 3 minutes. Pour into a large bowl and let cool completely before using.
Step 4
Tear newspapers into 1-inch strips.
Step 5
Moisten a strip of newspaper in the paper mache solution and run your fingers down the strip to remove excess liquidp. Place the strip onto the paper cup and balloon.
Step 6
Add wet strips of paper to the cup and balloon until the entire surface is covered in one layer. Let dry overnight. Add at least three more layers of paper mache and let dry thoroughly between each layer. Do this for each doll you are making.
Step 7
Paint the dolls with one solid base color and let dry. Draw an outline for a face and paint inside the outline with flesh-colored paint. Let dry. Add facial features with black paint: eyes, nose, mouth and cheeks.
Step 8
Paint the rest of the body with flowers, interesting designs or hands.
Tip
Store unused paper mache solution in the refrigerator between applications.
Torn newspapers work better than cut newspapers because the edges lay down easier.
Warning
This project requires adult supervision for the making of the paper mache solution.
Video of the Day