Things You'll Need
Worsted weight yarn
Crochet hook
Scissors
Large eye embroidery needle of the style used by knitters and crocheters
Any number of knitting looms and spools are on the market for today's loom-knitting aficionado. One of the smaller straight or comb-style looms is the Pocket Knitter™, an 8-inch-long plastic comb with a double row of flat paddles instead of pegs to wrap and knit your yarn from. You can do any stitch pattern on your Pocket Knitter that you can do on needles or looms – so long as it requires only 14 stitches in width to complete – and make any number of smaller knit items. A scarf provides the beginner to the Pocket Knitter the opportunity to learn the basic stitches, as well as cast-on and cast-off techniques.
Step 1
Pick up your Pocket Knitter with the front facing you. The front is the side that has the words "Pocket Knitter" written on it. You can see the letters through the back, but they will be backward. The front side also is the side from which the side strips of plastic paddles protrude. There are two rows of plastic extensions at the top of the Pocket Knitter; the front set, called paddles, is wide, and the back set, called pegs, is narrow.
Video of the Day
Step 2
Make a slipknot and put it on the right-most paddle with the knot and both ends of the yarn – the tail, which is cut, and the working yarn, which leads to the skein – to the back, between the first two pegs.
Step 3
Bring your working yarn around the back of the peg to the left, carry it to the front of the knitter between the third peg and the second paddle, around the front of the second paddle and to the back again between the second paddle and the second peg. This is called an "e-wrap," as you have just wrapped the second paddle in a loop of yarn that looks like a letter "e" when viewed from the back. Repeat down the row of pegs from right to left, wrapping the paddles counterclockwise and sandwiching the yarn between the pegs on either side and the paddle, until you have cast on 14 stitches and the working yarn is hanging between the last paddle and the second-to-the-last peg.
Step 4
Wrap your working yarn around the back of the second-to-the-last peg and around the front of the second-to-the-last paddle in an s-curve. Continue to weave the yarn in and out of the paddles and pegs in alternating motions – to the back of the next peg, to the front of the next paddle, and so on – until your working yarn is hanging from the right side of your knitter. All the paddles have two loops except the left-most or last paddle.
Step 5
Knit your row by lifting the bottom loop from the first paddle on the right, up and over the top loop and the top of the paddle, letting it drop to the back of the Pocket Knitter. Continue across the row, moving from right to left, until you come to the last peg, which has only one loop on it. Do nothing with this loop.
Step 6
Wrap the yarn around your pegs and paddles again in the same s-curve you used before, going from right to left, and knit them the same way, again going from right to left and starting at the second paddle. You won't wrap the first peg on the right this time, but you will wrap the last one on the left. This technique of leaving the first peg unwrapped and unknitted on each row will produce a series of longer knit stitches along the sides of your knitting that is decorative. Continue these s-curve wraps and knitting until your scarf reaches approximately the same length as your height.
Step 7
Bind off your scarf on a row where the yarn is hanging down to the right of the Pocket Knitter. Move the loop of yarn on the first paddle over to the second paddle with your tool. Wrap the working yarn around the second paddle above the other two loops. Pull the two lower loops of yarn up and over the top wrap and the top of the paddle, using a crochet hook if you can't grab them with your Pocket Knitter tool. Take the remaining loop off and move it to the next paddle to the left, wrap that paddle and pull the two bottom loops up and over and off. Repeat this all the way down and to the last paddle on the left. When you have the one loop left, remove it from the Pocket Knitter paddle. Cut the yarn about six inches from your knitting, pass this tail through the loop on your tool and pull it tight to knot.
Step 8
Thread the tail of yarn coming from your cast-off through your embroidery needle and run it through the stitches of your scarf.
Step 9
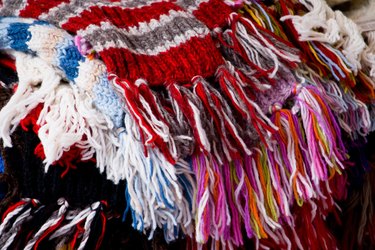
Add a fringe to your scarf by taking several strands of yarn and folding them in half to form a loop. Use a crochet hook to pull the loop through the stitches at the bottom of your scarf and then pull the ends of the yarn through the loop. Pull on the ends to tighten. Trim the strands to a uniform length.
Tip
Your scarf will roll up so it becomes a long tube of knitting. If you use a wool yarn, you may be able to block it – wetting it and then pinning it down to dry absolutely flat – into a more flat shape, but it will never be completely flat.
Video of the Day