Improper stove pipe installation can allow smoke to leak into the room. Stove pipes that are too long or that have too many bends will interfere with the stove's draft; the stove won't draw the right amount of oxygen to sustain a good fire. The basics are universal, but make sure you read the instructions that came with your stove.
Assembling the Stove Pipes
Video of the Day
Steel stove pipe comes in different lengths and gauges. Use the gauge recommended by your stove's manufacturer. If necessary, pipes can be cut with either a saber saw fitted with a metal cutting blade or a hacksaw. Individual pipes may not be fitted together at the seam when you purchase them. The easiest way to join the two sides of the seam is to lay the pipe down horizontally on a firm surface with the seam facing up. Place your palms on the pipe and press down. Push the two sides of the seam toward each other until you can slip one side of the seam into the slot on the other side. The seam is closed when you hear a snap.
Video of the Day
Specifications
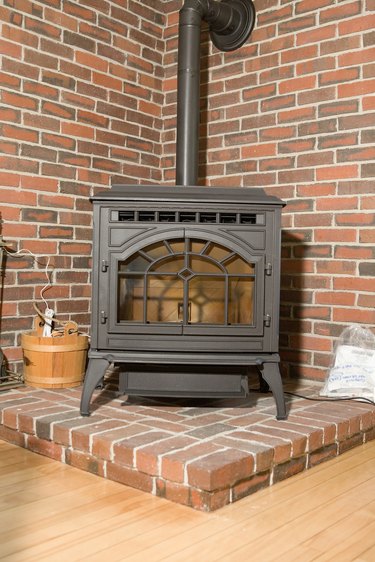
Make sure you've purchased stovepipe that is the same diameter as the flue collar on your stove. It should fit snugly inside the opening. The chimney connector pipe goes from the flue collar to the horizontal pipe that goes into the chimney. It should be as short as possible and no longer than 6 feet. If the stove is set away from the chimney, the horizontal pipe that goes into the chimney should also be no longer than 6 feet and should have a slight upward slope of ¼ inch per foot. The entire assembly should not be longer than 10 feet. Stovepipe should have only one bend, or elbow, where the chimney connector pipe is connected to the horizontal pipe that goes into the chimney. Rarely, a stove is in a location that requires two bends between it and the chimney. More than two bends decreases the stove's ability to draw.
Connecting the Stove Pipes
One end of a stovepipe is crimped, and the other is smooth. Always insert a crimped end into a smooth end. Start by inserting the crimped end of the chimney connector pipe into the flue collar on the stove. Use three sheet metal screws to attach the pipe securely to the stove. Once the assembly is complete, all of the crimped ends will point toward the stove rather than the wall. Slide the uncrimped end of the horizontal pipe into the chimney. Decorative rings are available to cover the wall where the pipe enters the chimney if necessary. Attach an elbow pipe and use three sheet metal screws to connect them. Slide the crimped end of the elbow into the chimney connector pipe and use sheet metal screws to connect them. Some stove manufacturers recommend sealing the joints with high temperature silicone or black furnace cement. Apply the silicone to the inside of the straight pipe before you insert the crimped end. Make sure the installation is sturdy and tight.