Things You'll Need
Compass with pencil
Paper
Fleece fabric, 1 yard
Scissors
Straight pins
Sewing machine
Iron
Thread
Needle
Pompom
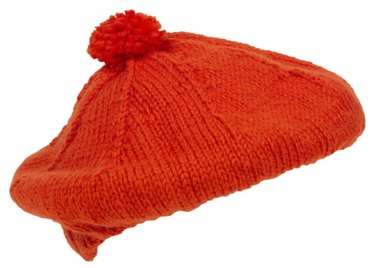
Although the Scottish tam was originally named after a character in a poem and was worn by men, the cap is also a fashion accessory for women today. The cap, traditionally made of wool, has a pompom on the top of the hat crown. The size of the tam can vary, although the basic shape of the cap remains the same. Tams are a popular choice ranging from hats for toddlers to the famous golf tams, to part of the academic dress for graduation ceremonies.
Step 1
Measure your head circumference. Record the measurement in inches. Divide the measurement by 3.14 , or pi, to get the diameter. For example, if the circumference is 24 inches, you divide 24 by 3.14 resulting in a diameter measurement of 7.64. Divide the diameter in half to get the radius. For instance, half of 7.64 is a radius of 3.82 inches.
Video of the Day
Step 2
Draw a circle on paper, using the compass set at your radius measurement.
Step 3
Draw a second circle, within the first circle, set at a 1/2 inch smaller radius than the first circle.
Step 4
Draw a third circle twice the radius of the first circle with the compass and pencil, using the same center point as the first two circles. Cut the smallest circle out of the center of the pattern. The result is a piece of fabric that looks like a doughnut.
Step 5
Cut a fleece strip 4-inches wide and 1/2-inch longer than your head circumference measurement for the tam brim piece, using scissors. Fold the strip lengthwise with right sides facing and machine stitch a 1/4-inch seam along the open ends. (Right side is a sewing term that refers to the side of the fabric that is printed or the side that will be exposed on the completed hat.)
Step 6
Cut two pieces of fleece fabric, using the largest circle outline as the guideline.
Step 7
Center the smallest circle hole on one of the large fleece circles and cut the center out of the large fabric circle with scissors, using the smallest circle outline as the guideline. This is the lower tam crown. The large piece without a center hole is the upper tam crown.
Step 8
Lay the two crown pieces together, right sides facing. Machine stitch a 5/8-inch seam completely around the crown pieces on the outside edge. Trim the fabric as close to the seam as possible to remove fabric bulk.
Step 9
Turn the tam right side out. Pin the brim piece length edge around the lower crown piece edge, right sides facing. Machine stitch the brim piece and lower crown together using a 5/8-inch seam. Trim the fabric as close to the seam as possible to remove fabric bulk.
Step 10
Turn the brim piece toward the inside of the tam. This gives the tam's lower crown edge a finished look.
Step 11
Sew a color-coordinated pompom on the tam's top crown piece center, using a needle and thread.
Tip
All items needed for the project are available at fabric supply stores.
A pompom is also known as a pom-pon. It is a decorative ball made from yarn or fabric.
Video of the Day