Things You'll Need
Screwdriver
Voltage tester
Channel lock
Electrical tape
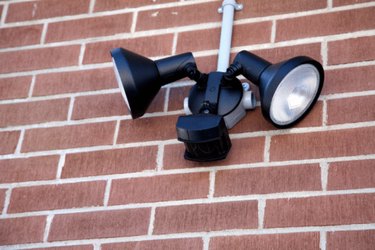
An electric eye, also called a photoelectric sensor or photo eye, is a sensor that detects motion or darkness, which triggers the light to come on. Over time these sensors get old and need to be replaced. Lights that come on earlier and stay on longer than they should need to have their sensors changed. Replacing an outdoor electric eye is simple and should take about 20 minutes to complete.
Step 1
Switch off the power to the light at the circuit breaker. This removes the chances of getting shocked while working with the light and wiring. Place electrical tape over the breaker so that no one accidentally turns the power back on while you are working.
Video of the Day
Step 2
Use the screwdriver to remove the light fixture from the wall or post where it is currently positioned. Removing the fixture will allow access to the bulb and electric eye.
Step 3
Check the voltage meter to ensure the power is off in the fixture. Remove the light bulb from the fixture. Find the electronic eye sensor. It will be round and look like an eye.
Step 4
Disconnect the three wires coming from the back of the electronic eye. The three wires should be white, red and black.
Step 5
Use the channel locks to loosen the lock nut on the electric eye and remove it from the fixture.
Step 6
Insert a new electric eye sensor into the hole with the wires extending through the back of the fixture. A waterproof ring should also be installed with the sensor to keep water from entering the light fixture. Once the sensor is set in place, tighten the lock nut that came with the new sensor with the channel locks.
Step 7
Attach the wires to the correct locations. The white wire is attached to the white wire from the junction box and the fixture. The red wire is attached to the black wire on the fixture. The black wire is attached to the black wire from the junction box. Use the wire nuts on each connection and wrap with electrical tape.
Step 8
Move the fixture back in to place. Verify that no wires are exposed and the fixture is set up the way it should be before turning back on the power.
Step 9
Turn the breaker on. Most electronic eye sensors will come on at first for few moments when the power is reapplied. If the light does not pop on, cover the sensor with electrical tape to make sure it is functioning properly.
Video of the Day