Things You'll Need
Tape measure
Marker pen
Tube cutter
Adapter coupling
Crescent wrench
PEX pipe
PEX fittings
Copper crimp rings
PEX crimping tool
Go/no go gauge
Polybutylene (Poly-Butyl) was once used to manufacture household water pipes. Today, however, these pipes have been found to be substandard and are no longer accepted by building codes. PEX water supply pipes are made of cross-linked polyethylene, and due to their flexible nature require fewer 90-degree elbow joints. The joining of one pipe section to another also requires no primer or cement (as does traditional CPVC), and is a far quicker process to install.
Step 1
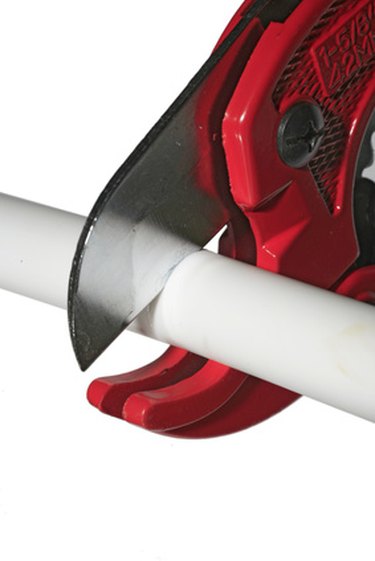
Turn the water supply off at the home's main shut-off valve. Mark the existing polybutylene pipe at the point where the new PEX pipe will be attached (as much polybutylene should be removed as possible). Make a straight cut through the pipe at the mark using a tube cutter. Cut into pieces and remove all unwanted sections of polybutylene pipe.
Video of the Day
Step 2
Remove the two nuts on the ends of an adapter coupling, also taking off the steel crimp fitting and acetal compression sleeve on each side of the main coupling body. Slip one nut onto the end of the polybutylene pipe, followed by the steel crimp fitting and also the acetal compression sleeve. Push the coupling body onto the end of the pipe, and tighten the nut surrounding the pipe onto the coupling body -- by hand. Tighten the nut to the coupling body using a crescent wrench. Now, attach the end of the PEX pipe to the other end of the adapter coupling by following the same process.
Step 3
Lay out the PEX pipe in its required route and mark the pipe at the point where the first PEX fitting (joint) needs to be installed into the line. Make a straight cut through the pipe at the mark using the tube cutter. Push a copper crimp ring onto the end of the pipe and slip it 4 inches down the pipe. Push a PEX fitting into the end of the pipe (the fittings are made of plastic and can be straight, angles or shaped like a T to join one pipe to another).
Step 4
Slip the crimp ring back towards the fitting so that there is 1/8 to 1/4-inch of pipe between the crimp ring and the fitting. Place the crimp ring evenly in the jaws of a PEX crimping tool. Squeeze the handles together quickly to seal the ring around the pipe. Remove the tool.
Step 5
Slip the installed crimp ring into both slots of a "go/no go" gauge. The ring should fit into the "go" gauge slot, but not the "no go" slot. If this does not happen, the ring has to be removed and replaced. Now, install the PEX pipe on the other side of the fitting by following the same process. Install all necessary PEX pipe with the required fittings, until the water fixture is reached (adapters are available for the PEX pipe to attach to the fitting's inlet; follow the same installation process as described).
Tip
Running the PEX pipe in place will probably require drilling holes in wall studs or ceiling/floor joists for the pipe to enter through. Use a wood drill bit that is 1/4-inch larger in diameter than the size of the pipe.
Video of the Day