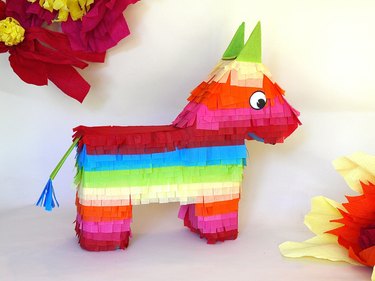
A rainbow donkey or burro piñata is a traditional element found at Cinco de Mayo celebrations, but this do-it-yourself version would also make a lively addition to a birthday party or any event. Fill it with treats and let kids or party guests try their luck at breaking it open. Fashioned out of recycled cardboard boxes and colorful tissue paper, it is sure to add festive color and fun wherever you hang it.
Things You'll Need
Video of the Day
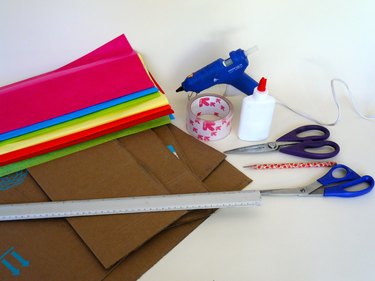
- Colorful tissue paper (3 to 4 sheets of each color)
- 16-by-20-inch cardboard box (or similar-sized cardboard pieces)
- Ruler
- Clear tape
- Clear packing tape
- Utility scissors or utility knife
- Paper cutter (optional)
- Craft scissors
- White glue or hot glue gun
- White paper and marker
Video of the Day
Note: This piñata features six different tissue paper colors.
Step 1: Draw a Donkey Shape Onto the Cardboard
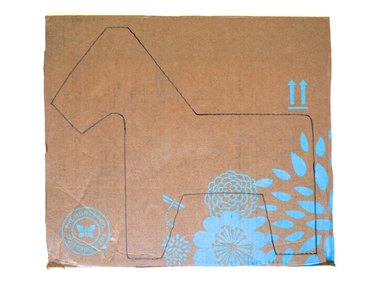
For this step, you will need two pieces of cardboard measuring 15 by 18 inches. Draw an outline of a donkey onto one of the cardboard pieces with a pencil.
Note: If you would prefer to use a template, simply print all four templates below, cut out and line up. Use some tape to secure the pieces together, and trace it onto the cardboard.
Step 2: Cut Out Donkey Shapes & Cardboard Strips
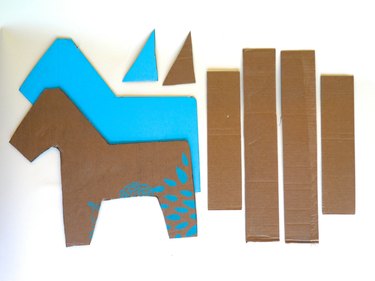
Cut out the donkey shape with utility scissors or a utility knife. Utility scissors worked best in this example. Trace the donkey onto another piece of cardboard and cut out so that you have two identical donkey shapes. Then, cut out 3-inch wide strips down the length of the cardboard, cutting strips until you have a total length of 65 inches when they are all joined together (three or four strips should be plenty). Next, cut two cardboard triangles roughly measuring 2 by 3 inches.
Tip: A paper cutter helps when cutting the strips, but a ruler and cutting knife or utility scissors will work if unavailable. Also, the grain of the cardboard should run horizontal to the width of the strips. This will make folding them easier.
Step 3: Tape the Strips Together
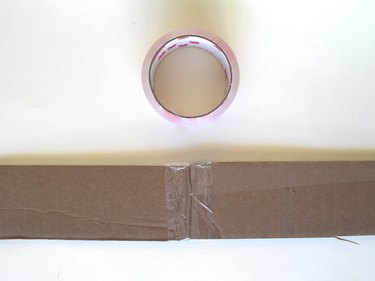
Using packing tape, tape the 3-inch cardboard strips together at the ends, forming one long strip.
Step 4: Attach the Strip Between the Donkey Cutouts
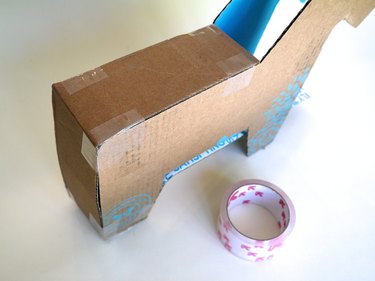
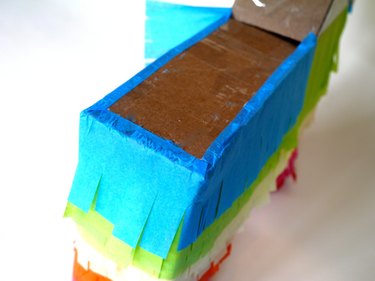
Make the form of the donkey by attaching the long cardboard strip in the middle of the two donkey cutouts. Beginning on the upper back, tape the cardboard strip between the donkey's shoulders with clear packing tape. Fold the strip down the back, and tape it to the cutouts.
Step 5: Continue the Strip Around the Donkey
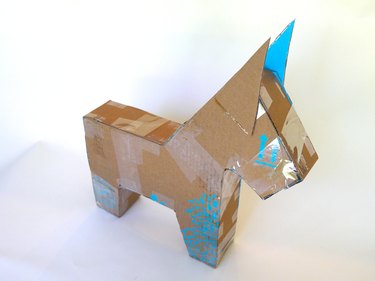
Continue folding the cardboard strip around the donkey cutouts, folding at the corners and securing it with tape. When you reach the spot where you started, trim the excess. Glue the ears in place on the sides of the donkey's head with white glue or hot glue.
Tip: If you plan on filling your donkey with candy, leave the last 3 inches open, or lightly secure the end of the strip with a small amount of tape. Don't overlap the beginning and end of the cardboard strip.
Step 6: Cut Out Strips of Tissue Paper
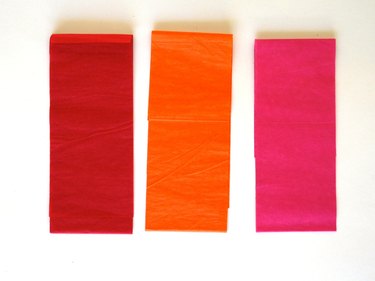
Next, trim the tissue paper into 3-inch-wide strips. Fold the sheets of tissue in half and cut down the length. You don't need to cut all of the tissue into strips; start with three strips of each color. You can always cut more if needed.
Tip: You can stack several pieces of tissue and cut with a paper cutter to save time.
Step 7: Fringe the Edge of the Strips
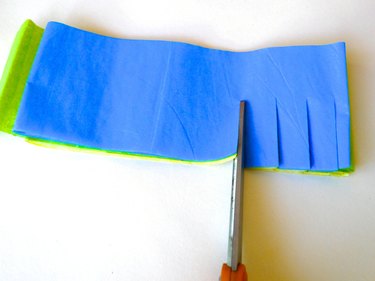
Fold the strips in half again and stack three or four strips on top of one another. Using craft scissors, cut slits down the length of the strips, stopping about halfway in the middle of the strips to create fringe. Each piece of fringe should be about 1/2 inch wide.
Step 8: Attach Fringe to the Feet
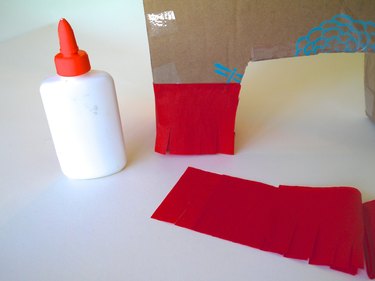
Begin at the bottom of the donkey and wrap a single fringed strip all the way around one of the feet so the edge of the fringe touches the work surface. Secure with a line of white glue under the top of the strip. Do this on the other foot.
Step 9: Attach Fringe to the Legs
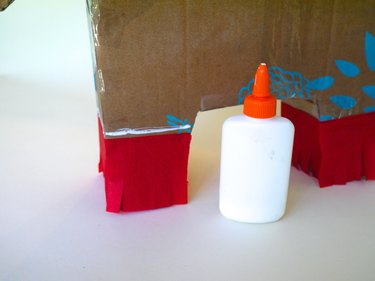
Run a line of white glue just above the first strip, and place another strip of the same color. Continue up the legs, securing three rows of strips before changing colors.
Step 10: Cover the Underbelly with Tissue
When you reach the point where the bottom of the fringe is flush with the bottom of the donkey's belly, stop and cover the belly with a couple layers of tissue paper in a new color. Glue it in place.
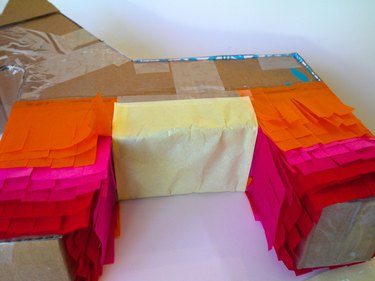
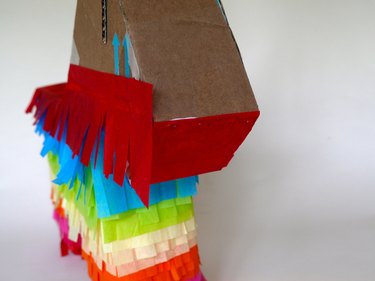
Step 11: Attach Fringe to the Midsection & Back
Continue gluing fringe strips around the middle of the donkey, alternating colors every three strips, until you reach the donkey's back. Fold the next fringe strip over the top edge of the back about 1/4 inch and glue in place. Add the same color fringe around the neck. Continue working up, folding the fringe strips over the top of the back as needed. When the fringe is completed, cover the back with a solid color of tissue paper. Simply cut a 3-inch strip of tissue paper, fold it into thirds so that it is three layers thick, and glue it into place.
Tip: If you left a 3-inch space open to fill the donkey with treats, then very lightly tape fringe over the opening so you can easily peel it back later.
Step 12: Cover the Chin & Mouth With Tissue
When the bottom of the fringe is flush with the bottom of the chin, stop and cover the mouth and chin with a couple layers of tissue paper.
Note: Don't worry about the fringe strips obscuring the shape of the neck and jaw, as you will cut away the excess fringe later.
Step 13: Attach Fringe to the Head

Continue working up the head until you reach the top. At this point, trim 1/4 inch off the top of the next fringe strip and attach it around the head directly on top of the previous layer (here, it's yellow on top of orange). Trim 1/2 inch off the top of the next strip, and then trim 3/4 inch off the next strip.
Step 14: Cover the Head & Ears With Tissue
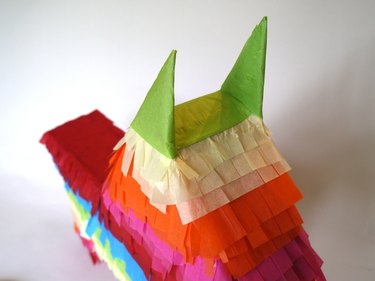
Cover the top of the head with a couple of layers of tissue. Then, double-wrap the ears with the same color of tissue. Trim any excess tissue and glue down.
Step 15: Trim the Excess Fringe Under the Jaw
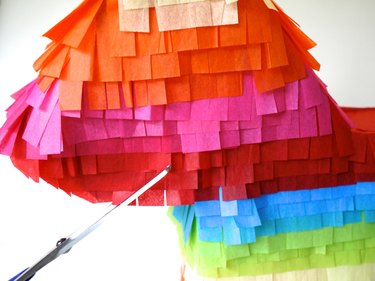
Next, trim the excess fringe just under the jaw until the shapes of the donkey's jaw and neck are clearly seen.
Step 16: Make a Tail
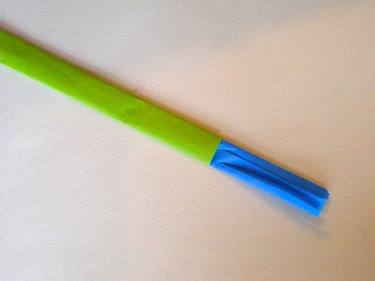
Make a tail by folding up a single sheet of tissue until it is about 1/2 inch wide. Wrap another colored sheet of tissue around it, leaving about 2 inches of the bottom color exposed. Trim the tail to 7 inches total. Fringe the bottom color with scissors.
Step 17: Attach the Tail
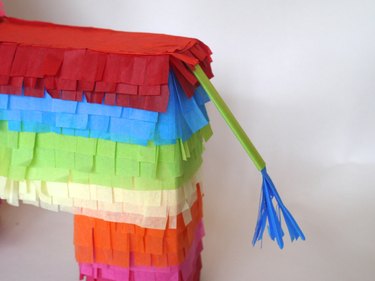
Attach the tail just under the first layer of fringe on the rear end of the donkey. Hot glue works best, but white glue will work, too.
Step 18: Make & Attach Eye Cutouts
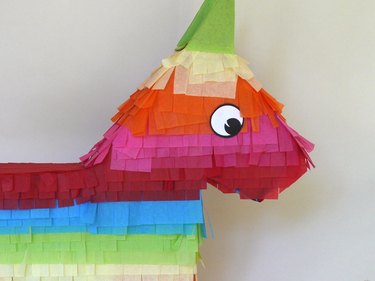
Finally, attach an eye on both sides of the head with white glue. You can draw them onto white paper and cut them out, or you can do a simple Internet search for "eye template," print out and cut.
Items Needed for Filling & Hanging the Pinata
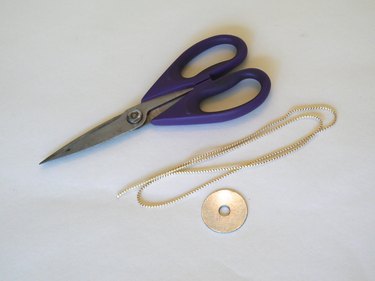
You can leave the donkey as-is for decorative purposes, or you can fill it with treats for a party. You'll need: 2-inch washer with a 1/4-inch hole Sturdy cord, about 8 inches long * Utility scissors
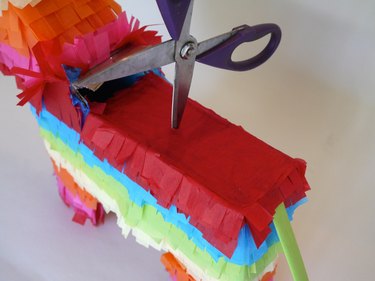
Step 1: Make a Fill Hole

Use scissors or a utility knife to make a 3-inch opening in the piñata where the neck meets the back, and fold the cardboard strip back. If you left this area open when you made the form, you'll just have to carefully trim the tissue with a utility knife. If it is taped shut, use scissors or a utility knife to release the tape.
Step 2: Poke a Hole for the Hanger
Use the tip of the scissors to poke a small hole in the donkey's back. The hole should be centered on the back.
Step 3: Attach the Cord to the Washer
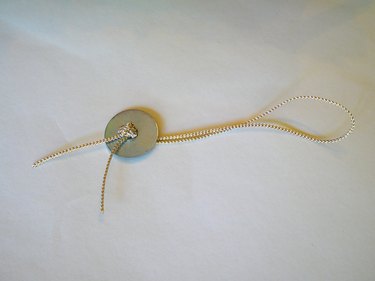
Fold the cord in half and tie the ends into a thick knot, leaving about a 1-inch tail. Thread the top of the cord through the center of the washer so that the washer stops at the knot. Make your knot big enough so the cord won't slip through the washer.
Step 4: Secure the Cord to the Pinata
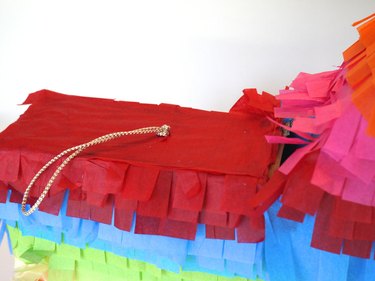
Entering through the fill hole, thread the top of the cord through the hole in the middle of the back, and pull it through. The washer should be inside the piñata. Pull the cord until it's taut, and tie a thick knot at the donkey's back so the cord doesn't slip.
Step 5: Fill the Pinata With Treats
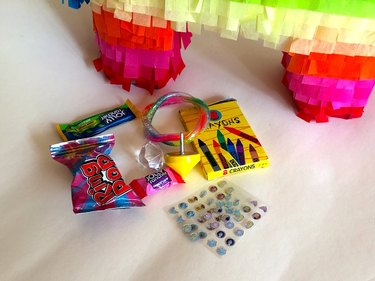
At this point you can fill the donkey with candy, bouncy balls, stickers, small party favors and confetti. Keep the weather in mind and do not fill with chocolate on a hot day. Then lightly tape the hole closed and re-tape the fringe as necessary.
Tip: If your donkey is unbalanced when you hold it by the cord, you can weigh the piñata by placing heavier candy and toys in the back, and lighter stickers and confetti in the front.
Step 6: Hang the Pinata
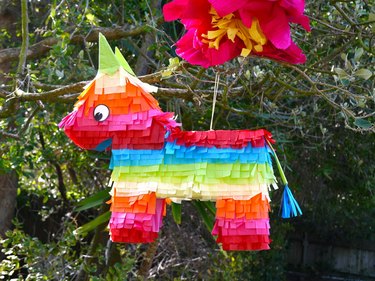
Hang the piñata on a sturdy tree branch. If you plan to allow children to break the piñata open, hang it low enough so the kids can reach it with a stick. Don't forget to blindfold them, spin them around and get out of the way.