Things You'll Need
5 lightweight bamboo sticks or narrow strips of the same size
Tube of pattex
Stencil knife
Strong Nylon/Cotton cord.(fish line can be used too)
Recycled plastic bags/Polyester or kite covering materials.(of Different colors)
Thin Strips of cloth.
Able to follow instructions well.
Step 1
Cut the bamboo into strips if it isn't already cut to size. You can cut the sticks or strips as long as you want, based on how big you'd like the kite to be. For example, to create a small hexagon, cut small strips of 8 or 9 inches long. If there are any rough edges, sand the bamboo with fine-grit sandpaper.
Step 2
Form an "X" with two pieces of bamboo. Lash them together in the center. Wrap the cord around the center two to three times horizontally and two to three times vertically.
Video of the Day
Step 3
Place Add a horizontal piece again in the center so that both ends are even. Wrap around with cord until all 3 pieces are firmly fitted to form a 6 points star.
Step 4
Add the vertical strip: this piece should be centered and placed vertically then wrapped with cord at the center.This will be a support for the arc that is to be placed at the top part of the kite.
Step 5
Place the final strip horizontally at the top left or right end and wrap with cord, then, bend it slightly to make an arc or to form a bow then rap the next end.
NOTE: This piece of strip for the arc needed to have been shaved/sanded a little thinner than the others so it can bend easily.
Do not clip the cord just yet; make a knot to hold the arc in place for the time being. Then after you've formed a bow with the cord, continue around the perimeter(end points)of the kite frame until your kite looks like the one in Step 8.(See Image) Balance and evenness is important and the cord must be firm so it doesn't slip out of place. This will also form a slight arc in the kite which will help to make the kite mount easier. Make a tight knot when you've completed the hexagon.
Step 6

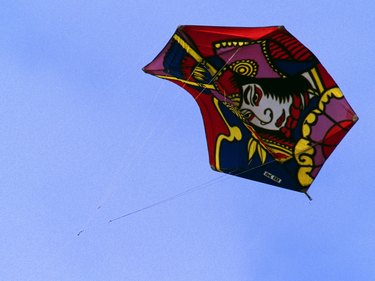
Paste paper/polyester etc to kite frame using pattex glue. So now you should have something similar to the one in my image. It's up to you now to use your creativity and use different colors of paper, plastic or polyester material unto the kite frame to make your kite unique.
Step 7

Now that you have finished pasting on the material(s) unto the kite frame; It's time to make the loops for the balancing tail and the navigating system so to speak; very important for your kite to fly.
Tie the cord at point (A)(see image) that's if you had cut it after you finished making up the frame in Step (7&8)(See Image) and make a loop pivoting at point (C)(See Image) tie a knot at point (B)(See Image). Ensure that both ends are tied firm so as to withstand strong winds.
Punch 2 small holes in the center of the kite at point (C)(See Image) and make a knot in the center of the kite frame, Run the cord along the center strip until you reached the top in the center of the arc. Step 9.2 (See Image) Now, tie that center piece to cord (A, B) at (D)(D is the center of (A,B)(See Image). Make a strong knot so that it doesn't slip from side to side to cause an imbalance while you attempt to fly the kite. Now follow Step 9.1(See Image) to make a loop for the tail (E, F)See Image).
Attach thin strips of cloth to the bottom loop for the tail and a reel of cord to the top loop and you are set for flying.
You're done! Yeayee!! Scheeeew! Wow! lota info! Better Print the Images.
Tip
You must view the Images to the left of the article in order to have a complete idea of the given instructions. If after you begin to fly the kite and it keep spinning in the air or perhaps to the ground, check to see if the loops are balanced and the knots are tight, and if the kite needs more tail weight. Use thin strips of cloth, preferably lighter fabrics, to make a tail for your kite and place it at (G).
Warning
Stencil knives are sharp and may cause extensive injury to self if not properly and resposibly used. Pattex give off fumes and is harmful if swallowed or caught in the eye. Bamboo wood can also cause injury if care is not taken whilst being used. (use gloves for handling) If you become stressed in the process, take a break and go have yourself a cup of tea...otherwise have fun making your Hex kite ROCK! Oh! you can make the kite without the ARC and the vertical piece if you want, it will still fly. It looks better with the arc though.
Video of the Day