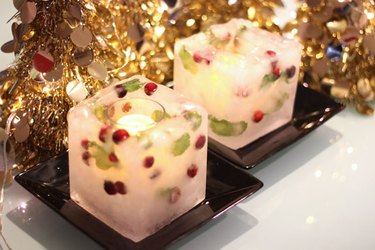
If you're dreaming of a white Christmas or winter solstice, these lanterns made of ice will add some cool vibes to your next holiday celebration. Ideal as a centerpiece for your holiday table, DIY ice lanterns are a fun winter craft to enjoy with friends and family.
When you make ice luminaries, you freeze cranberries and mint leaves inside for festive color, although you can be creative and try other greenery, such as sprigs of evergreens. The lanterns are sized perfectly to hold an LED tea light candle, which makes the blocks of ice glow from within—without melting them.
Video of the Day
Video of the Day
Celebrate this winter's freezing temperatures with this tutorial that shows you how to make ice candles with some basic ingredients from your local grocery and craft stores.
Things You'll Need
Half gallon juice or milk carton
Half pint (or 10 ounces) juice or milk carton
Hobby knife
Wood skewers
Crushed ice
Cranberries
Mint leaves
Regular or distilled water
Cut the cartons to make a mold
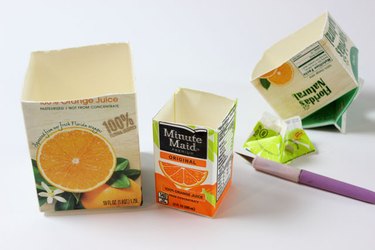
We will be using a half-gallon carton and a half-pint carton to make a mold for the ice lantern. Cut the larger carton with a hobby knife to a height of about 4 1/2 inches, and cut the smaller carton to a height of about 3 1/2 inches. Discard the top sections.
Punch holes in the cartons
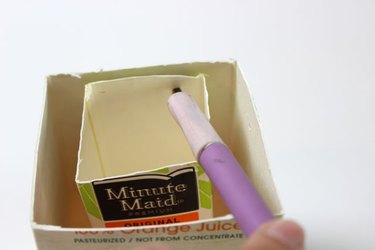
Place the smaller carton inside the larger one. Line up the two cartons at the top. Position one side of the smaller carton in the center of one side of the larger one, and, using a hobby knife, punch two holes that go through both cartons. Repeat this step on the opposite side so both cartons have four holes altogether.
Insert skewers through the holes

Insert two wood skewers through the boxes using the holes that you've punched. The skewers suspend the smaller carton above the larger one to create a square mold. Adjust the position of the smaller carton so that it's centered.
Fill the mold
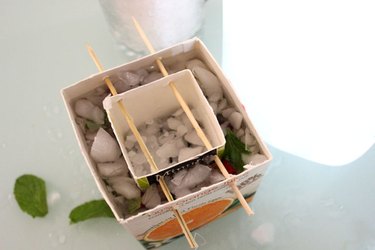
Place a small rock in the smaller carton to add stability to the mold. The rock is a reminder that this inner section is not to be filled with water, as it is holding the space in the ice for the candle holder. Now comes the fun step in this how-to-make-ice-lanterns tutorial.
Fill the outer section with about 1 inch of crushed ice. Drop in a few cranberries and mint leaves. Cover the cranberries and mint with another inch of crushed ice. Add a few more berries and mint on top of that, and cover them with another layer of crushed ice.
Finally, pour water into the mold until the water level reaches about a half-inch below the skewers. You'll see that the crushed ice holds down the berries and mint so they don't all float to the top when you add water. Store the mold in the freezer overnight.
Tip
If you've dropped a little crushed ice into the center section, don't worry about it. It won't affect your ice mold.
Slide out the inner carton
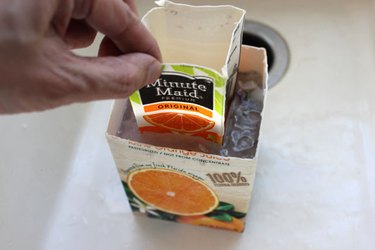
After the ice is completely frozen, take it out of the freezer and place it in your sink. Remove the skewers. Then run cold water from the tap into the inner carton. The water in the inner carton will slowly loosen the ice on the other side so that you can slide out the carton.
Tip
If the ice has expanded so much that your skewers are frozen in the ice, run water along the top of the ice to melt the top portion until the skewers are free. Don't worry—with the tiny amount melting at the top, it will not even be noticeable on your finished ice lantern.
Loosen the ice block
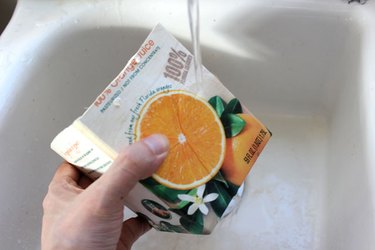
Run cool water on the outside of the carton to loosen the ice. Keep the water cool. Although it may be tempting to use hot water or even warm water, a high temperature may crack the ice. Keep turning the carton so the water hits the exterior of all four sides.
Eventually, the ice inside will loosen up, and you will be able to just slide it out. Be sure to catch it as it separates from the mold. The ice is slippery and heavy.

Display the ice lantern with an LED candle
Display the finished ice lantern on a chilled plate. Insert a glass votive holder and an LED candle in the opening, and see the ice glow with a warm light. Because the walls of the ice block are relatively thick, the ice will melt very slowly and should last up to three hours, depending on the temperature in your room. You may want to line your plate with a towel to soak up water.
For those living in colder climates, place these lanterns outside on your front porch or flanking your walkway for a beautiful glow during the winter.