Things You'll Need
Knitted baby blanket
Yarn
Straight needles
Circular needles
Stitch markers

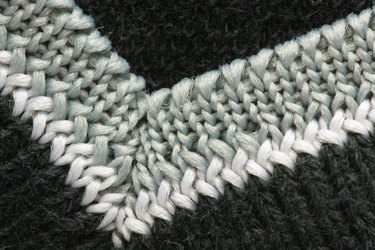
How you knit a mitered corner on a baby blanket depends on how you are knitting the border. If you are knitting a border parallel to the blanket edge — knitting around the completed blanket — you'll use increases to make the mitered corner. If you are knitting the border perpendicular to the finished blanket, you'll use short rows to make the mitered corner. One thing that will help is using a pair of very long circular needles rather than straight needles for a border that you are knitting parallel to the finished blanket edge. Use your regular straight needles for a border knit perpendicular to the edge of the baby blanket.
Parallel Border
Step 1
Pick up stitches all around the blanket, one stitch for each row or column of stitching, using circular needles. Join to work in the round.
Video of the Day
Step 2
Knit one round all around the blanket, placing a stitch marker at each corner.
Step 3
Knit the next round, knitting into the front and back of the stitch before and after each marker, so that you are increasing two stitches at each corner. Move the stitch marker over to the right needle every time you come to it, to keep it at the corner of your knitting.
Step 4
Knit as many rounds as you need to make the border wide enough, increasing one stitch before and one stitch after the markers at each corner. Bind off when the border is wide enough.
Perpendicular Border
Step 1
Cast on as many stitches as you need for the width of the border, using a straight needle. For instance, if your gauge is five stitches per inch and you want a 2-inch border, cast on 10 stitches.
Step 2
Knit nine stitches on the first row, using our example of a 10-stitch border. Knit the last stitch together with a stitch you pick up from the edge of the blanket. Turn and knit 10 stitches back out to the edge of the border. Turn and knit nine stitches back to the blanket. Knit the 10th stitch together with one stitch you pick up from the blanket edge. Continue knitting the border in this manner until you reach the corner of the blanket.
Step 3
Knit 10 stitches from the blanket edge to the border edge. Turn your work and knit back nine stitches, leaving the 10th stitch on the left needle. Do not pick up a stitch from the blanket. Turn your work again and knit the nine stitches out to the edge of the border again.
Step 4
Turn your work and knit eight stitches, leaving two stitches on the left-hand needle. Turn your work and knit the same eight stitches back to the edge of the border. Keep decreasing the number of stitches you knit by one, every two rows, until there is only one stitch left on the right-hand needle.
Step 5
Turn your work and knit two stitches. Turn your work and knit two, so that you are out at the edge of the border again. Turn your work, knit three stitches. Turn the work again and knit the three stitches back out to the edge of the border. Each time you knit back in toward the blanket, pick up one more stitch until you have picked up all the stitches and turned the corner. Then just begin knitting your border again along the next side, and repeat this step when you get to the next corner.
Tip
Short rows can be confusing the first time you try to knit them. Knit a sample, and just follow the instructions without trying to understand them too much. You'll pick it up right away. Feel free to rip out stitches and try again until you like the look of your work.
Video of the Day