Things You'll Need
Picture of Nefertiti's bust
Measuring tape
Wig cap or swim cap
Pencil
Tan or light yellow posterboard
Scissors
Tape and glue
Blue posterboard
Red and green paint or posterboard
Gold braid
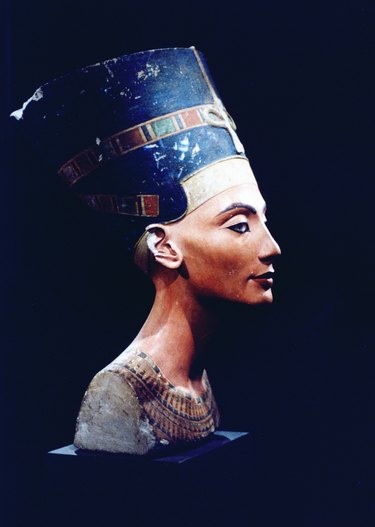
Nefertiti is one of the most recognizable Egyptian queens, due to the sculpture of her that was found in 1914. Her blue, almost helmet-like headpiece marks her as a ruling queen because it's shaped like a pharaoh's crown, and the gold-colored knot at the front symbolizes wealth -- another mark of royalty. This distinctive headdress makes a perfect complement for ancient Egyptian costumes and you do not have to be wealthy to make one.
Step 1
Make the base headband. Tuck your hair under a wig cap or swim cap to keep it out of the way and get a close measurement of your head. Measure the circumference of your head around the brow with a sewing tape measure. Cut out a strip of light-colored posterboard of the appropriate length. Glue or tape it together and make sure it fits around your brow snugly. This will form the light piece in the front of the headdress, so make sure the seam is in the back where it will be hidden later on.
Video of the Day
Step 2
Begin drawing the main part of the headdress on blue posterboard. Use a pencil so you can erase parts you don't need to cut. The stiffness of the posterboard will make it stand up when it is taped later on.
Step 3
Use your brow measurement from Step 1 and draw a line of this length. In the center of the line, draw an oval shape with the line running through its middle. This oval is wider than it is tall, and is roughly one third the width of the line. The bottom curve is your cutting line. You can erase the top half of the oval and the straight line inside the oval before you cut later on, but leave the straight line for Step 4.
Step 4
Continue drawing the headdress shape. Measure the approximate height you would like the headdress to be when it is finished. For a child, six inches is enough, but an adult may need more height. Draw a horizontal line on the blue posterboard this distance above the base line. Make it stick out an inch farther on either end. For example, if your brow measurement was 18", your top line would be 20". Both lines have the same center point, so the base is nine inches on either side, and the top is ten inches. Connect these two lines at both ends.
Step 5
Cut out the shape you made in Steps 2 and 3. Tape it together on the inside, and try the headdress on over the headband. The tape seam goes in the front. Cut a rectangle out of the front headdress so the light-colored headband peeks out on your forehead. Trim any pieces that are too large, especially around your ears and neck, or at the top. Once you are happy with the way it fits and looks, glue or tape the blue headdress to the light headband so they are one piece.
Step 6
Make the flat top of the headdress. Hold the headdress upside down on blue posterboard, trace around it, and cut out the tracing. Tape this shape securely inside the top of the headdress to hide the tape.
Step 7
Create the trim. The trim is made of red, green, and blue rectangles set in a yellowish material that was probably gold on Neferititi's real headdress. Simulate these by painting the design, or by cutting rectangles from paper and gluing them on your tan or yellow posterboard. Make this strip long enough to wrap around the headdress twice.
Step 8
Attach the trim. The strip you created will wrap around the headdress once. A small piece of trip also runs from the horizontal strip down to the neck in the center of the back. There are two side pieces of trim as well, going from the back, next to the vertical piece, and slanting down to above the ears. Glue on the vertical and slanted pieces first, then glue on the horizontal piece.
Step 9
Add the knot in the front. Tie two loops in a piece of gold braid. Glue the braid so the loops are over your horizontal accent. One end of the gold braid will run down to the brow band, and the other end will run up to the top. Trim any excess, glue the ends down, and your headdress is complete.
Tip
Accent the edges of the trim and blue piece with gold puff paint, for a more 3-D look.
Video of the Day