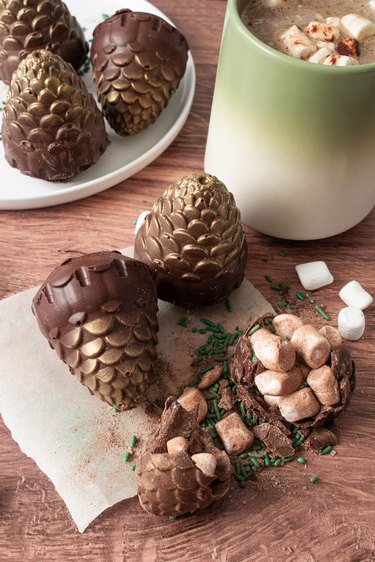
If you love sitting by the fire and sipping on hot cocoa, you'll want to add this hot chocolate bomb DIY to your to-do list. Featuring a special silicone mold, gold edible dust and a ton of sprinkles and marshmallows, this project creates gorgeous hot cocoa bombs that look like pretty pine cones. They're perfect for your next cabin getaway or simply relaxing at home on cold winter nights!
Now, if you're new to making hot cocoa bombs, this recipe might seem intimidating. But don't worry—we've got your back. Below, you'll find a detailed step-by-step tutorial along with tips and tricks for creating the project with ease. We've also listed ideas for personalizing your pine cone hot cocoa bombs based on your preferences and what you have on hand.
Video of the Day
Life is too short for boring drinks! With this hot chocolate bombs recipe, you'll be able to transform warm milk into a delicious beverage whenever the craving hits. From there, top it off with your favorite flannel shirt, a knitted blanket and a good book for ultimate cabin vibes.
Video: Pine Cone Hot Cocoa Bombs with Cozy Cabin Vibes
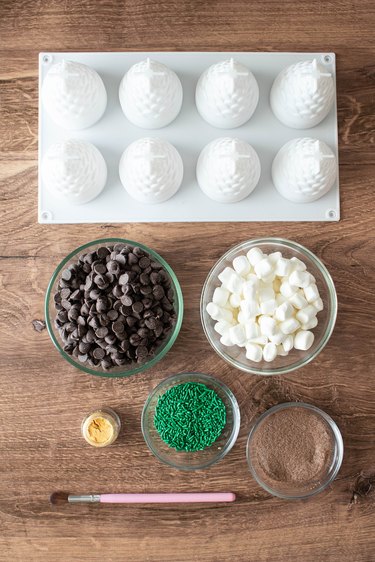
Things You'll Need
3 to 4 cups chocolate chips
Mini marshmallows
Hot cocoa mix
Cocoa powder (optional)
Dusting brush
How to make Pine Cone Hot Cocoa Bombs:
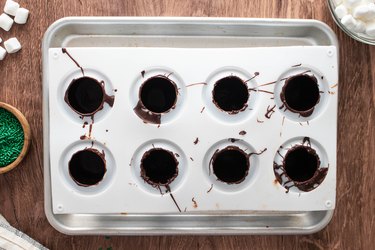
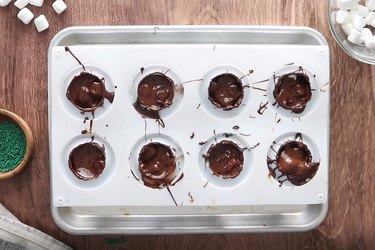
1. Fill the mold with melted chocolate
First, melt the chocolate. You can do this in the microwave or on the stove top.
To use the microwave, transfer the chocolate to a microwave-safe bowl. Warm at high heat for 60 seconds and then stir. Continue heating at 30-second intervals, mixing after each interval. To use the stove top, use a small pot, stainless steel bowl and water to create a double boiler. The melted chocolate should be smooth and stick to the back of a spoon.
Spoon the chocolate into the silicone mold. Next, using a thin spatula or small spoon, spread the melted chocolate upward to coat the entire surface of the mold. You can also tilt the mold to help spread the chocolate.
Tip
You can use milk chocolate, semisweet chocolate or dark chocolate chips. Alternatively, you can break plain chocolate bars into pieces. Chocolate candy melts or wafers are another option, though they might not have as much flavor as chocolate chips and bars. If you choose to use chocolate melts or wafers, go for a high-quality brand, such as Ghirardelli. Finally, for an extra winter or holiday touch, add a few drops of mint extract to the melted chocolate.
By the way, due to the shape of the molds, this step will likely be messy! Don't worry if there's melted chocolate on top of the mold.
Refrigerate the chocolate for at least 30 minutes or until it's completely hard. The total time will depend on the original temperature of your chocolate and how much you add to the mold.
Tip
Place the silicone mold on a quarter baking sheet. This will make it easier to move around.
2. Fill the chocolate mold
Once the chocolate has hardened, remove the mold from the refrigerator. At this point, you can add a second coat of melted chocolate to fill in any gaps if needed.
Now, it's time to add the fillings! To each pine cone mold, add mini marshmallows, sprinkles and hot cocoa mix. For a stronger chocolatey flavor, add some cocoa powder.
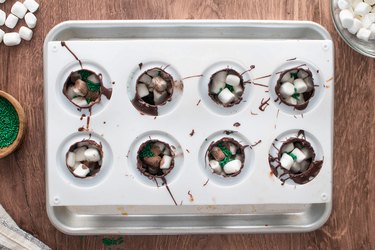
Continue adding these ingredients until the pine cone is nearly full.
Tip
For a holiday or Christmas twist, add crushed candy canes to each pine cone. If you want to switch things up, add white chocolate or peanut butter chips.
Top off the pine cones with more melted chocolate. This will help close up the pine cone, so be sure to spread chocolate to the edges. Chill in the refrigerator until the chocolate has completely set.
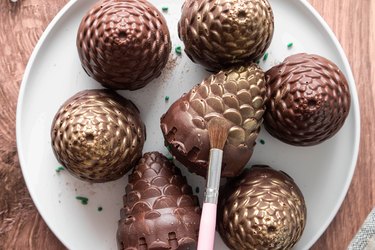
3. Decorate the hot cocoa bombs
Carefully remove the pine cones from the mold. Dip the dusting brush into the gold dust and then tap off the excess. Apply it to the chocolate pine cones. You can add as little or as much as you'd like.
Tip
Another idea is to use a piping bag to drizzle melted white chocolate on the pine cones. This will create the illusion of snow, which may be ideal for winter or the holiday season.
To store your hot chocolate bombs, place them in an airtight container at room temperature. You can also store them in the refrigerator to increase their shelf life.
When you're ready to get cozy with a cup of hot cocoa, place a chocolate pine cone into a mug and pour hot milk over it. You can also microwave milk in a mug and then add the chocolate bomb to the milk. Either way, you'll be sure to have a delicious drink. Cheers!