Things You'll Need
Fabric with a bold repeated pattern
Fabric with a solid color
Ruler
Pins
Scissors
Iron
Sewing machine
Thread.
Batting
Backing
Binding
Quilts can be utilized to keep user warms and comfortable. They also can be beautiful additions to bedroom or living room decor. "Stack-N-Whack" is a method of making squares to be used in quilting designed by Bethany S. Reynolds. The method allows you to easily make kaleidoscopic patterns.
Cutting the Pieces
Step 1
Measure a 6.25-inch strip down the length of your fabric inserting pins to indicate where to cut.
Video of the Day
Step 2
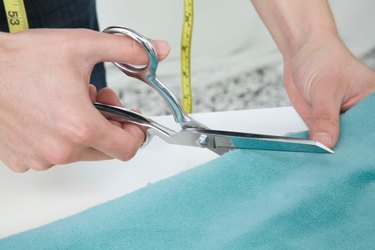
Cut down the fabric with scissors -- following the pins.
Step 3
Identify where the pattern repeats on your fabric and cut eight identical pieces.
Step 4
Stack the eight identical pieces of fabric on top of each other. Choose one point on the pattern and insert a pin into it. Put the pin through the exact same point on the layers beneath lining up the eight layers of material. Pick another point at the other end of the strip and repeat the process of inserting a pin through the exact same spot in all of the layers and smooth the material flat. Repeat this process in several places along strips so that it the material will not shift when cutting your 6.25-inch pieces.
Step 5
Cut across all eight layers with the scissors at 6.25-inch intervals.
Step 6
Cut diagonally from corner to corner across a stack of the 6.25-inch squares to create triangles. All eight of the triangles should look identical.
Step 7
Cut the solid colored material into 6.25-inch squares and then cut the squares diagonally from corner to corner to form triangles.
Step 8
Cut 32 rectangles from the solid colored material measuring 2.75 inches by 8.5 inches.
Assembling the Quilt Square
Step 1
Arrange one stack of the triangles right side up in a circle with the same corner in the center forming a pinwheel. The pattern repeated in the same orientation in a circle produces a kaleidoscope effect.
Step 2
Place a triangle of the solid-colored material on top of every other patterned triangle in the pinwheel with corresponding sides together. Pin the outer edges together and sew the two triangles together along the pinned edge with your sewing machine -- removing the pins as you sew.
Step 3
Place a rectangle of the solid-colored material on top of the remaining triangles in the pinwheel, so that the outer edges line up and pin them together along the outer edge. Sew these two pieces together along the pin line with the sewing machine.
Step 4
Unfold each of the pieces and iron them flat with the iron.
Step 5
Reassemble your pinwheel pattern with the corners together and the proper sides of the material up. These should now form a square with some overlap. Flip one triangle made of the two different materials over onto the piece next to it so that right sides are together. They should now have the longest sides aligned. Pin and sew along the long edge. If you are confused about which way to flip the triangles pin them together along the sewing line and open them up and they should form a square, not another triangle. Repeat this step four times, iron the seams flat and then reassemble your pinwheel. You should now have four large squares.
Step 6
Flip one square onto its neighbor and pin along the seam and sew the blocks together. Repeat with the other pair of squares.
Step 7
Set the two rectangles next to each other so that the pinwheel is formed. Flip one piece onto the other so the right sides are together and pin along the inside edge. Sew these two pieces together.
Step 8
Repeat these steps until all eight pinwheel patterned squares are sewn.
Step 9
Utilize these squares in your quilt design adding backing and batting and sewing the quilt pattern before binding the edges.
Tip
Right side means the front of the fabric where the pattern is printed. More Stack-n-Whack™ patterns are available from Bethany S. Reynolds Try both corners in the center of the kaleidoscope pattern to see which looks more interesting.
Video of the Day