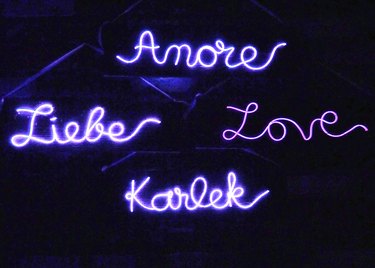
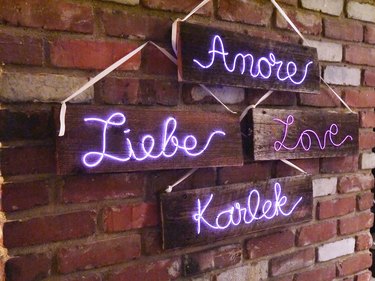
With the help of electroluminescent wire, or "EL wire," making your own lighted sign is quite simple. All you do is bend the wire into any shape, or in this case, the languages of love. The softness of the font and reclaimed wood make these lighted signs ideal for rustic weddings, but they would be equally lovely for baby showers, anniversary parties, Valentine's Day or everyday home decor.
Video of the Day
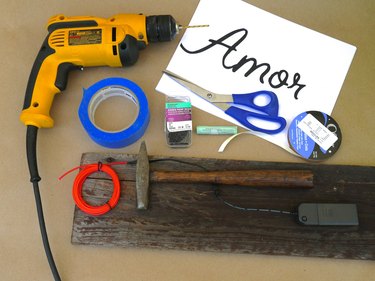
Things You'll Need
5-by-20-by-1-inch reclaimed wood boards, 4
Chalk
Drill
1/8-inch drill bit
Scrap wood
Electroluminescent wire kit, 9 feet, fitted with batteries (1 kit for each sign)
Scissors
Painter's tape
Double-point tacks, size #9, 1 box or 1.5 ounces
Small hammer
Duct tape
1/4-inch satin ribbon, 8 feet
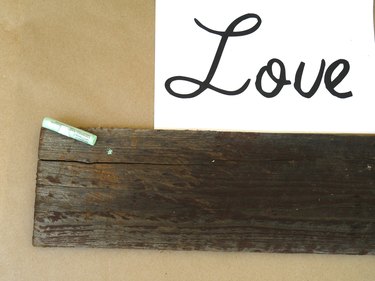
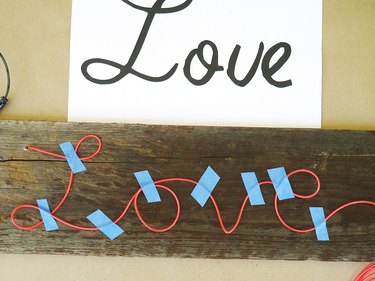
Step 1: Begin With "Love"
Download the four templates. The English word for "love" is the easiest to construct of the four signs, so begin with that template. Place the "Love" template next to the wood board to use as a visual reference. Eyeball how you'd like the spacing of the word to be on the board, and mark the wooden board with chalk where the letter "L" should begin.
Video of the Day
Tip
You could also make your own design in a word processing program. Use a cursive font and format your word to 250 points (roughly) in size, so it fits when you print it horizontally on an 8 1/2-by-11-inch sheet of paper. You will use the template simply as a reference -- it's not meant to be an exact replica -- so the size proportions and font do not need to be exact.
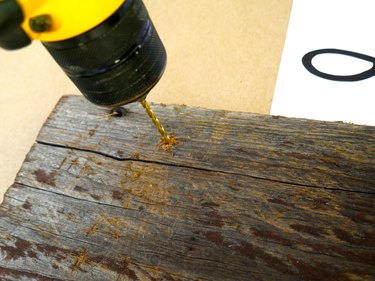
Step 2: Drill Through the Mark
Put a piece of scrap wood under the wooden sign to protect your work surface from being drilled. Place the drill bit on the chalk mark and drill a hole entirely through the wooden board.
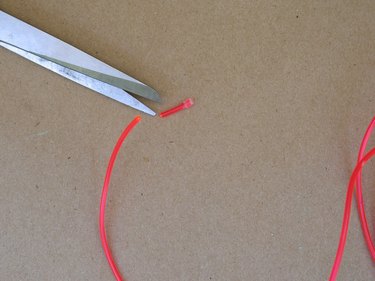
Step 3: Trim the Tip of the EL Wire
The EL wire comes with a small plastic cap over the tip. Trim it off with scissors so that the tip of the wire will fit through the 1/8-inch drill hole.
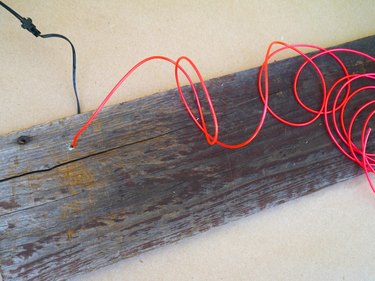
Step 4: Feed the Wire Through the Drill Hole
Enter from the back, and feed the trimmed tip of the EL wire through the drill hole to the front. Pull all of the EL wire through until the black wire attached to the battery pack is at the back of the board.
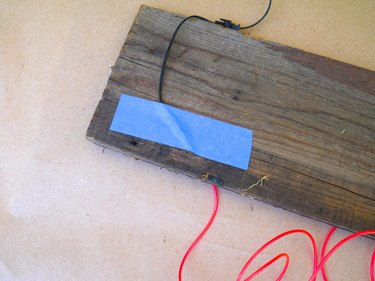
Step 5: Tape the Battery Wire to the Back
Temporarily tape the black wire to the back of the board with painter's tape. This will keep the EL wire from slipping while you work.
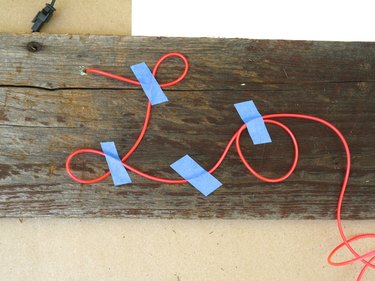
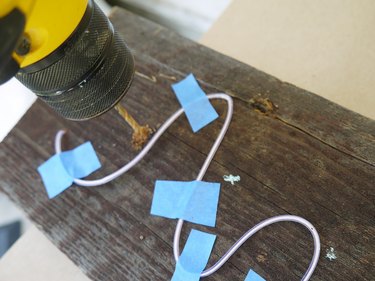
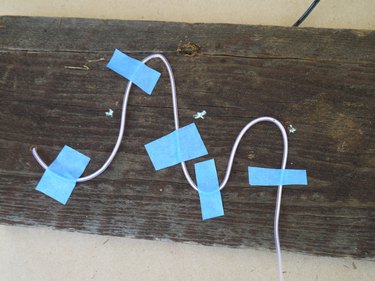
Step 6: Form the Letters
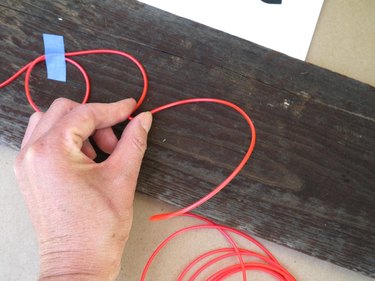
Turn the board over and bend the EL wire into the shapes of the letters. Keep the template handy to see how to bend the letters, but don't worry about copying them exactly. The wire will bend naturally in some directions and not in others, so go with the flow. Use small strips of painter's tape to secure the letters to the board as you form them.
Step 7: Pinch the Wire to Form Pointed Letters
Gently pinch the wire to form any sharp points on letters. In this case, the sharp point is in the letter "v."
Step 8: Adjust Letters as Needed
Continue forming and taping the letters until you finish the word "Love." Check that the entire word fits evenly and is centered on the board. At this point, the wire is easy to manipulate, so if the spacing seems off or if the letters seem too big or too small, you can adjust as necessary.
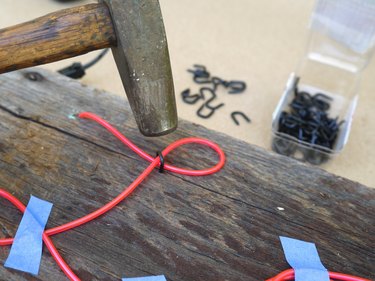
Step 9: Tack the Letters Down Permanently
When you are happy with the layout, remove the first piece of tape and place a double-pointed tack to secure the EL wire permanently to the sign. Gently tap the tack into place with a small hammer just until the wire is snug. Do not tap too hard, as this could cut off the flow of the luminescence through the wire. Continue tapping tacks and removing tape throughout the rest of the letters.
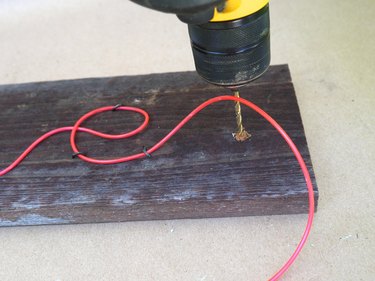
Step 10: Drill a Hole Where the Word Ends
Drill a hole where the EL wire should end at the end of the word, and thread the excess wire through to the back of the board.
Step 11: Secure the Wire and Battery Pack
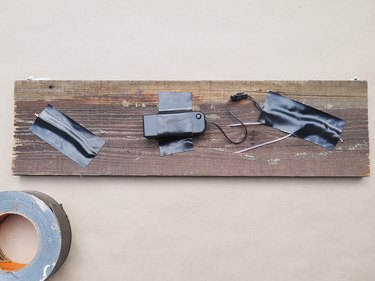
Turn the sign over and trim the excess EL wire with scissors, leaving about 2 extra inches. Use duct tape to tape the excess wire down and secure the battery pack to the middle of the board. Be sure not to tape over the on/off switch on the battery pack. Remove any temporary painter's tape and secure any loose wires with duct tape for a more secure hold.
Step 12: Make a Hanger
Nail two double-sided tacks to the top of the sign, one on each end. Tie a 2-foot piece of ribbon inside the tacks to make a hanger.
Step 13: Make the Remaining Signs
After the first sign is complete, make the others following the same guidelines. Here are a few tips to help along the way.

Tip 1: Crossing and Dotting Letters
Sometimes the wire just won't bend enough to form certain letters, or you'll need to cross a "t" or dot an "i." To solve these dilemmas, finish shaping the word without the dots or crosses. Drill a hole where the word ends and thread the excess wire through to the back of the board. Then mark the wood with chalk where the crosses or dots should go and drill extra holes in these marks. Thread the wire through the hole from the back, out to the front and then back through to the back, like sewing. Secure the wire with duct tape on the back of the board.
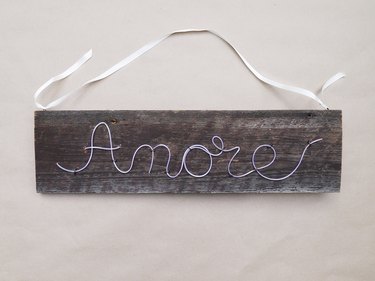
Tip 2: Shaping the Word "Amore"
"Amore," the Italian word for love, is the trickiest of the four signs because the wire won't bend enough to make the letter "m," and the capital letter "A" needs a cross. Fix these two problems in one fell swoop.
Start by marking the wood where the "A" will begin and drill a hole in the mark. Feed all of the wire through the hole from the back. Form the first part of the "A" and the first hump in the "m" with EL wire and tape into place. Then use chalk to mark the bottom of the first hump in the letter "m" and another mark at the top of the second hump. Also mark with chalk where the cross over the letter "A" begins and ends. Drill holes through the four marks. Feed the wire through the bottom of the first "m" hump and come back through the left side of the "A." Cross the wire over the "A" and thread the wire through to the back, entering again at the beginning of the second hump in the "m." The rest of the word should go smoothly from here.
Display the Signs on the Wall
Cluster the signs on a wall, line them up in a row, or hang them sporadically throughout a space. To turn them on, simply turn the power switch to the "on" position on each battery pack. The possibilities for an illuminated sign are as numerous as the different ways to say "love."
Light Up the Signs at Night
The signs really pop when you light them up at night. Hang them for festive wedding reception decor, baby showers or other special events, or simply set the mood for love on your patio or deck.