No Halloween angel costume would be complete without a lovely angel halo, and it is not hard at all to make one on your own. A halo symbolizes holiness, and looks like an arc or circle of glowing light around a holy person, angel or saint's head. Halos were first seen in ancient religious art, and nowadays they are still seen in artwork, but also in holiday decorations, cartoons and many other places.
Ways to Make a Halo
Video of the Day
You can make a halo for an angel costume in several different ways, but the most straightforward is to use a headband, craft wire and a feather boa or furry or sparkly garland. You can use gold, silver or white tinsel garland, or even try a bold color if you prefer. Try to find headbands that match the color of your hair – that way they will be camouflaged and the only thing others will notice is the halo itself.
Video of the Day
Other ways to make a DIY halo crown include using craft pipe cleaners to make the halo piece, or even using zip ties. Actress Amber Heard rocked the Met Gala back in 2018 by wearing a gold halo headband made from zip ties; it was made by Etsy designer Apatico. This is an easy-to-replicate halo for an angel costume, since all you'll need to do is paint and attach the ties, and you can expect to get countless compliments when you wear it.
Things You'll Need
Measuring tape
Craft wire
Wire cutter
Scissors
Headband
Feather boa or garland
Glue
Safety gloves
How to Make a DIY Angel Halo
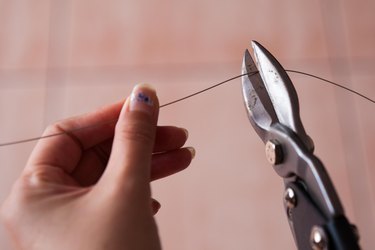
Step 1: Measure and cut wire
First, measure your head using a tape measure. Then, measure out enough wire for the halo; it will need to go completely around your head. Cut the wire using wire cutters.
Step 2: Wrap the wire around a headband
Begin to wrap the wire around the top middle part of a headband. Be careful as you work not to poke yourself with the ends of the wire. You might wish to use pliers to bend the ends of the wire so they are looped over themselves, rather than raw edges.

Step 3: Make a loop
Once you've secured the wire to the headband, you'll need to bend the remaining wire into a circle to make the halo shape. Fasten the circle by making loops on the ends of the sire and connecting them; twist them so they do not come apart. You may wish to add the glue where the pieces of wire come together, as well as where the wire is attached to the headband, so it won't come apart during wear.

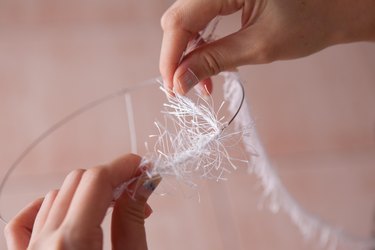
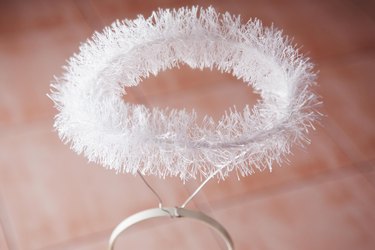
Step 4: Glue on a garland or boa
Next, you'll make your halo fuzzy and ethereal by gluing on a garland or feather boa. Apply glue to the wire circle; apply it just to one part at a time if using hot glue, since this tends to harden very quickly and you may be unable to work fast enough before the glue dries.
Wrap the garland or feather boa around and around the halo's circle, making it tight to ensure complete coverage of the wire. Continue until you have encircled the entire halo.
If you are using hot glue, be very careful not to touch any of the glue with your fingers as you work. You can wear work gloves, just to be safe.