Things You'll Need
Handy box
3/8-Inch drill/driver
Masonry bits
Plastic anchors
Wood screws
Screwdrivers
12/2 Type AC cable
Two AC cable connectors
AC cable cutter
Wire cutters
Wire strippers
Needle nose pliers
Duplex receptacle
Black plastic electrical tape
Handy box duplex receptacle cover
Installing a new handy box for a receptacle is an easy project, even for the beginner. Unlike a regular device box that requires you to cut an opening in the wall to mount it, a handy box mounts on the outside surface of the wall. Like the handy box itself, the wiring for handy boxes is, as a rule, also surface mounted. If this wiring is in such a location where it subject to damage, you will have to wire it using armored cable or enclose the wires in a conduit system-rigid conduit, thin wall conduit, or metal flexible conduit. Armored cable is the better choice when just installing one handy box because eliminates the need for specialized tools.
Step 1

Mount the handy box in the desired location. If you're mounting it on a concrete, cement block, or brick wall, you will need to drill the wall using the appropriate size masonry bit (the one that came with the plastic anchor kit), drive in the plastic anchors, and screw the box to the anchors. If you are mounting it on a wood wall, select a spot over a stud and screw directly into the stud.
Video of the Day
Step 2

Remove a knockout from the side of the handy box. Drive it inward into a horizontal position with a screwdriver and hammer, then wiggle it back and forth with Lineman's pliers until it snaps free. Install a cable connector in the hole.
Step 3

Cut a length of cable to reach from the new handy box to the handy box where you are picking up the power for the new receptacle. Cut it long enough so that the individual wires will extend 6 to 8 inches inside each box.
Step 4

Turn off the circuit breaker controlling the receptacle you will be connecting to. Remove the cover plate and the two No. 6-32 "captured" screws securing the receptacle in the box. Pull the receptacle from the box.
Step 5

Install a cable connector in this box as you did in Step 2.
Step 6

Run the cable between the two handy boxes and secure in the boxes by tightening the clamping screws on the connectors. Support the cable between boxes with cable staples at intervals not exceeding 48 inches.
Step 7

Remove 3/4 inches of insulation from the individual wires. Make loops in the stripped ends using the needle-nosed pliers.
Step 8
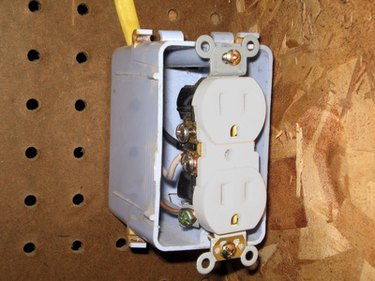
Attach the black wire and the white wire to the brass screw and silver screw respectively. Place the loops under the screws in a clockwise direction and tighten the screws.
Step 9
Wrap the screw terminals with tape. Secure both receptacles in their boxes. Install the handy box covers. Turn on the circuit breaker.
Video of the Day