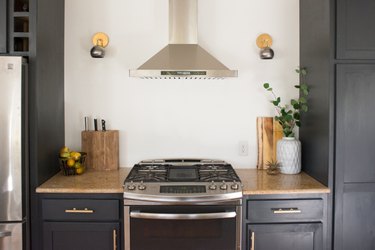
Whether you need extra lighting for your cook space or just need a little more visual interest on a wall, sconces are a great way to improve a room. They can work in so many places: from kitchens, to bathrooms, flanking a bed or adding character to a fireplace. They're a simple way to add visual interest and provide a good amount of bang-for-your-buck, given how little effort they take to install.
Video of the Day
Things You'll Need
Sconce light fixture
Tape measure
Level
Pencil
Electrical circuit tester
3-1/2" round electrical box (plastic 'old work' box, or metal shallow box)
Drywall saw
Cable stripper
Wire stripper
Screwdriver
Step 1: Decide on the Sconce Placement
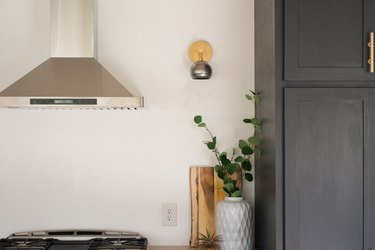
Mark the wall location where you want to position the sconce. If you are centering the sconces above a cabinet, use a tape measure and a level to mark a center point line above the cabinet, and have a helper hold the sconce up on the wall to help you visualize the placement along this center line. Take into account whether your sconces will hang down, out or up. The sconces in this tutorial were mounted at 42" above the cabinet.
Video of the Day
Step 2: Have Circuit Wires Run
This tutorial assumes that you will have circuit wires run to the location for the wall sconce lighting fixture by a licensed electrician, but that you will be installing the electrical box and connecting the wires to the light fixture yourself. Make sure your electrician understand where you want the light fixture when you instruct them.
The type of electrical box you need will depend on whether the wall sconce is positioned over a stud location, or between studs. This project has one of each. Use a 3-1/2-inch plastic 'old work' box if the sconce will be positioned between studs, or a 1/2-inch-deep round metal box if it will be directly on a stud location.
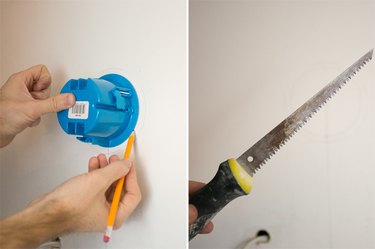
Step 3: Mark and Cut Your Drywall
First, make sure the wires run by the electrician are shut off. Use an electrical circuit tester to make sure the wires are dead before proceeding. If they are live, turn off the circuit breaker that controls these wires. Retest to make sure the wires are not active.
Locate the mark that you made in Step 1. Using the edge of your electrical box as a guide, draw a cutting circle around the mark that you made. Now use a drywall saw to cut out an opening for the electrical box. Make sure to stay inside the circular lines to ensure that you have a good fit. Don't force the saw, just use an easy in and out movement. Pull the electrical cable out through the opening you just cut.
Step 4: Prepare the Wires
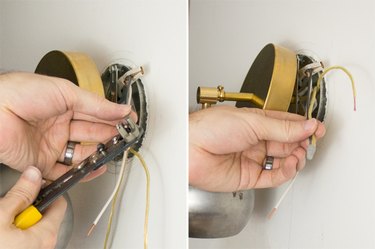
Use a cable stripper to remove about 12" of the outer jacket of the electrical cable, then trim away the protective jacket on the cable. Now use a wire stripper to remove about 1/2" of the insulation on each individual wire that was inside the cable. There will be a black (hot) insulated wire, a white (neutral) insulated wire, and a bare copper grounding wire.
Tip
Before working on your own electrical projects, please make sure you are familiar with your region's building codes and always be safe.
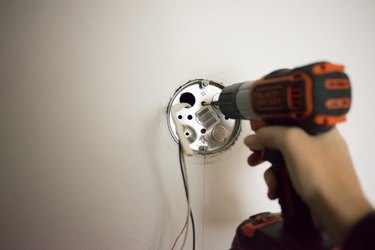
Step 5: Install the Electrical Box
In our project, we installed two sconces that flanked the range hood. One sconce fell between wall studs, requiring a plastic 'old work' box. The other fell on a stud location, requiring a shallow, 1/2" deep metal box.
For the 'old work' box, first pry open an opening on the back of the box and thread the wires into the box. Then simply insert the box into the opening you cut, and tighten the screws that draw the box clamps tight against the back of the wallboard.
For a shallow, metal box, open a knockout on the back of the box, attach a cable clamp into the opening, and thread the circuit wires into the box. Insert the box into the wall opening and anchor it against the stud with screws driven through the back of the box.
Step 6: Add the Sconce and Wire
The mounting details for a sconce light fixture may differ slightly, depending on the style of light fixture used. Generally, there will be a metal bracket of some type included with the light fixture kit. Begin by attaching this bracket to the electrical box, using the included screws. Now thread the circuit wires through the center hole in the strap. The next step will be a little tricky. Before you can attach the light fixture to the mounting strap, you'll need to hold the light fixture in place as you connect the wires.
The light fixture wires are usually braided copper. The neutral wire from the light fixture will always have white insulation; twist this wire together with the white circuit wire inside the electrical box and secure the connection with a wire connector screwed down over both wires. Most light fixtures come with the wire connectors included.
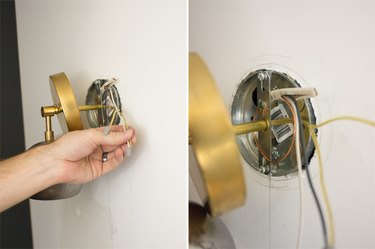
The remaining wire in the light fixture is the "hot" wire, and its appearance may vary depending on the light fixture style: it can be black, red, or yellow, or is sometimes a striped wire. Connect this remaining fixture wire to the black circuit wire from inside the electrical box, using the same method as for the neutral wires. Now attach the bare copper grounding wire from the electrical box to the green grounding screw on the light fixture. Tug gently on all connections to make sure they are secure.
Finally, gently tuck the wires into the electrical box, fit the light fixture housing onto the electrical box, and secure the light fixture with the provided screws. Turn on the circuit breaker controlling the circuit and make sure your light fixture operates.