Whether you're a mother who saves an article featuring your son's soccer team or a journalist producing content every day, one of the best ways to protect an article is by scrapbooking it. The process offers you many options, allowing you to keep the article from aging while presenting it in a personal or professional light. If you've never 'booked before, don't worry. All it takes are a few simple steps and your memory will be protected in a place that allows you to show it to visiting family or a prospective employer.

Video of the Day
Things You'll Need
Scrapbook With Protective Covers
Scrapbooking Paper
Newspaper Article
Adhesive
Decorative Supplies
How to Scrapbook Newspaper Articles
Step 1
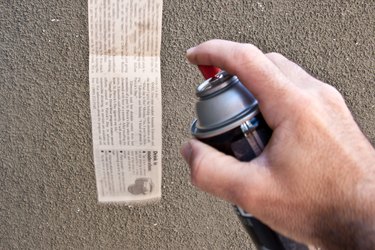
Spray the front and back of the article and any accompanying photos with a deacidifying spray after cutting it out. This will keep it from turning yellow. According to ScrapJazz, you can even spray articles that are already turning yellow.
Video of the Day
Step 2

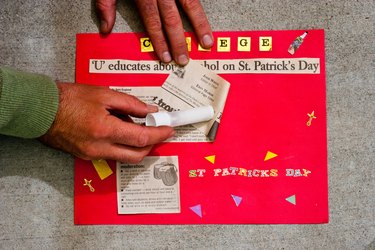
Position the article and any accompanying photos on scrapbooking paper before gluing it down. Ensure that the layout you use is the one you want. This includes choosing a background color you like. According to "All Things Scrapbooking," you should choose colors that match the photo (if applicable).
Step 3

Decorate the empty spaces of the page around the article. This can include anything from decorative stickers bought from the store to letters that spell out the headline or numbers that list the date in the margins. Again, lay all your decorative materials out before you glue them down.
Step 4
Secure the article and decorative materials with an acid-free adhesive. According to ScrapbookScrapbook, household glue sticks work well as an adhesive for beginners. Ensure you've applied enough adhesive to the article and decorative materials so that they won't come loose. Allow time to dry.
Step 5

Insert the page into a scrapbook cover. This cover will protect your entire page but still give you the option of taking it out again and adding to it if necessary. Alternatively, you can laminate the page and punch three holes in the left-hand margin, but once you laminate it you cannot add to the article.
Step 6
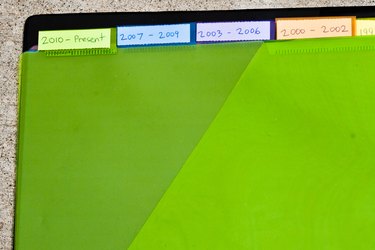
Categorize the pages chronologically. You can either place them most recent to least recent or vice versa, whichever makes more sense for your project. You might also consider a table of contents, which will make it much easier when you're trying to find a specific article.
Tip
You can laminate the article before putting it on the page to add a layer of protection.
Before decorating your pages, consider if you'll use the book for personal or professional use. This should guide how you decorate it.