Things You'll Need
Drill with masonry bit
Masonry screws
C channels
Resilient sound clips
Furring channels
Drywall screws
Sound-resistant plasterboard sheets
Drywall damping compound
Drywall sheets
Soundproofing a ceiling generally involves the addition of insulation and drywall to add mass to the ceiling and block the flow of sound waves. With concrete ceilings, the task becomes more complex because insulation cannot be added to the inside of a ceiling, and simply applying drywall won't be as effective. To properly soundproof a concrete ceiling, space must be created for the sound to pass through before it encounters the drywall and sound insulation you add. This space allows the sound to disperse after passing through the concrete, with the dispersed sound being blocked by drywall and insulation.
Step 1
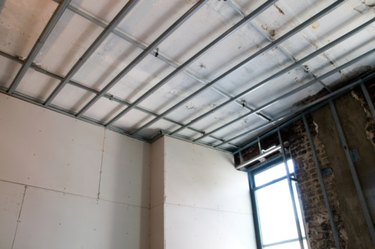
Attach specialized metal bars known as C channels to the concrete ceiling. These channels create the basis for the open space needed to soundproof your concrete ceiling. The open space needs to be at least 3 inches deep, so select C channels of the appropriate size. Drill holes into the ceiling using a masonry bit, then connect the channels using masonry screws.
Video of the Day
Step 2
Attach metal clips known as resilient sound clips or isolation clips to the C channels you placed on the ceiling in Step 1. These clips provide a place for bars known as drywall furring channels to be attached so that drywall and plasterboard can be hung from the ceiling. Place the resilient sound clips every 48 inches across your ceiling, approximately 7 to 10 inches apart along the C channels.
Step 3
Connect your furring channels to the C channels by attaching them to the isolation clips with bolts or screws. Make sure the furring channels are securely attached, as they will support the weight of the drywall and plasterboard you hang on the new ceiling.
Step 4
Hang a layer of sound-resistant plasterboard, using drywall screws; the screws should attach to the furring channels as a connection point. You do not need to finish or sand the plasterboard once it is hung because you will add additional layers beneath it.
Step 5
Apply a drywall damping compound to additional pieces of sound-resistant plasterboard or to standard drywall. Hang the drywall or plasterboard on the ceiling as well, with the damping compound facing up so that it is spread between the new drywall and the original plasterboard. Cut the drywall plasterboard pieces so that the seams don't overlap with the seams of the sound-resistant plasterboard.
Step 6
Finish and paint the drywall as you normally would. The space between the new ceiling and the original concrete ceiling combined with the sound-resistant plasterboard and the damping compound will significantly reduce the amount of sound that passes through the ceiling.
Tip
Place sound-resistant insulation between the C channels before hanging the furring channels and drywall to increase the effectiveness of the soundproofing.
Video of the Day