Things You'll Need
30-feet of 2-by-2-inch square tubing
Light trailer axle
U-bolts
2 wheel hubs (with wheels attached)
Treated lumber
6 Lag bolts
Hitch hardware and bolt kits
Drill
Welding material
Ratchet set
Hacksaw
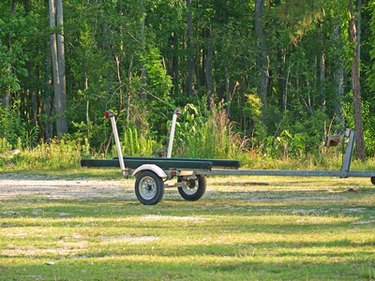
Utility trailers are useful when transporting light-weight cargo. There are various types of utility trailers ranging from an open-top rear cargo area to enclosed areas. Some of the enclosed trailers come with shelving units to organize the cargo that is being carried. Depending on the size and weight capacity of the trailer, you can build your own trailer which can be much more cost efficient than purchasing a new utility trailer.
Step 1
Cut three 4-foot long identical pieces of 2-by-2-inch square tubing to use as cross members on the trailer's main frame.
Video of the Day
Step 2
Cut three additional 5-feet long pieces of square tubing with the hacksaw. These will be used as the sides of the trailer's main frame. Set one pipe aside for later use.
Step 3
Drill holes into each end of the 4-foot tubes and two of the 5-feet square tubing. Drill an additional hole in the center of each 5-foot long tube.
Step 4
Join the ends of the 4-foot long pieces to the ends of the 5-foot long pieces to form a rectangle. Secure the tubes to each other with the lag bolts.
Step 5
Place the remaining 4-foot long tube in the center so the holes at the center of the 5-foot long pieces are aligned with those of the 4-foot tube. Secure the crosspiece tube with lag bolts.
Step 6
Affix the light trailer axle to the center cross member of the trailer's main frame with U-bolts.
Step 7
Use the remaining 5-foot long tube to serve as the trailer's tongue. Attach the tube to the front of the trailer with lag bolts.
Step 8
Mount the bolt-on hitch to the trailer's tongue by using the included hardware.
Step 9
Weld the two wheel hubs with the wheels attached on each side of the trailer. Make sure that the crosspiece is situated behind each hub to balance the trailer.
Step 10
Cut the treated lumber into several 5-feet pieces in order to form the trailer bed. Place the pieces on the trailer's main frame and bolt the pieces to the top of the trailer frame using the lag bolts.
Tip
You can leave small spaces between the pieces of treated lumber when forming the trailer’s bed in order to allow mud and water to fall through the boards. The pieces can be butted up against one another to form a solid floor. The trailer hitch kit will normally come with instructions on how to attach the bolts since each kit is different. Follow these instructions to affix the bolt to the trailer hitch. Steel flooring can also be used to create the trailer’s bed.
Warning
Wear safety equipment when working with metal and welding.
Video of the Day