Whether beach-combing, hiking in the forest or walking through your neighborhood, you may come upon fallen branches in many places. With a little imagination, you can transform those branches into beautiful wall art using a few simple supplies. But even if you don't have access to real branches, or just don't feel like leaving home to source your craft materials, this project is still doable. Just order some realistic-looking faux branches; they may be on the thinner side, so you'll need a lot of them to make a large piece of wall art, but will still work.
Video of the Day
Things You'll Need
Large scrap of cardboard, approx. 2 1/2 feet long by 2 feet high
20 to 25 short tree branches, 1 inch diameter or less, 18 inches long or less
Craft paint, 4 different shades of one color
Large tree branch, 2 to 3 inches in diameter and 2 1/2 feet long
Step 1: Clean the Branches
Scrub branches with warm water to remove mud, dirt and loose bark. Let them dry completely before using.
Tip
Choose branches that are completely dead and have been broken off the tree for a while. You'll know if a branch is dead if it snaps when you try to bend it. Green or living branches tend to bend first and have several sinewy slivers at the breaking point. Smooth branches work best for this project, so avoid branches that have rough-textured bark that would be hard to remove.
Step 2: Draw the Template
On a large piece of cardboard, use a pencil to sketch out a large heart (or another shape of your choice). Then with a permanent marker, draw over the sketch for an easily visible template of the wall hanging.

Step 3: Lay Branches Over the Template
Starting with the thickest branch in the middle, lay branches vertically as they correspond to the height allowance.
It will probably be necessary to cut some larger branches down to size. Arrange these branches on the template and mark where the break needs to be with the permanent marker. Use sturdy pliers to break the branch at that exact location. Pliers are used instead of a saw to preserve the organic look of the broken branches.
Tip
Acrylic paint works well for this project. To get four shades of the same color, buy individual paint tubes or pick up a value pack of paints and create your own ombre shades by mixing white into another color. Use a flat brush to apply paint to the branches. If you want to create a piece of art that's all one color, using spray paint is the easiest way to evenly coat all the branches.
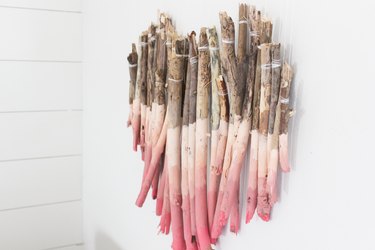
Step 4: Paint the Branches With an Ombre Effect
Moving across the middle of the arranged branches, mark where you want the lightest paint color to end on the heart, about halfway up the middle branches. Start painting with the darkest color on the bottom two inches of the middle branches. Make sure to paint all the way around the branches.
Paint the second darkest color a couple of inches above the darkest color. Lightly overlap the two colors so that they blend together. Repeat this process for the second lightest color and the lightest color.

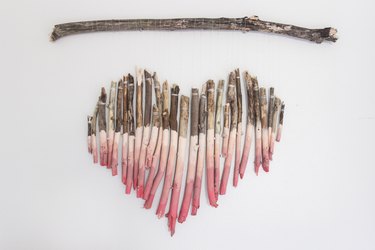
Step 5: Tie the Branches to a Hanging Branch
Position the large hanging branch horizontally above the heart branches on the template. If you don't have a large branch, use a long wooden dowel instead.
Wrap clear invisible nylon thread around the large horizontal branch, tie a knot and run a taut line to the outermost vertical branch on the heart. Firmly place your finger right where the thread will need to be wrapped around the vertical branch. Without removing your finger, lift the branch off the template and wrap the thread around the branch several times, so that it slightly overlaps both sides of the mark that your finger is securing. Once you have wrapped the thread around the branch about 10 times, tie a knot to the vertical taut line and trim any excess thread.
Repeat this process for all of the branches, making sure the large horizontal branch is level to the heart and the vertical branches stay in their locations within the template every time you tie a knot.
Step 6: Adjust the String Spacing
In order to get an accurate location for each branch, hang the large horizontal branch on the wall, using two nails spaced about one-foot apart. Gently slide any strings over so they hang close together. They shouldn't be touching too much, but don't place them too far apart.
Tip
Using nylon thread ensures that the thread will not break when making adjustments to the branches.
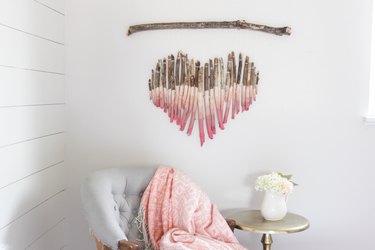
The finished result adds a textural and colorful feature to your walls that can be used seasonally or year-round. With different paint colors (or no paint at all), this tree branch art piece can work in a variety of rooms and suits numerous design aesthetics.
