Things You'll Need
2 pieces bubble wrap, 30-inch square
Wool batt, 6 ounces
Window screen fabric, 30-inch square
Water
Pot
Stove
Dish soap
Large bowl
Textured roller, large and small sizes
Meat mallet
Hat shaper, fedora
Steam iron
Fabric shears
Ribbon, 1-inch wide
Sewing Needle
Thread
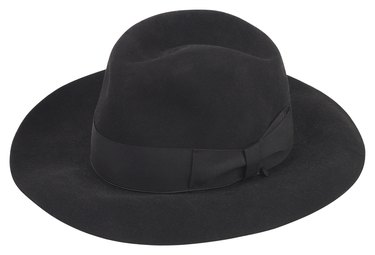
It is precisely because the felting process is so difficult and labor intensive that making your own felt fedora can be a rewarding experience and a topic of conversation. Fedoras are a readily recognizable style of hat that, due in part to iconic movie heroes favoring them, give the wearer an air of adventure and sophistication. Unlike other cloth hats, however, the felt for the hat is formed in the very process of making the hat itself. The extra labor this requires will reward you with a streamlined appearance and an incredibly sturdy end result.
Prefelting
Step 1
Portion out the wool batt. The exact amount of wool necessary to make a fedora will vary by size and your diligence in the felting process, but 6 ounces is a good starting point for a first attempt. Peel apart the wool batt layer by layer and set aside.
Video of the Day
Step 2
Prepare the felting surface by laying down the two pieces of bubble wrap, smooth side up, next to each other. Place the wool layers on one of the pieces of bubble wrap, one layer on top of the other, arranging the fibers in a crisscross pattern. Create a circle that is 26 inches in diameter using this process. Once all your allocated wool has been placed on the surface, cover the fibers with a sheet of window screen fabric. Ignore the second piece of bubble wrap for now.
Step 3
Heat water in a pot on a stove until it is near boiling. Mix in a small amount of dish soap, just enough to make it slightly sudsy. Maintain the heat throughout the felting process.
Step 4
Pour the still-hot soapy water over the netting until the fibers are saturated. Press down on the screen to remove air bubbles, and then rub the fibers through the screen in a circular motion. This begins the felting process. Add additional hot soapy water as necessary to keep it wet. Once the fibers start to work through the screen, carefully remove it and continue rubbing the wool directly with your hands. Occasionally stop and pound the surface with your fist, then resume rubbing. Continue this until you are able to lift a few fibers and, instead of pulling away, they lift the rest of the fabric with them.
Step 5
Slide your hands underneath the bubble wrap and flip the fibers over onto the second piece of bubble wrap. Cover the fibers with the window screen, and add more hot soapy water. Press down again to remove any new air bubbles, then begin rubbing this side with the same circular motions and pounding action as with the first side. Remove the screen once it appears fibers are working their way through. Continue to rub and pound this side until it holds together as well. The fibers are now at the soft felt stage and you are ready to begin shaping the felt.
Felting in Earnest
Step 1
Transfer the soft felt to a lipless bowl that is slightly larger than the desired interior of the final product. Add additional hot soapy water if necessary. Resume rubbing and pounding the felt until it takes the shape of the bowl and can maintain that shape once removed.
Step 2
Remove the felt from the bowl, fold it brim to brim and place it back on the bubble wrap or a hard textured surface. Roll the felt from brim to crown several times using a textured roller. Alternate this with beating the felt with a meat tenderizer, also from brim to crown.
Step 3
Unfold the felt, turn it 90 degrees and refold it. Roll and beat the felt again.
Step 4
Unfold the felt, turn it inside out and refold it. Continue to roll and beat this side as well. Unfold it, turn it 90 degrees, refold it and roll and beat it some more. Continue this process until the felt becomes pliable and retains the form it is shaped into. It will be slightly clay-like at this point.
Step 5
Rinse the felt thoroughly with clean water to remove all soap.
Shaping the Fedora
Step 1
Place the felt, best side up, on a hat shaper designed for fedoras. Apply steam to the crown using the iron and then alternate between beating the crown with a meat mallet and rolling it with a small textured roller until the crown is firm. Apply steam often during this process.
Step 2
Steam the brim with the iron. Alternate between beating it with a meat mallet and rolling it with the small textured roller. Steam often. Continue until the brim is stiff.
Step 3
Lightly press the hat with the iron itself, and pay particular attention to the front creases and top indentation.
Step 4
Remove the hat from the shaper and trip the brim to the desired shape using fabric sheers. Let the product sit, cool and dry until the next day.
Step 5
Measure and cut the ribbon so that it will wrap around the hat where the brim joins with the crown. Using the thread and needle, sew the two ends of the ribbon together and slide it over the top of the hat. The hat is now ready to be worn.
Tip
If you want a colored fedora, wait until the hat is complete and then prepare a large pot of dye and submerse the hat for around 30 minutes. If you plan on dying the hat, then it is advisable to make the hat slightly looser than desired since dying can continue the felting (and thus shrinking) process.
Felting is not a simple process and the result can vary depending on your technique. If this is your first time felting, plan on having enough excess wool so that you can test the process first, before working on the hat itself.
Since felt can be itchy, you may wish to make a lining out of a smoother fabric to sew on the inside of the hat.
Warning
Do not use water that is so hot that you scald yourself while working with it, but do keep the water as hot as is safely possible.
Video of the Day