Things You'll Need
Glass jar
Dish soap
Washing-up brush
Rubbing alcohol
Clean, soft cloth
Latex gloves
Air-dry, acrylic enamel glass paint
Small, soft paintbrush
Three-dimensional gold paint
Tea-light
Box of long, fireplace matches
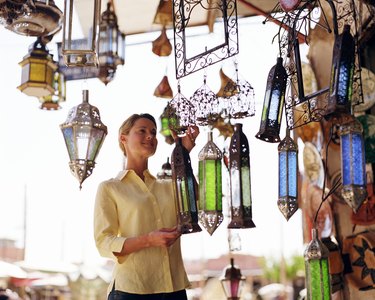
Homemade Moroccan lanterns are an attractive and inexpensive addition to a themed home makeover. Moroccan decor is warm and vibrant. Traditional Moroccan colorfulness shows up in traditional tiling, fabrics and use of stained glass. Lanterns made from colored glass throw off extra color and moving shadows to enhance an overall exotic impact. Make your own from recycled jars as a cheap and environmentally-friendly option to buying ready-made lanterns.
Step 1
Collect glass jars of different sizes and shapes. Save sauce, storage, pickle, coffee and jam jars. Any jars that are large enough to safely hold a tea light will work.
Video of the Day
Step 2
Soak a lidless jar in hot water and dish soap until the labels come off easily. Scrub off glue residue with a washing-up brush. Rinse and leave to dry. WIpe rubbing alcohol over the dried glass jar with a clean soft cloth.
Step 3
Put on latex gloves and use a smallish, soft paintbrush to completely cover the inside of the jar with glass paint. Blues, purples, deep reds and terracotta colors all work in Moroccan decor. Air-dry enamel glass paints are easy to use. They are durable, cure in 24 hours and don't need any heat treatment.
Step 4
Use three-dimensional gold paint on the outside of the jar to create the appearance an ornate outer brass structure. Squeeze the paint through the applicator to cover the top and bottom of the jars with solid layers. Outline these layers with circular or geometric patterns using more of the 3D paint. Alternatively, create patterns on the jar with dots of the 3D paint. Look at pictures of Moroccan lanterns to get ideas.
Step 5
Leave to dry for 24 hours before use.
Step 6
Place a tea light -- traditional or battery-operated -- in the bottom of the jar. Light with a long, fireplace match.
Tip
Make several Moroccan-style lanterns in different colors to spread around the room. They look pretty by day and throw out multi-colored light when lit at night. Wind fine-gauge wire tightly around the neck of lanterns and create a loop to hang lanterns.
Use sandalwood-scented candles to add to the mystical Moroccan atmosphere.
Warning
After washing and drying jars ready for painting, avoid touching them unnecessarily. Wear latex gloves because the natural oils from your hands may negatively affect the glass paint.
Video of the Day