Bleach art on fabric is an interesting way to transform ordinary pieces of fabric and turn them into one of a kind artwork pieces that can be used for clothing, home decor crafts and other creative DIY projects.
One of the great things about bleach art is that it doesn't have to be perfect and can be really forgiving. You can be an experienced artist or a curious beginner and achieve fun and unique results while experimenting with bleach.
Video of the Day
The best fabrics for bleach are definitely natural textiles, such as cotton, linen and denim, because they absorb the bleach well and hold up better during the bleaching process. Avoid synthetic fabrics, like polyester, as they can be unpredictable and may not react as effectively with bleach.
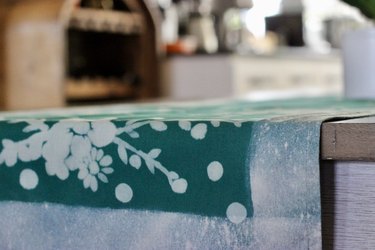
Check out some of the basic techniques and tips I used to create this table runner. Hopefully, this will inspire you to try bleach art soon!
Video: Bleached Table Runner

Things You'll Need
Fabric (preferably dark-colored)
Liquid bleach or gel bleach
Brushes and sponges
Old newspapers or cardboard
Protective gloves and eyewear
Face mask (optional)
Masking tape or painters' tape (optional)
Stamps (optional)
Stencil (optional)
Pressed flowers (optional)
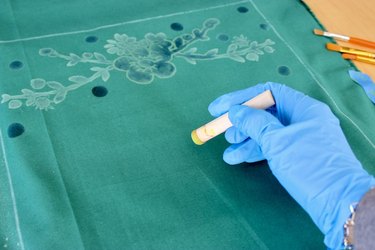
Seamstress chalk (optional)
Spray bottle (optional)
1. Prepare your workspace
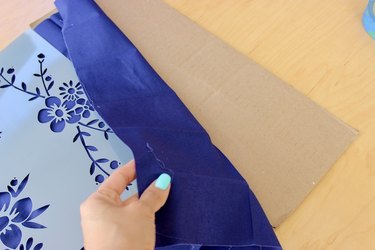
Protect your workspace from bleach spills using old newspapers or cardboard.
Take your project outdoors if possible or work in a well-ventilated area with the windows open. Wear protective gloves and eyewear to safeguard your skin and eyes from contact with bleach. Consider using a face mask, especially if you are sensitive to smells.
Warning
It’s super important that you take all precautions into account when working with bleach. Avoid contact with skin and eyes and work in a well-ventilated area to minimize inhalation of bleach fumes. If bleach comes in contact with your skin or eyes, rinse immediately with water.
Always test your bleach mixture on a scrap piece of fabric to see how it reacts. This will help you notice the effects of the bleach on that specific type of fabric and color, and you can make any adjustments before applying it to your final piece.
Tip
Don’t forget to prewash your fabric before you start your project to remove any finishes that may interfere with the bleaching process. Make sure the fabric is completely dry before applying bleach.
2. Create a design
There are many ways to create designs on fabric using bleach, from hand-painted strokes to silhouettes made of pressed flowers. Check out some of the easiest methods:
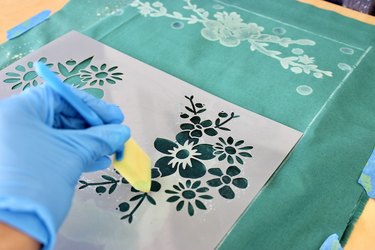
Stencils
Place a stencil on the fabric and dab gel bleach over it to create an intricate and well-scattered pattern. Make sure not to add too much bleach to your sponge so it doesn't bleed under the stencil.
You could use liquid bleach and spray it on top of the stencil as well. Some of the splatters might end up outside of the stencil, so make sure to stay inside the stencil area.
Freehand
Use brushes to apply bleach directly to the fabric and create your own unique designs. Gel bleach works better for this technique because it doesn't bleed as much as liquid bleach. The key is to plan and trace your design using seamstress chalk first. Once the design is ready, you might need to trace the design with bleach a couple of times until you get the desired bleach intensity.
Depending on the project and design, it is important to use appropriate brushes. For narrower and finer strokes, you'll need thinner brushes. For bigger strokes, you'll need thicker brushes. You should experiment in a corner of the fabric to make sure you pick the brush that works best for your project.
Splatter technique
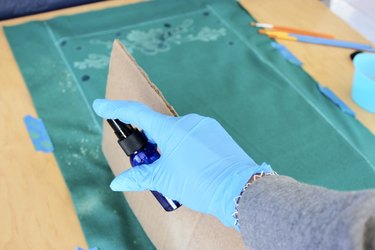
This is an easy and popular bleach art technique that looks quite cute! Dip a hard brush or toothbrush into liquid bleach and flick it onto the fabric to create a splatter effect.
You can also create a similar effect using a spray mist bottle. Use a piece of cardboard to protect areas of your project that you don't want to spray.
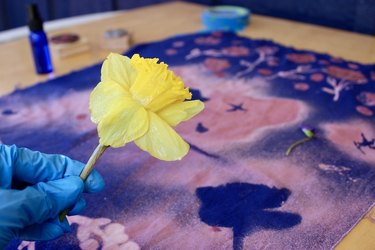
Pressed flower technique
Use some pressed flowers from your garden or any other interesting flat object and place it on top of your fabric. Spray liquid bleach on top. You can get different effects depending on how much bleach you apply. The end result is a cool silhouette with a kind of shadow effect.
Stamps
Carefully dip a wood stamp in liquid bleach or gel bleach to create a one of a kind pattern. Take your time pressing the stamp in your fabric to make sure the shape looks good.
Tape
Use masking tape or painters' tape to create cool geometric shapes. You can apply gel bleach with a sponge, or you can spray liquid bleach. Wait a couple minutes before removing the tape.
Use your favorite technique or a combination of different ones to achieve the desired look for your bleach art project.
3. Apply bleach
When applying bleach to fabric, keep the following tips in mind.
Test first
You always want to test a small area on your fabric first to see how the bleach will react. I also recommend testing different fabric colors, as colors will react differently to bleach. For instance, a navy blue fabric can turn out pink, and an emerald green fabric can turn out beige using the same techniques.
Dilution
Depending on the effect you want to achieve, you can dilute liquid bleach with water to create varying levels of intensity. Start with a small amount of bleach and gradually add more until you achieve the desired effect. A ratio of about one part bleach to three parts water is a good starting point.
Gel bleach shouldn't be diluted because it'll lose the purpose of the consistency. Usually, you want to use gel bleach for more detailed projects and/or to avoid bleach bleeding.
Bleach consistency
Take into account that some projects will work better with different consistencies of bleach. With a hand-painted project, the gel bleach works wonders compared to the liquid version. Liquid bleach is amazing for splats and spray projects.
Control the flow
Use different sizes of spray bottles, such as a fine-mist spray bottle, to control the application of the bleach and use different sizes of brushes or sponges for more precise control.
The bleaching process can vary depending on different factors, so keep an eye on the fabric as it bleaches to ensure you achieve the desired level of lightness.
4. Rinse and neutralize
Wait five to 20 minutes until you get the result you desire.
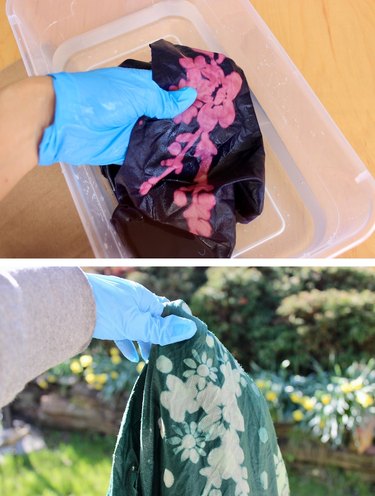
Once you are happy with your design, rinse the bleached fabric thoroughly with cold water to stop the bleaching process.
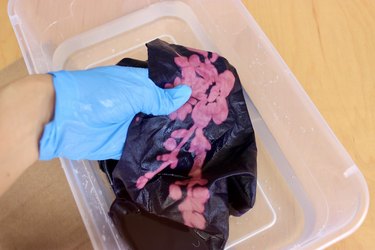
After rinsing, wash the fabric with a neutral detergent to remove any remaining bleach and to neutralize its effects.
5. Drying and care
After washing, air dry your bleach art fabric or tumble dry it on a low setting. Avoid ironing directly over bleached areas, as this may cause discoloration or damage to the fabric. Instead, iron the fabric on the reverse side or use a pressing cloth.
The most beautiful thing about bleach art is that it is so versatile. Have fun experimenting with tools and objects and also with different fabrics and colors until you discover your style.
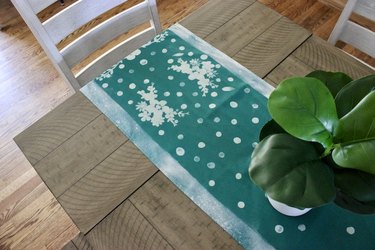
I created this table runner using these techniques. It turned out great, and it looks so fresh on my dining room table!
Some other products you might want to transform with bleach art include dark-colored T-shirts, jeans, tote bags and even canvas shoes. The possibilities are endless!