I was baking one day in the kitchen when I heard a sudden flurry of footsteps. I just assumed that Philip, my then 8-year-old son, was rushing downstairs to play Fortnite. Instead, he found me—and my heartstrings—making snowy skin mooncakes for Mid-Autumn Festival. Mooncakes, if you're not familiar, are a traditional Chinese pastry filled with different fillings (from red bean paste to lotus seed paste) and are typically eaten in East and Southeast Asia during the Mid-Autumn Festival, or Lantern Festival, which celebrates the autumn harvest and full moon.
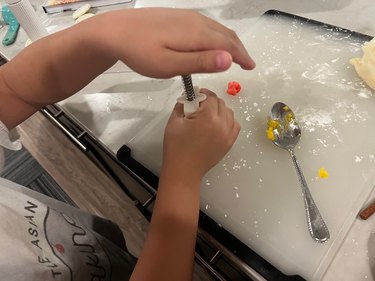
"I love this eggy thing," Philip said, pointing to the fragrant, not-too-sweet but very addictive salted egg yolk and miso custard filling I had made for our mooncakes. With deft hands, Philip flattened a mochi dough ball into a perfect disc. I'm a physical therapist turned baker, and let's just say that occupational therapists would be proud of his fine motor skills! First, he wrapped a ball of filling with the mochi disc and then shaped it into an oval before transforming it into a mooncake with a mold press. At that moment, so much pride, joy and nostalgia flooded me. And I was reminded why I love Mid-Autumn Festival so much in the first place.
Video of the Day
Video of the Day
When is Mid-Autumn Festival?
This year, Mid-Autumn Festival starts on September 29, 2023.
As recipe developer Judy Leung of the blog The Woks of Life puts it, this holiday is "a little like Chinese Thanksgiving." In Korea, the mid-autumn harvest festival happening during this time is called Chuseok, and it's also known as Korean Thanksgiving Day. In Vietnam, the festival is known as a children's festival and is called Tết Trung Thu. In Japan, families celebrate Tsukimi and enjoy tsukimi dango (rice dumplings or mochi stacked in a pyramid arrangement).
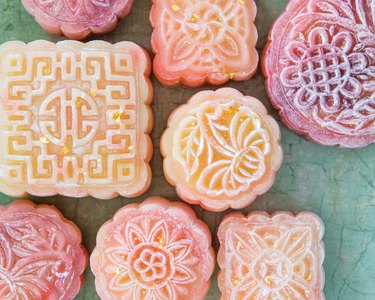
Traditionally, during Mid-Autumn Festival, people in China and Taiwan eat auspicious foods like taro, pomelo and lotus root to ensure good luck and fortune. In the past, my family's sharing table has always been filled with food like steaming hot rice, crispy roasted pork and duck, stir-fried pea shoots and whole steamed fish. These days, my family and I order takeout like fried chicken or pizza on Mid-Autumn Festival—let's just say we've become more flexible and open-minded since the pandemic! However, we still make sure we share mooncakes after dinner. Mooncakes, round like a full moon during Mid-Autumn Festival, symbolize family unity, harmony and togetherness.
And that's exactly what I think of when I make them around the time of the harvest moon for the Chinese holiday. As I mold the dough, I'm brought back to visits with my paternal grandmother, Ah Ma, in Montreal when I was just a kid in the '90s. We'd make mooncakes together using the wooden molds Ah Ma kept for decades. She always made beautiful mooncakes, some in the shape of cute pigs, each shiny from their baked egg wash and almost too adorable to eat. These days, I use reusable molds from Amazon for about $15, and while they're great and easy to use, I yearn so badly for Ah Ma's handmade molds!
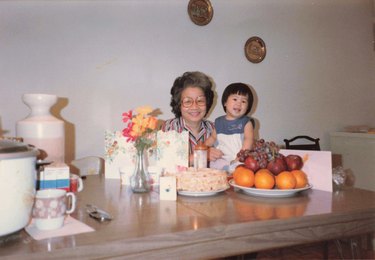
I yearn even more for the beautiful end-of-summer evenings we spent strolling Montreal's Chinatown. The Mid-Autumn Festival celebrations and night market stalls were always spectacular. In one corner, you could watch a confectioner make dragon beard's candy (aka Chinese cotton candy) from scratch, while over in the adjacent stall, a Chinese paper-cutter skillfully created intricate artwork with just a pair of scissors. My favorite vendor, however, was the one who sold paper lanterns of all shapes, colors and sizes. I'd walk down the street under the stars, holding a colorful paper lantern Ah Ma had lit for me. Back then, we didn't have LED candles, so I felt like the most responsible child ever, holding a paper lantern with a real lit candle inside!
As Ah Ma and I stared at the full moon, I always wondered if the Jade Rabbit and the goddess Chang-e truly lived up there. Back then, I believed in Santa Claus (I still do, shhh...), so you can't blame me for thinking those Chinese folklores were real!
Those nights were magical to me, and it's one reason Mid-Autumn Festival remains one of my favorite holidays—that and who doesn't need a good excuse to eat mooncakes? As Philip can attest, they're eat-a-dozen-all-at-once delicious!
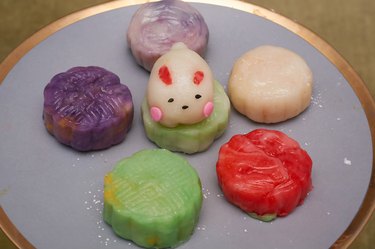
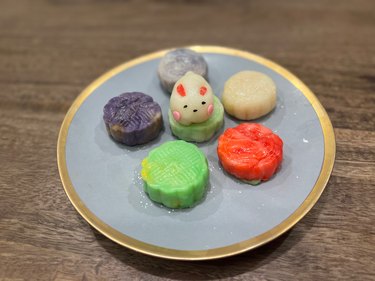
As for the types of mooncakes to make during Mid-Autumn Festival? That's really up to you. In my family, my mother loves traditional mooncakes: white lotus with extra salted egg yolks—the more the better. My husband doesn't care as long as he gets a good bite of any filling with or without the yolk, be it red bean paste, peanut, black sesame or lotus but never any durian fruit! My father, rest in peace, loved nutty and slightly savory mooncakes. (Yes, there are some mooncakes with savory fillings like ham in them!) Philip, well...you already know he loves my snowy skin mooncakes, which you'll learn to make in a few simple steps below.
As for me, I'm not too picky. As long as I'm with my family during Mid-Autumn Festival, any mooncake is sweet and delicious. Especially the durian ones!
How to Make Snowy Skin Mooncakes
OK, recipe time! We're going to make snowy skin mooncakes with salted egg yolk and miso custard. I know what you're thinking: What are snowy skin mooncakes? Unlike traditional mooncakes, snowy skin mooncakes are not baked and are gluten-free. The skin is made with glutinous rice flour and has the mouthfeel and chew of soft mochi.
Tip
This recipe requires a mooncake mold. You can easily find one on Amazon for around or under $15. If you don't have a mold or hand-press, no worries—simply shape and pattern the dough into shapes and designs of your own choosing!
Snowy skin mooncakes originated in the 1960s in Hong Kong and are usually white and served chilled, hence the nomenclature "snow skin" or snowy skin. I love how the skin is milky, and it melts nicely in the mouth. Snow skin mooncakes can be stored for a few days in the refrigerator. They are enjoyed cold or can be warmed for 10 to 15 seconds in the microwave. The skin can also be any color you'd like, making them fun to make with kids! This recipe is from my cookbook, Modern Asian Baking at Home.
Recipe Ingredients
For Mooncakes Filling:
Things You'll Need
45 grams (3 tablespoons) melted butter
120 milliliters (1/2 cup) milk
78 grams (6 tablespoons) granulated sugar
3 large eggs, medium size, beaten
1 teaspoon vanilla extract
1-2 salted duck egg yolks, steamed for 15 minutes and mashed with a fork (OK to skip if you can't find it but highly recommended)
1/4 teaspoon miso or salt
32 grams (4 tablespoons) cornstarch
36 grams (3 tablespoons) custard powder
For Mooncakes Skin:
Things You'll Need
60 grams (1/2 cup) glutinous rice flour
40 grams (1/4 cup) rice flour
24 grams (3 tablespoons) cornstarch
39 grams (3 tablespoons) granulated sugar
185 milliliters (3/4 cup plus 1 teaspoon) milk
25 grams (4 teaspoons) sweetened condensed milk
30 grams (2 tablespoons) plus more for brushing canola oil (or other neutral oil)
1 teaspoon vanilla extract (optional)
A few drops food coloring gel (optional)
Edible gold dust or gold flakes for decorating (optional)
Recipe Steps
1. Make the filling
In a saucepan, add all the filling ingredients and whisk until fully combined. Place it over low to medium-low heat and whisk continuously.
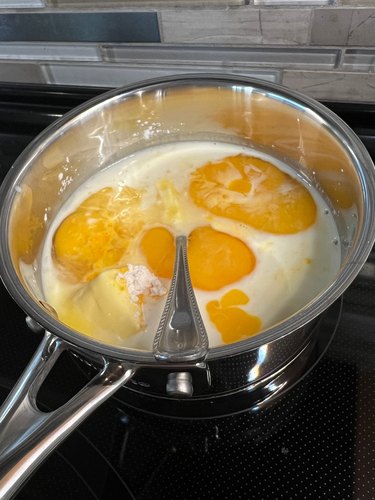
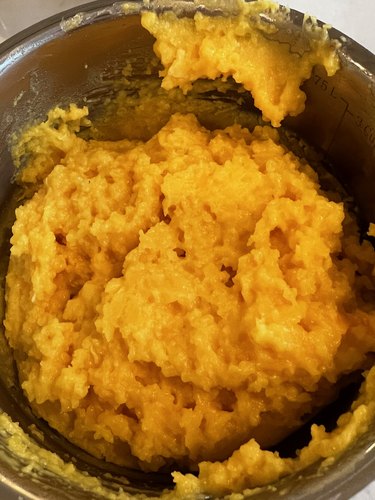
When the filling mixture thickens (i.e., it pulls away from the saucepan and balls up), remove it from the heat. Don't worry if it is lumpy. Refrigerate for at least one hour.
2. Make the mooncake skin
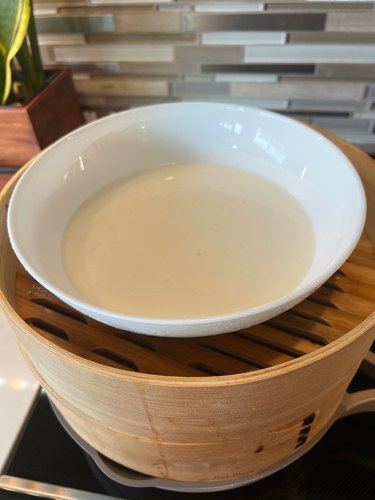
Add all the mooncake skin ingredients to a heatproof bowl and whisk until smooth.

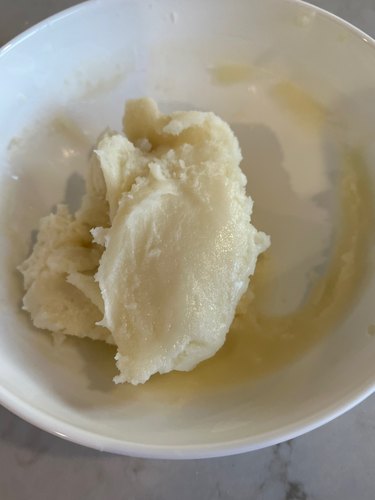
Cover it with aluminum foil. Steam over medium-high heat for 30 minutes or until the mixture solidifies and is no longer runny. The dough is ready when it resembles a stiff jelly and an inserted toothpick or bamboo stick comes out clean.
Mix it with a spatula. If the dough is runny, it needs to be steamed for a bit longer.
3. Start kneading the dough
Using the same spatula, transfer the dough to a lightly floured (with cornstarch) work surface. Allow the dough to cool before using your hands to knead it. It's best to work with it when the dough is still warm but not hot.
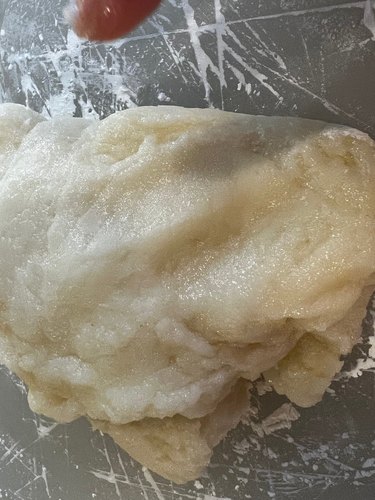
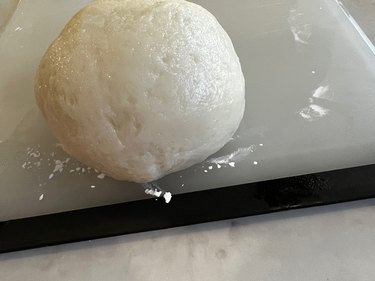
Knead the dough until smooth. Feel free to shape it into a ball.
4. Assemble the mooncakes
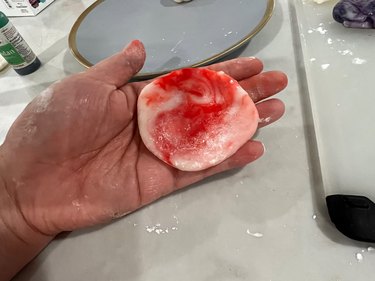
It's recommended to wear food-safe gloves for this part. With gloves on, add drops of food coloring to the dough and then stretch and mix the dough until it is marbled with coloring. You can also divide the dough into even portions and dye each one with different colors. Scoop up a heaped tablespoon (about 20 grams) of dough and roll it into a ball.
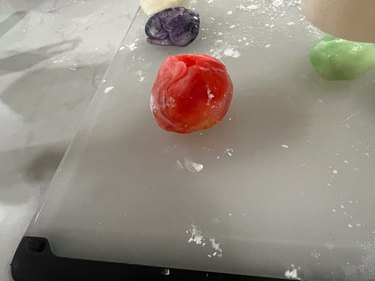
Flatten the ball into a disc.
Add a heaped tablespoon of filling (about 25 grams) to the middle of the disc.
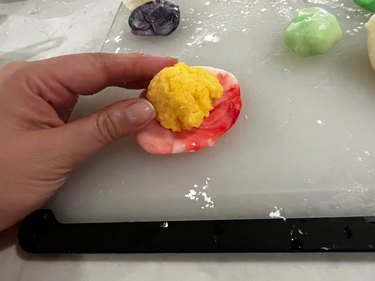
Wrap the dough around the filling and pinch in the seams.
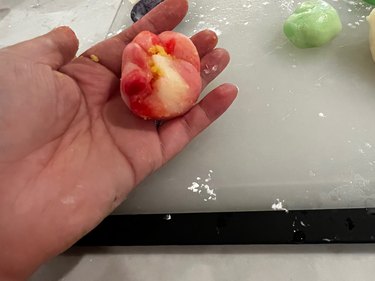
Form a smooth ball or oval. Dust it with some cornstarch.
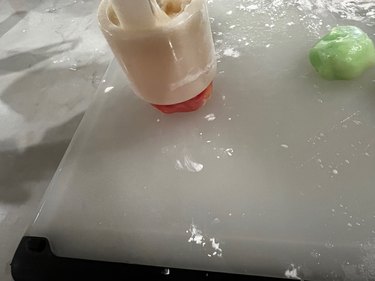
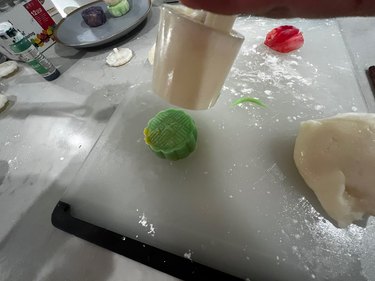
5. Start stamping
Use the mooncake mold press (with stamp of your choice) to gently stamp the dusted ball. Add edible gold dust or gold flakes if you'd like.

Repeat to make about 14 more mooncakes.
Cover and refrigerate for a few hours or up to four days. Remove the mooncakes from the fridge and allow them to reach room temperature before eating.
Enjoy!