The classic Westinghouse roaster oven was a staple in the modern kitchen from the '30s into the middle of the 20th century. While Westinghouse no longer manufactures roaster ovens, you might be lucky enough to inherit a vintage electric roaster oven from Grandma. These large, countertop appliances allow you to roast a whole turkey or make enough chili for a crowd without tying up the oven.
Westinghouse Roaster Oven Models
Video of the Day
The first roaster oven was released in 1936 for the Westinghouse Company's 50th anniversary. The "Jubilee Deluxe Adjust-O-Matic" was available in white or black. The next model was the "Automeal," released in the late 1930s. It incorporated Art Deco styling, with three horizontal bands that wrapped around the bottom of the roaster oven. It featured the first lid holder, which was included on all later models.
From the 1940s through the mid-1950s, Westinghouse introduced the RO-29, HR-25 "Royal Lady," RRA-94, RO-81, RD-414 "Deluxe," RO-91 and budget model RO-915. The RRA-94 included matching china, and RD-414 came with Hall "Betsy Ross Blue" china. From 1954 until manufacturing ended, Westinghouse roaster ovens were variations of the RO-541, available in pale pink, aqua, yellow and pink.
In addition to the matching china, Westinghouse provided optional equipment, including the Infra-Red Broiler Grill, ovenware sets and Glasbake dishes. Even if you don't have the optional oven glass dishes, the insert pan and wire rack were designed to hold standard pie pans and cookie sheets.
Still in Demand
Roaster ovens, while a revelation when Westinghouse first introduced them, are still manufactured by a number of appliance manufacturers because of their convenience, versatility and energy-saving attributes. A roaster oven can cook an entire meal without heating up the kitchen.
You can use it to roast a turkey or ham and free up the oven for the side dishes for a holiday meal. The portability of a roaster oven allows you to take it outside on a summer day — all you need is an outside outlet to plug it in and a table to set it on to make an outdoor kitchen.
How to Use the Roaster Oven
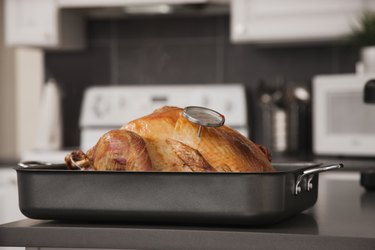
A roaster oven is easy to operate. Plug it in, set the temperature, and when the light goes off, add the food. Because the insert pan and interior of the oven are hot, put the chicken parts, turkey or roast on the wire rack and lower into the roaster oven. The indicator light will go on and off as the roaster oven maintains the temperature.
After cooking for the recommended time according to the recipe, open the roaster oven by lifting the lid away from your face and hands. Allow the steam to dissipate before checking the meat or casserole temperature with a meat thermometer. In general, poultry and casseroles should reach 165 degrees Fahrenheit in the thickest part of the meat or the center of the casserole. Turn the temperature to "off" before removing the food from the insert pan.
Use potholders when removing the wire rack and oven-safe pans or casseroles from the roaster oven. While the manual may say that you can leave the unit plugged in, always unplug a vintage electric roaster oven when it's not in use and before you clean it.
Optional Infra-Red Broiler-Grid
With the optional broiler grid, you can also broil steaks inside the roaster oven or scramble eggs on the top of the unit. When broiling, the meat must be at least 1 inch away from the heating element on the broiler grid. Keep a close eye on the unit to prevent burning steaks, hamburgers or chicken parts. You can also use the broiler grid to make toast or toast sandwiches.
Clean the Roaster Oven
Allow the roaster oven to cool; then lift out the insert pan, wire rack and lid. Wash in hot soapy water and allow it to dry before replacing it in the roaster oven. Do not immerse the body of the roaster oven or the broiler grid in water. Instead, wipe it clean with a damp sponge or cloth.
Cooking Meats in the Roaster Oven
When roasting beef or poultry, heat the roaster oven to 325 to 350 degrees. Put the meat in a shallow pan or casserole dish, fat-side up. Add 1/2 to 1 cup of water to the pan when cooking pot roasts and less tender cuts. The cooking time varies, depending on the item being roasted; the USDA recommended minimum internal temperature (listed); and your personal preference. Allow meats to rest for a minimum of 3 minutes after cooking.
Beef Roast
- Rare: 18‒20 minutes per pound – 145 degrees
- Medium: 22‒25 minutes per pound – 160 degrees
- Well: 27‒30 minutes per pound – 170 degrees
Fresh Pork
- Loin or shoulder: 35‒40 minutes per pound – 145 degrees
- Pork butt: 45‒50 minutes per pound – 145 degrees
- Fresh or uncooked smoked ham: 30‒35 minutes per pound – 145 degrees
Fully Cooked Pork
- Ham, whole or half: 25‒30 minutes per pound – 140 degrees
- Precooked ham: 15 minutes per pound – 140 degrees
- Cottage or picnic: 35 minutes per pound – 140 degrees
Lamb
- Leg: 30‒35 minutes – 145 degrees
- Shoulder: 40‒45 minutes – 145 degrees
Veal
- Loin: 25 minutes per pound – 145 degrees
- Shoulder: 40‒45 minutes per pound – 145 degrees
Ground Meats
- All: 10‒20 minutes per pound – 160 degrees
Poultry
- Whole or parts: 10‒20 minutes per pound – 165 degrees
Fish and Shellfish
- Cooking times vary according to the recipe – 145 degrees
Other
- Leftovers: 165 degrees
- Casseroles: 165 degrees
Roaster Oven Recipes
You can cook any of your favorite recipes that you would normally bake in the oven. If you're making a casserole, you can brown ground meats ahead of time; then add all the ingredients to a large oven-safe dish placed on the rack inside the insert pan. If cooking for a crowd, pour the ingredients directly into the insert pan. In general, cook at 325 to 350 degrees Fahrenheit until the dish reaches at least 165 degrees Fahrenheit.
Chicken Casserole
Heat the roaster oven to 350 degrees. Mix flour, salt, garlic, onion and lemon pepper. Add a dash of cayenne or Cajun spice if you like your chicken a little spicy. Dredge the chicken pieces in the flour mixture. Brown in oil in a skillet. Arrange the chicken pieces in a casserole dish. Make gravy with the drippings and pour it over the chicken. Cook for 1 1/2 hours, until the chicken reaches an internal temperature of 165 degrees. Serve with mashed potatoes and vegetables.
Ribs With Beans
Heat the roaster oven to 325 degrees. Open several cans of your favorite baked or BBQ beans and pour into a large casserole dish. Stir in chopped onions, diced peppers, garlic and brown sugar. Place the pork or beef ribs on top of the beans; then pour your favorite barbecue sauce over everything. Cook for 2 to 4 hours, until the ribs are falling off the bones.
Baked Potatoes
Set the roaster oven at 350 to 400 degrees. Wash the potatoes thoroughly. Rub butter over the outside of the potatoes and arrange them on the wire rack. Roast for 1 to 1 1/2 hours.
Spicy Bean Soup
Set the roaster oven at 350 degrees. Brown 1 pound ground beef and/or pork with 1 chopped onion. Drain off the fat. Pour into a 4-quart pot. Add 4 cans of any combination of pink, red, black, pinto or kidney beans. Add 2 cans corn, 2 cans diced tomatoes with juice, and 2 small or 1 large can mild or jalapeño chiles. Add 1 or 2 packets taco seasoning. Stir together and place the pot on the bottom of the insert pan. Cook 1 to 1 1/2 hours, stirring occasionally.
Check out this related video from ExpertVillage on Youtube