Things You'll Need
Large corrugated cardboard box
Sheer black paint
Silver duct tape
Black duct tape
Wide paintbrush
X-Acto knife
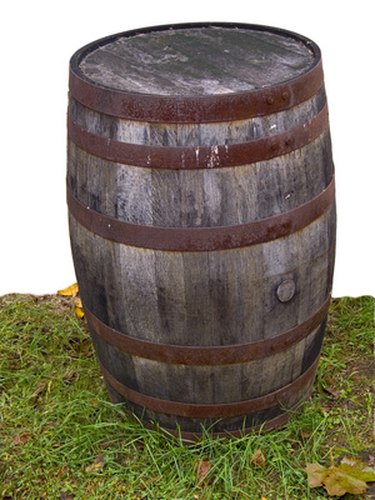
Once among the most common forms of containers, the use of barrels is now mostly restricted to the production of certain alcoholic beverages, and a good cooper (barrel-maker) is harder to find than an arrowsmith. However, barrels maintain a strong hold in our collective culture, and there is often a need for barrels or legitimate stand-ins in plays or other themed events. A water cooler is a strong base to build a barrel mock-up for stage, or simply for the novelty of watching real liquid come out of your very own bung.
Step 1
Measure the circumference of your water cooler. Wrap a soft tape measure around the top edge of the cooler. Alternatively, measure straight across the top and multiply by 3.14.
Video of the Day
Step 2
Cut the box into strips about 6 inches wide. Make sure each strip is long enough to cover the cooler down the tap (at least), with about 6 inches to spare at the top. Also confirm that there are enough strips to cover the entire circumference of the cooler.
Step 3
Lay the strips side by side on a flat surface so that they make a large rectangle.
Step 4
Tape the strips together. Place two long pieces of tape across all the strips of cardboard horizontally. One should be placed about 8 inches from the top and the other about 8 inches from the bottom.
Step 5
Dip the brush lightly in black paint. Wipe or pat it until it is almost completely dry.
Step 6
Brush the cardboard with long vertical strokes, rotating your hand as you go down. This "drybrushing" will give it a wood-like texture.
Step 7
Wrap the rectangle around the water cooler so that the strips are vertical and the tape is horizontal. The bottom should rest just below the tap.
Step 8
Tape the strips together so that they form a cylinder. Place the tape on top of the existing horizontal "bands."
Step 9
Place another tape band around the bottom to keep the barrel from slipping.
Step 10
Press the top of the strips down with even pressure, so that the sides bend out. Place black duct tape on the inside of the "barrel" to cover the space that opens between the strips. This tape should hold the barrel's shape, as well as keep light from shining through. Interestingly, real barrels were sealed with tar.
Step 11
Cut a cardboard circle of the circumference you measured in step one.
Step 12
"Seal" the barrel by attaching this lid with more black duct tape.
Step 13
Drybrush the silver duct tape and the top of the barrel.
Step 14
Cut a small hole to allow your admiring co-workers or pirate companions to access the water tap. Cut below the lower tape band so the barrel does not fall apart. The curve of the barrel should shade the hole and make it less noticeable.
Tip
Practice drybrushing on the back (interior) of your strips to get a texture you like before trying the front sides.
You can double the tape bands (front and back) in order to increase the structural integrity of your barrel.
Warning
Drybrushing can damage brushes - use one that is old or already fraying.
Video of the Day