Things You'll Need
Sandblaster
Media
Ceramic nozzle
Blast hood
Gloves
Air compressor
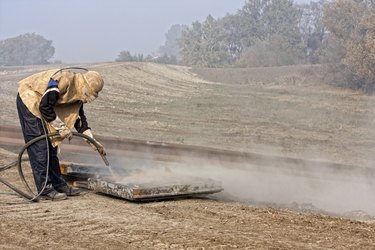
Sandblasting can resurface or shape wood in minutes. It's efficient, but is typically done only by professionals. It requires a steady hand with deliberate, dedicated motion to prevent damage. Sign makers and woodworkers use sandblasters to weather wood for special projects, blasting away soft grain to make the wood appear as if it has been floating around in the ocean. Others use sandblasting to strip wood of paint or old finishes. The keys to safe sandblasting are to start with low pressure, use soft media, and have a steady hand.
Resurfacing Wood
Step 1
Fill the sandblasting pressure pot or tank with sandblasting media. Appropriate media for sandblasting wood include soda, one of the softest mediums and also the safest, walnut shells or corn cob, which are more abrasive, or pumice, the most aggressive media typically used on wood.
Video of the Day
Step 2
Install an appropriate-sized ceramic nozzle on the gun or wand, which is an extended handle with a long tube. The nozzle fits on the end of the tube. If you're starting with the softest media, soda, install a 3/32-inch nozzle on the gun or wand. If you're starting with walnut shells or pumice, install a 1/8-inch nozzle on the gun.
Step 3
Don protective clothing that includes an abrasive blast hood and gloves. Cover all bare skin with appropriate clothing. Work only in a well-ventilated area, preferably outside.
Step 4
Turn on the compressor and set the pressure at 35 pounds per square inch. Test the gun on a piece of scrap wood. Hold the gun 8 inches from the surface of the wood. Pull the trigger and wave the gun back and forth over the surface of the wood, overlapping each pass by no more than about 3/4 inch. Check the results. Look for pits, blown-out chunks, dips or an uneven surface. If you see any, move the gun or wand further from the surface of the wood and test again, moving the gun or wand faster until you get the desired results without defects.
Step 5
Fill the tank with a more abrasive media if the results of the test reveal little effect, and test again. If still not effective, increase the output pressure in 10-psi increments and test again. When the desired result is achieved, start on your project.
Step 6
Wave the gun over the surface of the wood with a continuous, deliberate pattern, never stopping the gun or wand in one spot. Check your progress frequently. If too much material is being removed, work faster. If too little material is being removed, work slower.
Tip
Hard blast media such as glass beads, melamine and steel, are too abrasive for wood and shouldn't be used.
Pressure exceeding 60 psi is not recommended for wood.
Sandblasting results depend on wood species, which can vary greatly in density. Softwoods such as fir, pine, spruce and poplar require less effort and pressure, and sustain damage more readily than other species. Hardwoods, such as oak, ash, maple or hickory, are more dense and can absorb more punishment without damage.
Warning
If you're attempting to sandblast large surfaces, EPA air quality laws and regulations may require permits and even tenting of the project.
Sandblasting to remove paint must be reviewed by the Department of Environment, Health and Safety to determine if the paint contains lead. Sandblasting lead-based paint is potentially polluting and highly regulated.
Silica sand is considered hazardous and should not be used as a sandblasting media.
Video of the Day
- Kramer Industries: Abrasive Media
- B & B Stripping: Soda Blasting Versus Sand Blasting
- Cleaning Consultants: Modern Sandblasting Wood Techniques
- MGA Guru: The MGA With an Attitude
- Feng Blast: How to Choose the Right Sandblasting Media
- University of North Carolina: Lead-Based Paint Hazard Policy
- Feng Blast: Important! Instructions for Operating a Sandblasting Machine Right