Things You'll Need
Clipboard
2 pieces of gimp, 3 ½ yards long (each color)
Lanyard hook
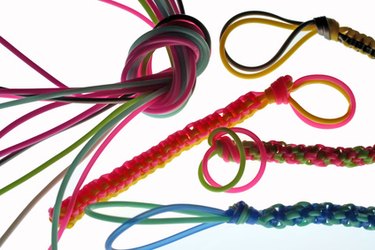
Gimp, also known as craft lace, boondoggle and scoubidou, are plastic laces available in a variety of colors and commonly used to make lanyards and lanyard keychains. These braided ropes make excellent holders for keys and other small trinkets. Learn a few simple stitches and you're on your way to creating colorful gimp lanyard projects.
Diamond Braid
Step 1
Fold the two pieces of gimp in half and cut them to create four strands, two of each color. Slide the ends of the gimp through the bottom of the lanyard hook and tie a knot. Secure the gimp to a clip board by placing the clip over the knot.
Video of the Day
Step 2
Arrange the gimp strings so the two like colors are together. Beginning with the right-most strand, take it behind the two center strands and around the left-center strand, so it is on top of this strand.
Step 3
Bring the left-most strand behind the two center strands. Pull the strand around the right-hand center strand and pull tight. The two like colors should still be side by side.
Step 4
Take the right-most strand and bring it behind the two center strands. Bring this strand to the front, over the left-hand center strand. Repeat with the opposite side and pull tight. Now, you've created two rows of a diamond braid.
Step 5
Continue to create the diamond braid until the loose ends are about 12 inches long.
Box Stitch
Video of the Day
Step 1
Tie a knot at the end of your braid ensuring that the opposite colors are next to one another. Starting at the right corner and moving in a counterclockwise motion, mentally number the strands one, two, three and four.
Step 2
Take strand one and fold it over strand two to form a loop. Fold strand two over strand one to make another loop. Hold strands tightly.
Step 3
Take strand three and fold it over strand two, forming a third loop. Fold strand four over strand three and weave the end through the loop in strand one. Pull tightly with strands one and four in one hand and strands two and three in the opposite hand. Now you have formed your first box stitch.
Step 4
Continue to make box stitches until the gimp is about 4 inches long. Complete one more box stitch leaving it loose. Take strand one, take it around strand two and up through middle of the stitch. Continue with strand two, taking it around strand three and up through the middle. Finish with strands three and four until all the strands come up through the middle of the last box stitch. Pull tightly. Now the lanyard is secure and you can trim the excess ends.