Things You'll Need
Calibrated pressure gauge
Plastic tubing, 1/4-inch inner diameter
Snap-in tube fittings
Adjustable wrenches
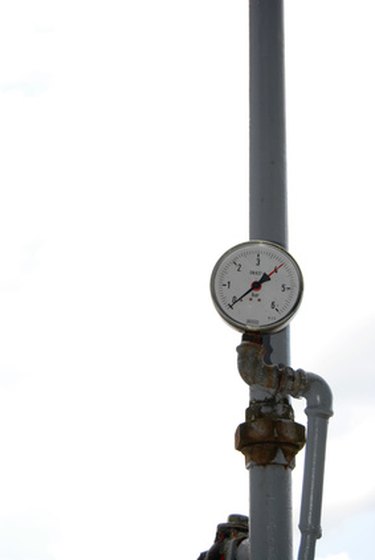
Most tank level gauges used in industry consist of either gauge pressure or differential pressure measuring instrumentation. The variable in either case is hydrostatic pressure, a measure of the specific weight of a water column due to gravitational force. Interestingly, the pressures exerted at the bottom of a 30-foot-high, ¼-inch-diameter water tube or a 30-foot-deep lake are identical, at 13 PSI (pounds per square inch). This characteristic makes it possible to measure and indicate non-pressurized water tank levels with simple pressure gauges.
Step 1
Define the scale of your application. On non-pressurized tanks, every 27.71 inches of water height will impose 1 PSI on the pressure gauge. A pressure gauge that reads zero to 10 PSI is therefore capable of indicating up to 277.1 inches of level, or about 23 feet. In all cases, find the lowest reading PSI gauge you can that still fits your range, because trying to read a 1-foot water level on a zero to 50 PSI gauge would be beyond the gauge's capability to even move its needle.
Video of the Day
Step 2
Select an available PSI pressure gauge range. Divide your highest level by 27.71. If your highest level is 6 feet, divide 72 inches by 27.71 and find an available gauge that is closest to 2.6 PSI. A zero to 5 PSI gauge would work better than a zero to 10 PSI gauge because of its greater mechanical resolution.
Step 3
Organize your materials. You will need the pressure gauge, tubing, connection fittings to connect to the bottom of the water tank, a Tee for the tubing and at least two shut-off valves. Use plastic if at all possible for the tubing and fittings, and snap-in fittings also make this project much easier.
Step 4
Install your level system. Locate one valve as close to the tank as possible. Run the tubing to your gauge. The gauge's height must be even or just slightly lower than the lowest level you want to indicate for the basic calibration to work. The tube from the tank, the other valve and the gauge should all be tied to the Tee. Mount the PSI gauge face side up so the sensing element will not trap sediment. The valve on the Tee allows flushing the gauge tube occasionally to remove sediment.
Step 5
Calibrate your level system and create a level-reading dial to indicate level directly. If your application is a 20-foot-high tank (240 inches), divide 240 by 27.71 to yield 8.66 PSI. Choose a zero to 10 PSI gauge. Cut out a concentric plastic dial that fits around the outside of the gauge. Mark a scale to align with the pressure readings on the gauge. At the 8.66 PSI point, mark "20 feet"; at the zero point, mark "0"; mark "5 feet" at 2.16 PSI; "10 feet" at 4.33 PSI; and "15 feet" at 6.5 PSI. Space out single-foot markings between these readings and your direct-reading level indicator using a PSI pressure gauge will be close enough.
Tip
Taking the time to find a pressure gauge with a low range that fits your application is worth the effort.
Try experimenting by moving the gauge up and down to see how the reading changes with distance.
Warning
Double-check for leaks before leaving your installation.
Don't use this method for pressurized tanks, or damage may result.
Video of the Day