If you attended science class the day your teacher discussed heat transfer and how it increases in a dark environment, then you understand why that dark enamel turkey roaster has been passed down for generations in your family. The crispy Thanksgiving turkey, cooked the requisite minutes per pound, sits proudly in its roaster as it comes out of the oven. The expectation of a juicy turkey portends a great meal. But does the dark, enameled-covered roaster deliver?
The Science Behind the Roaster
Video of the Day
The choice of a dark color for the roasting pan isn't an accident. The darker the color, the better heat is conducted. Inside the roaster, heat bounces off the dark sides, radiating warmth back onto your turkey. If used correctly, the enameled dark roaster results in a bird that looks like a Norman Rockwell portrait, roasted and crisped more quickly and perfectly than you could get with a conventional roaster.
Video of the Day
Manufacturers start with a steel roaster and bake enamel over the steel. Steel is lightweight, durable and conducts heat well, plus, the enameling makes it easy to clean. If you're shopping for a roaster, avoid a product that's constructed of enamel over aluminum as it may prove a health risk when the aluminum ages and leaches into your food.
Tip
Be choosy when buying your enameled dark roaster. Lightweight steel can buckle over time, and it does not heat evenly. A heavy-gauge roaster, while taking longer to get to the optimum heat, disperses the heat more evenly.
Enamelware Morphs Into Graniteware
While graniteware has been around since the 1700s, the definition changed in the 1950s when porcelain-covered tin was replaced by porcelain or enamel-covered aluminum or steel to become enamelware. Tin was flimsy, tended to chip and couldn't hold the weight of steel cookware. Today, modern manufacturing uses the two terms interchangeably to define the large, enamel-over-steel covered roasters we associate with a Thanksgiving turkey.
Modern graniteware can be touchy. It chips easily, and if it's lightweight in construction, it doesn't hold heat well. Be sure your roaster has heft. Today's graniteware also cannot be used on glass-top ranges if your cookware doesn't have a flat bottom, therefore putting a glitch in your gravy preparation.
Looking Inside the Roaster
Shades of nostalgia sweep over as you look at the speckled-enamel roasters on the store shelf. The oval shape is conducive to roasting a turkey or any other meat. The undulating interior base raises the bird, allowing the heat to waft over its bottom during the cooking process. There are disadvantages, however, to the wavy bottom. Once the turkey is removed, it's difficult to whisk the bottom juices into a gravy.
Other Things to Look for Include:
- Make sure the sides are not too high. You need the heat to circulate onto the sides of your turkey. A roaster that's 2 to 3 inches deep is ideal.
- Don't get a non-stick roaster. The best bits of the turkey won't stick to the bottom, eliminating the tasty deglazing that makes a gravy rich.
- Be sure the handles are riveted to the roaster.
Topping Off Your Roaster
The traditional oval, speckled and enameled roaster comes with an impressive lid. This is ideal if you're braising a hunky piece of beef and need a slow roast. But roasting a turkey to ultimate crispness means doing a lid dance.
Start your turkey roast covered, in an oven set to 450 degrees Fahrenheit. After 30 minutes, reduce the heat to 325F and remove the lid for the rest of the roasting process. There's a logic involved here.
Think about it... when you cover the roaster, you're raising the interior temperature, but also creating steam. The heat rises to the top, and wet steam drops down onto the turkey. The steam will cook your turkey, but the skin won't be anywhere near crisp, and your turkey will be done well before you expect it to be. Look at the expensive stainless-steel roasting pans in your local cookware department — none of them come with lids.
If you find that parts of the turkey are becoming too well-done, cover the individual parts, like the wings, with foil. And if you insist on using the lid during the entire process, remove it the last hour, so the skin will crisp. And, for a really delicious skin, wet a cheesecloth in sherry and cover the bird with the boozy cheesecloth during that last hour.
Prepare the Roasting Pan
Create flavor for your gravy by adding sliced onion, carrot and celery sticks, a bay leaf and some sprigs of sage to the bottom of the pan. Place a roasting rack over the vegetables. If the bottom of the pan is wavy, still use the vegetables. Pour just enough chicken or turkey stock into the roaster to cover the vegetables.
Prepare the Turkey
Once your bird is completely defrosted, remove it from the refrigerator and pat it all over with a paper towel, inside and out. Place it on a baking tray and return it to the refrigerator for at least 4 hours. This dries out the skin and helps make it crispy when roasted.
When you're ready to roast, remove the turkey from the refrigerator and let it come back to room temperature, which should take about one hour. Baste the bird with olive oil or melted butter and sprinkle it all over with garlic powder and salt. This will be the only time you'll baste the turkey.
When you put the turkey in the enameled roaster, be sure enough space is around the sides for air to circulate. This ensures that all parts of your turkey are well roasted. Let the heat "meet the meat" and do its work.
Remove any upper racks, and put the bird into an oven heated to 450 degrees Fahrenheit. Once the bird is in the oven, let it roast at the high temperature for 20‒30 minutes before turning the temperature down to 325F. The dark interior of the enamel roaster cooks a turkey faster than the turkey packaging indicates. Do not use the "20-minutes-per-pound" recipe; instead, depend on an instant-read digital thermometer to monitor the doneness of your turkey. When the thermometer reads 165F, take the turkey out of the oven and let it sit for at least 20 minutes before carving.
Tip
Do not use a convection oven with a high-sided roaster. The circulating heat cannot get to the sides of your turkey, and the skin will be soft and yellow.
While the turkey is resting and after you allow the interior juices to settle into the meat instead of pouring out as you slice it, prepare your gravy by placing the flat-bottomed roaster on your cooktop. If you have a rounded bottom, scrape all the interior vegetables and as much of the bottom bits as you can into a saucepan. Heat. Reduce. Add flour and seasonings and then strain the glorious gravy into a serving jug. Add a dab of butter to give it a shiny glaze.
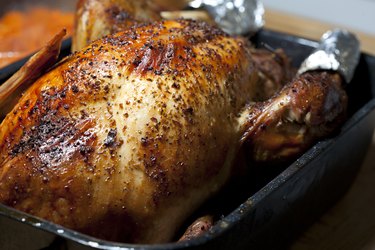
Your turkey's skin should be crisp, the sides well roasted and the breast glistening. The old-fashioned, enameled roaster can still produce a moist turkey with crispy skin.
If you want to use your enameled roaster, raise the turkey by setting it on a bottom rack so that the heat circulates not only over the top of the bird, but onto the sides and bottom as well. Don't cover the turkey with a lid or aluminum foil during the cooking process. While the lid cooks your turkey faster, the foil deflects heat, increasing the cooking time.
- Fine Cooking: Picking a Roasting Pan to Use All Year
- Foodal: The Best Roasting Pans: What to Look for and How to Choose
- Kitchn: When to Use a Light-Colored Pan and When to Use a Dark One
- Cook's Info: Roasting Pans
- Graniteware: FAQs
- Granny Sue's News and Reviews: Graniteware and Enamelware: What's the Difference?
- Healthy Cookware: The Pros and Cons of Modern Graniteware Rosters