Whether it's a hot summer night or a cool autumn evening, an outdoor bonfire is a fun and intimate way to enjoy the great outdoors. And you don't need to be on vacation to do it, either! Building your own brick fire pit is an inexpensive addition to your backyard that'll make for many warm memories. Add a kaleidoscope of colors to make it that much more unique, and feel free to use any shades that suit your style. Your friends and family will love gathering around the fire for drinks, s'mores and conversation throughout the year.
Video of the Day
Things You'll Need
Bricks
Decorative stone
Shovel
Hand gardening shovel
Spray paint or other marking device
Paint in desired colors (optional)
Step 1: Outline Your Fire Pit
First, lay bricks out in your desired pattern to gauge just how many you'll need. This example required 33 bricks, but the depth, width and style you choose may require more.
Video of the Day

After you've created an outline, leave one layer out to mark how big of a circle you will need (this example used the top layer). Use spray paint or lawn chalk to mark the circle.

Tip
You can also stand the bricks up and mark the outside of the circle, rather than the inside, as shown. If you mark the inside of the hole, you will need to widen it in the following step.

Step 2: Dig the Hole
If you marked the inside of your outline, you have to widen the hole by the width of your bricks so that they will all fit inside (see the tip above). In this example, the desired depth of the hole was achieved first, and then it was widened to the proper size.

Step 3: Place Bricks and Decorative Stone Inside
First, lay out your bottom layer of bricks in the desired pattern.

Then, fill in the area around the bricks with stone — this project uses white marble. Keep a few handfuls aside to help level the bricks and fill in any remaining holes at the end.


Next, layer the side bricks, and then use some of the remaining marble stones to level out the bricks where necessary. After, place the highest layer of bricks on top.

Step 4: Backfill Empty Holes with Dirt
Using the dirt dug out of the hole, fill in the noticeable spaces behind and between the bricks. You can also fill in the empty spots with small rocks to keep dirt from falling between the bricks onto the marble.


Step 5: Paint the Bricks (Optional)
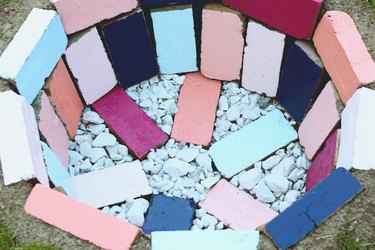
Adding color to the bricks is a great way to give the pit personality! Pick up sample sizes of your favorite shades and alternate colors on every brick. For this project, Behr Ultra samples in a Satin finish were used in these hues: Guava Jelly, Tidewater, Pink Mimosa, Very Navy, Glitterati and Deco Shell. Start by painting the bottom bricks first, and then continue up the sides with your own personal pattern.

The paint won't be flammable, but it also won't hold up forever because of the heat. So, this is a fairly temporary addition that will impress your guests for the first several uses. All that's left to do is get a fire burning!

