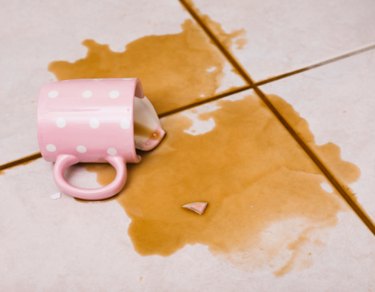
When your favorite coffee cup slips off the counter or the normal wear-and-tear finally takes its toll, a broken handle can result. While you may be tempted to retire the cup to the nearest trash bin, you can try your hand at repairing it. With the right type of glue, you can reattach the handle and get more mileage out of your mug, as long as you don't mind a few imperfections.
Video of the Day
Things You'll Need
Clear, Waterproof 2-Part Epoxy Resin (One Tube Of Resin, One Tube Of Hardener)
Masking Tape
Soap
Latex Gloves
Small Piece Of Cardboard Or Lid Of A Shoebox
Small Wooden Craft Sticks
Lint-Free Towel
Water
Step 1
Wash the broken ends of the detached handle and the remaining stubs on the cup itself with water. If a spill, such as coffee, was involved and stained the handle, use a combination of soap and water. This will give you a clean surface, free of debris to apply the epoxy resin.
Video of the Day
Step 2
Open both of the tubes included with the 2-part epoxy resin. One tube is liquid resin and the other is liquid hardener. When the two are mixed together in equal amounts - or amounts recommended by the manufacturer - they will form a paste-like epoxy resin. Squeeze equal amounts - or the amount recommended in the product instructions - of each tube, side by side, onto a small piece of cardboard or the lid of a shoebox.
Step 3
Stir the resin and hardener portions together slowly with a small wooden craft stick to mix well. The resin and hardener will form a paste.
Step 4
Coat the broken parts of the detached handle and the body with the epoxy resin with the end of the craft stick. Don't use too much or you may have an oozing mess.
Step 5
Press the broken handle against the broken stubs on the body of the cup and hold it securely so that it will begin to set. Wait approximately three to four minutes and then gently let go. Wrap masking tape tightly around the handle and the cup to hold the handle in place as it dries.
Step 6
Wipe away any excess epoxy resin with the end of the craft stick. Allow the cup to dry overnight before removing the tape.
Tip
Work quickly once you mix the resin and hardener because it will become difficult to work with after three to four minutes. (Reference 2)
If you have chipped pieces of the handle to re-attach, tweezers can prove a helpful tool for holding the piece against the cup.(Reference 2) If this is the case, you will need to glue the chipped pieces on, one-by-one, leaving drying time in between before attaching the handle.
Avoid using tape that leaves a residue behind, such as Duct tape, on the cup.
A wooden stirring stick or toothpick can be used in place of the wooden craft stick.
Warning
Work in a well-ventilated area when working with epoxy resin. (Reference 1)
If you mix the epoxy resin and hardener too swiftly, air bubbles can develop. You can blow on them or pop them with a straight pin to get rid of them. (Reference 4)