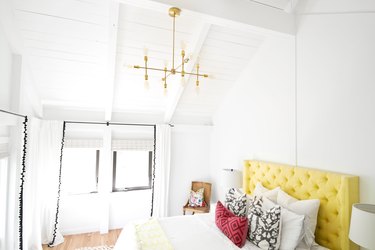
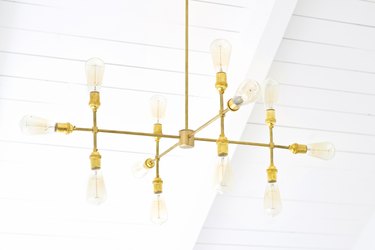
Adding a statement light fixture to a room can easily add more interest to your space. If you're looking to add one to your home, you'll be excited to find that building one yourself is easier than you may think. This fixture is fairly simple, but the Edison bulbs provide extra interest that takes the piece to the next level. With basic electrical wiring knowledge, a little time, and a few lamp parts, you can have your own modern light fixture.
Video of the Day
Lamp Parts Needed
Things You'll Need
2 1/2" x 1/8 IPS hollow brass pipe stem (qty 12)
11" x 1/8 IPS hollow brass pipe stem (qty 4)
4-way arm back with 1/8F IPS bottom x (2)1/8F IPS sides x 1/8F IPS top (qty 4)
E-26 lamp socket 1/8F IPS (qty 12)
18 AWG wire (2 colors)
Chandelier body (4)1/8F IPS sides X 1/8F IPS top (qty 1)
Wire nuts (qty 2)
24" x 1/8" IPS hollow brass pipe stem (qty 1) note: this length will depend on ceiling height and desired drop of chandelier.
1/8" IPS pipe pendant cross bar set for 1-1/16" slip hole (qty 1)
Brass canopy with 1 1/16" slip hole (qty 1)
E-26 Edison bulbs (qty 12)
Tools Needed
Things You'll Need
Wire cutters
Electrician's combination tool
Philips screwdriver
Threadlocker
Needlenose pliers
Voltage tester
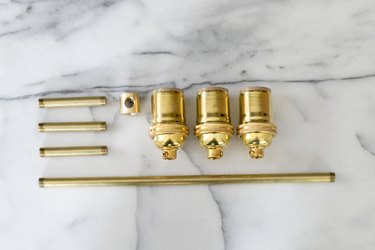
Step 1: Gather the lamp parts for the chandelier arms
The photo below shows the parts required to assemble each arm of the chandelier. Each arm will require three 2 1/2-inch-long brass pipe stems (upper left), one 11-inch-long brass pipe stem (bottom), one 4-way arm back (center) and three E-26 lamp sockets (upper right).
Video of the Day
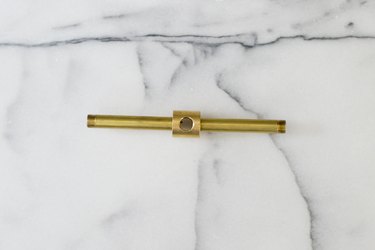
Step 2: Install the pipe stems in the arm back
Thread the 2 1/2-inch-long brass pipe stems into the top and bottom of the arm back.
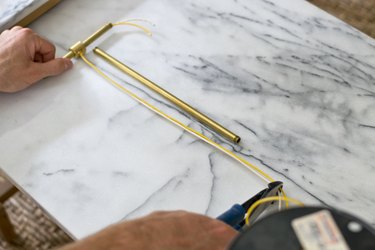
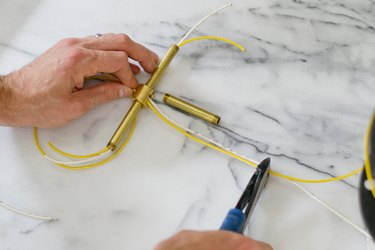
Step 3: Insert the wires for the long arm
Insert two wires through the arm back, so the ends extend approximately 2 inches through one of the 2 1/2 inch long brass pipe stems. Position one of the 11-inch-long brass pipe stems so it extends from the arm back, and cut the wires so about 2 inches of wire extends beyond the end, as shown.
Tip
Wires will need to be run in pairs—one for the positive "hot" wire and and one for the neutra . Lamp part suppliers will carry wire with thin jacketing in different colors that can make it easy to run through bends in the arms. Wiring convention dictates that "hot" positive wires can be red, black, or yellow, while the neutral wire should be white.
Step 4: Insert the wires for the short arm
Repeat step 3, cutting the wires so they will extend 2 inches beyond the final 2 1/2-inch pipe stem.
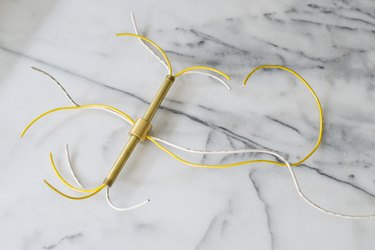
Step 5: Insert the wires through the pipe stems
Insert two wires straight across the two 2 1/2-inch pipe stems and arm back. You will now have two sets of wires extending out from the ends of the 2 1/2 -inch stems and one set of wires for the 11-inch pipe stem, running perpendicular to the 2 1/2-inch pipe stems.
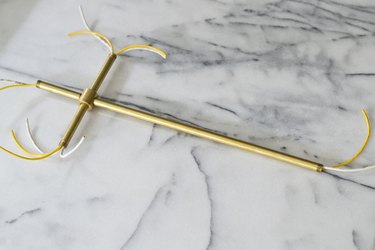
Step 6: Thread on the remaining pipe stems
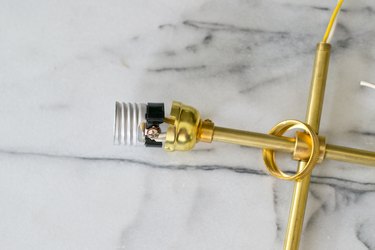
Slide the 2 1/2-inch pipe stem and 11-inch pipe stem over the wires and thread them into the remaining sockets on the arm back.
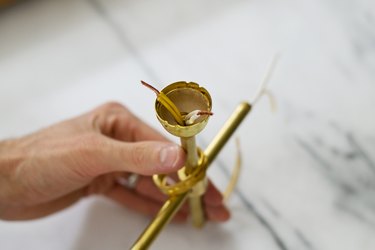
Step 7: Install the lower half of the socket
Thread the lower half of an E-26 lamp socket onto each of the 2 1/2-inch arms. Cut the wires so they extend approximately 1 inch out of the socket. Using a combination tool, strip back 1/2 inch of the jacketing to expose the metal conductor wire inside.
Step 8: Wire the socket
The wires to the positive and neutral terminals on the socket. Normal convention will have the positive screw terminal as a brass-colored screw, while the negative screw terminal will be silver in color. On the top and bottom arms (where two pairs of wire extrude) install both positive wires to the positive screw terminal and both neutral wires to the negative screw terminal.
Tip
Always ensure that the conductor is wrapped around the terminal screw in a clockwise direction, so it pulls in when the screws is tightened.
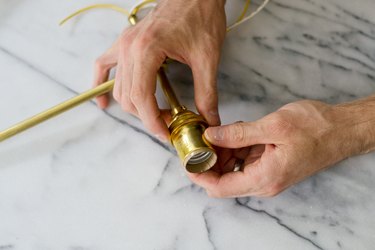
Step 9: Reassemble the socket
Secure the top half of each socket. Depending on the socket design, this will either involve snapping it down into place, or sometimes a setscrew that is tightened. Repeat steps 1-9 for the remaining three chandelier arms.
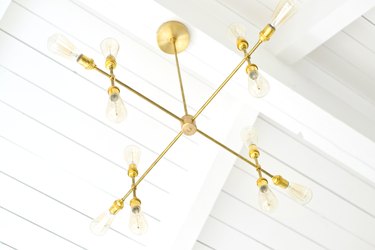
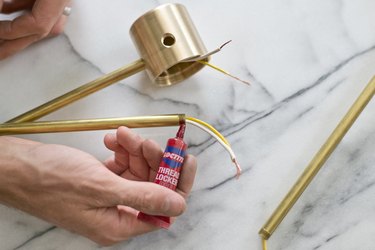
Step 10: Install the arms to the chandelier body
Apply thread locker to the end of the pipe stem, and thread it into the chandelier body. Make sure that each arm is straight and allow the thread locker to cure. Repeat for the remaining three chandelier arms.
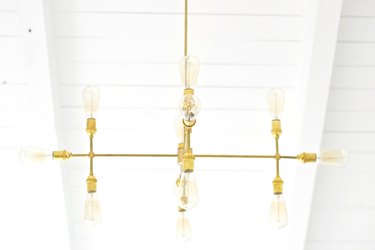
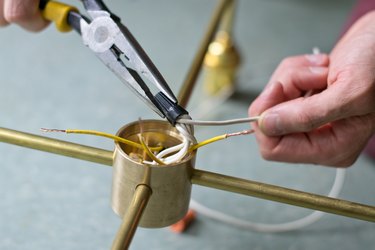
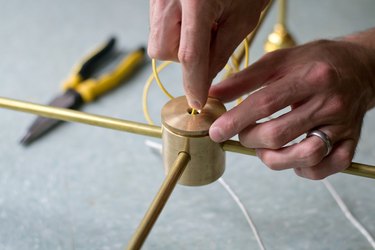
Step 11: Wire the chandelier body
Cut two wires approximately 30 inches long for the top chandelier stem (which will connect to top canopy). Strip 1/2 inch of insulation from each end of the wires in the cluster and use a wire nut to secure all of the positive wires together with one of the 30-inch-long positive wires. Repeat with the neutral wires, and tuck the nuts down into the cluster.
Step 12: Install the chandelier body cap
Insert the two 30-inch long wires through the top cap, then slide the cap down and thread it onto the body.
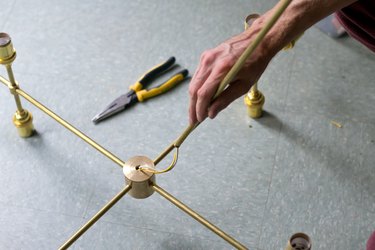
Step 13: Install the 24-inch-long pipe stem
Slide the 24-inch-long pipe stem over the two wires and thread it into the chandelier body.
Note: The length of the pipe used for this piece of the fixture will depend on your ceiling height and the desired hanging height of the chandelier.
Step 14: Gather the parts for the top canopy
The photo below shows the parts required to assemble the top canopy of the chandelier. The canopy will require a cross bar assembly (left), a canopy with 1/16-inch-wide slip hole (center), and a 1 1/16-inch slip hole retainer (right).
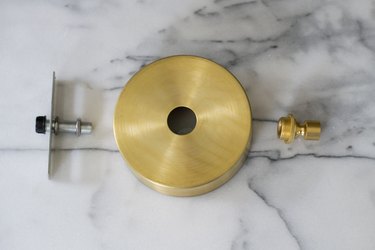
Step 15: Assemble the canopy
Adjust the cross bar assembly so the bar is slightly within the brass canopy. The retainer nut and brass canopy will need to be slid over the 24-inch-long pipe stem while the crossbar is being positioned for installation.

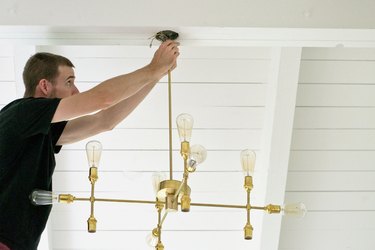
Step 16: Install the chandelier to the ceiling box housing
Turn off the breaker and verify there is no power coming from the house wiring in the box, using a voltage tester. Once you confirm that the power is off, install the cross bar onto the electrical box, securing with mounting screws, then wire the positive and neutral wires to the house wiring—positive wires to the black or red house wiring, the neutral to the white house wire. Secure the ground wire onto the cross bar with the set screw. Slide the canopy up over the slip hole retainer and and thread on the retainer nut to secure the canopy against the ceiling. Install bulbs and turn the circuit breaker back on to restore power.
Tip
A chandelier may be considerably heavier than the light fixture it is replacing, and it is important that the ceiling box be sturdy and secure enough to handle the weight. If you have doubts, the ceiling box may need additional reinforcement and and support—often a task for an electrician.