Things You'll Need
Derwent Inktense pencils in Tangerine, Baked Earth, Sun Yellow, Bark, Apple Green, Leaf Green, Deep Indigo and Outliner. All colors are included in the 12 color set.
Derwent Inktense Outliner (included in 24 color Derwent Inktense set).
Watercolor paper or pad
Drawing board and artist tape if you're using a loose sheet of watercolor paper
Optional sketch paper for practice and ordinary pencil
Kneaded eraser
White vinyl eraser
Round synthetic or sable watercolor brush size 5, 6, 7 or 8 with a good point.
Cup of water
Master's Brush Cleaner cake or other good brush soap/conditioner.
Artist's hand bridge or a piece of waxed paper as barrier to rest your hand on.

Derwent Inktense pencils are unique. Unlike most watercolor pencils, you can only dissolve them with water once. After that, glazes are waterproof. Derwent Inktense also creates much stronger color washes than watercolor pencils. This exciting new medium takes some special handling, it's ink in a pencil! With this project you'll learn to handle Inktense washes to render a three dimensional bright colored subject with shadows.
Step 1
Read all the steps of this article thoroughly before beginning. Awareness of later stages may prevent mistakes that could ruin your piece. Then do one step at a time. If you have trouble with any technique, stop and practice it on scratch paper till you get the effect shown in the picture for that step before you continue.
Video of the Day
Tape your loose sheet of watercolor paper to your drawing board if you're not using a watercolor pad or block.
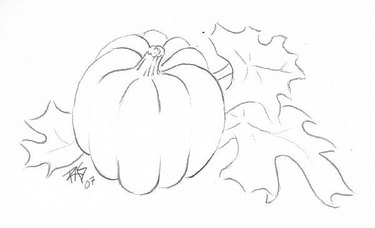
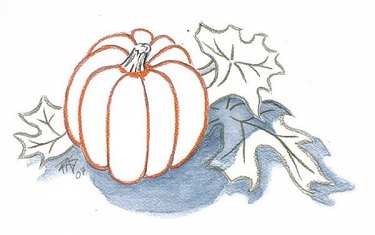
Sketch your pumpkin with the Outliner, or copy my sketch. Don't let the lines between the ribs quite meet, feather them off as you get to the middle. Use curved, expressive lines to describe the stem. Sketch the leaf and a few lines for veins. If you like, practice the sketch and the strokes on sketch paper before putting the sketch on your watercolor paper. If you grow pumpkins, you could draw the leaves from life, just sketch loosely in the same style.
Position your sketch so that the paper's horizontal and you have at least two inches of space between the drawing and the edges. If you make changes or overlap a subject and want to remove lines, pick them up with the kneaded eraser. If they are quite dark, you can finish removing them with the white vinyl eraser. Be sure to brush off any eraser crumbs before continuing.
I place my signature as part of the composition, and with this I'll put my initials monogram in at the Outliner stage. Replace with your initials or signature on your sketch, or sign under mine if you copy mine exactly.
Step 2
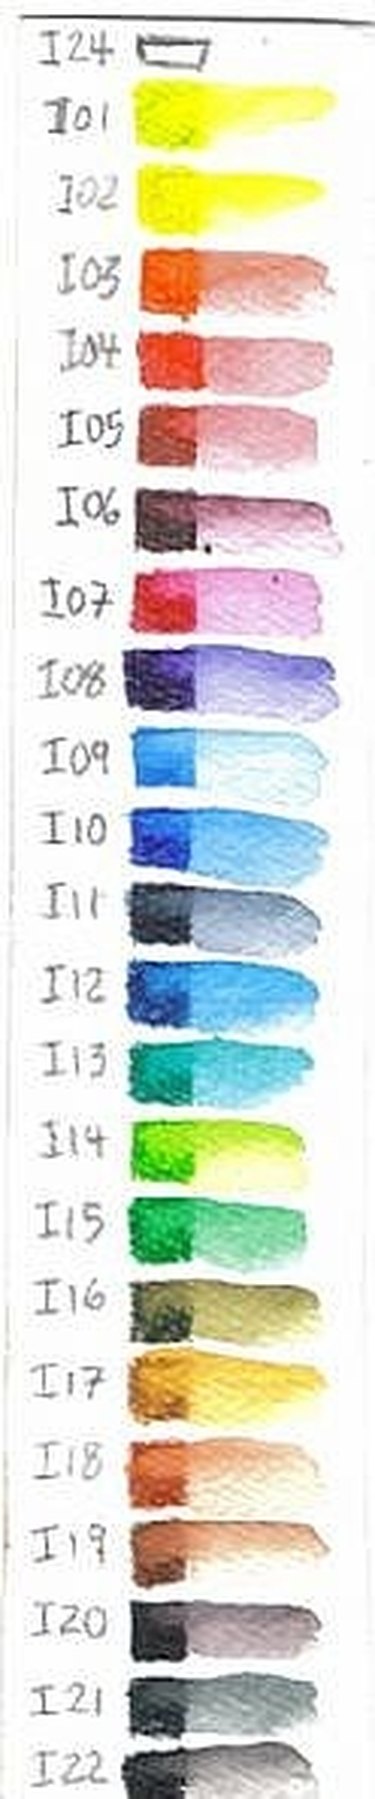
Create a color chart for your Derwent Inktense pencils. This is my chart for my 24 color set. I marked the color number next to each swatch so that I can find it easily if it looks like another color dry. This is very important to tell how strong the colors are and how they handle when wet. These patches were made by drawing the colors in hard, full strength, but if I wanted lighter washes I would do soft tonal layers and wet them.
If you like, you can create a second row of color and wash tests with soft tonal layers.
Cut the strip out of your watercolor paper and keep it in the tin with your set if you've got a set, it helps for reference in planning any Inktense drawing. I did this one for a previous project, a painting that needed very light washes, and it helped a lot to choose the right colors and decide how much to use. A little goes a long way with Inktense.
Step 3
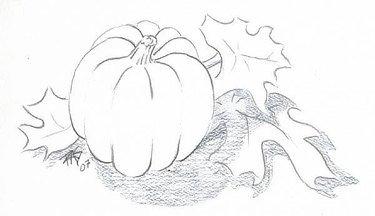
This stage is one of the most difficult techniques with any colored pencil drawing, so practice drawing light tonal layers on scratch paper until you get it. If you already use soft tonal layers in your art, proceed to doing the shadows using Dark Indigo.
Draw the shadows under the Outliner sketch, setting them off a little to the right to define the angle the light is hitting the still life. Always set shadows off a bit to one side or the other, or a lot. Shadows define where the light is, and that will determine later on where your highlights are. The lighter side of the ribs on the pumpkin will be to the left, while the color will be stronger toward the bottom and the right on each of them.
Use short, light strokes to create a soft tonal layer. Try to keep them as even as possible and try not to overlap them, or you'll create darker areas. Avoid making rows and unintended lines. If you have trouble getting smooth tonal layers, practice on scratch paper until you can fill an area without dark areas or obvious strokes.
Keep a blunt point on the Dark Indigo pencil while you do this. If it's sharp to begin with, draw on scratch paper till it's worn down to at least half the width of the core. This helps for creating soft tonal layers. It doesn't matter if your strokes are directional or circular, just try to keep them light and smooth. If you have a pattern, go in afterward and fill in gaps in the pattern till the strokes don't show.
If your tonal layer is smooth but too dark. press the kneaded eraser on it hard and lift it. Do this all over the shadow area, repeat as needed until it's very light. This is also a way to get rid of unintended dark strokes in the middle of a tonal layer -- lift them till they're light and then gently fill in around them where the kneaded eraser removed more than you intended.
Do not rub with the kneaded eraser. This will drive the color into the valleys in the paper where it may not dissolve and won't come up as easily, creating an ugly unwanted texture. Press and lift, press and lift. If too much is getting on your kneaded eraser, stretch and fold it a couple of times till you have a clean surface on the eraser again.
Step 4
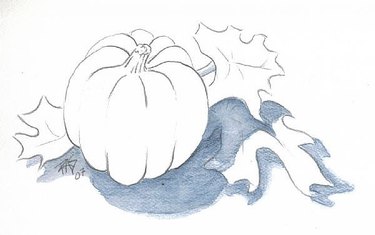
Wash the shadows. Load your round watercolor brush with plenty of water, till it's almost dripping. Swish around from the middle of a colored area and gently spread the water to the edges. It's okay to extend the edges a little bit, especially where it doesn't go over an Outliner line into the pumpkin or leaves, but keep the shape of the shadows reasonably accurate.
Swish it around in the wash area until you don't see any individual particles of Dark Indigo drawing and it's all dissolved. Keep it wet, letting areas dry and continuing to work may create unintended dark lines and faded areas within the wash area. Work fast and try to avoid runs. I prefer not to work on a tilted surface, but if you do, keep the art right side up so that any runs head for the bottom. Wipe off runs with a rag or facial tissue fast and try to remove them before they dry.
If you see a bead getting ready to run, touching it with a facial tissue will wick it up and prevent the run.
Work one shadow area at a time if you like, this helps to control runs and keep from drying out other areas.
You can soften some edges by running a brushful of clean water over them while they're still damp. This creates the effect of an indirect light source as well as the strong one and may give both a hard edge and a second softer edge.
Let the washed shadows dry completely before proceeding with the next stage of the project. Wash your brush immediately and thoroughly. Do not let it dry while there's still pigment in the hairs. They may be stained, some colors do stain. But you should be able to take a stroke on white paper with clean water and see no color in it when you're done rinsing the brush.
Don't let the color migrate up into the ferrule at all, keep it down toward the tip. This is advice for any ink painting, be careful and don't let ink stay in the brush or you'll ruin the brush.
If you are better at painting than drawing, you can use a palette to mix a thin wash of Dark Indigo by shaving the point and adding water till it's as soft as you want, then skip Step Three and just paint the shadows with a premixed wash.
Step 5
My shadows came out a bit strong, but with the bold colors of the pumpkin and the leaves, I decided to keep them rather than start over. Don't do yours any darker than this.
Using Tangerine, start sketching in the pumpkin. Draw heavily along the lines of the ribs and work to the inside of the Outliner lines, connecting them. At the center, draw heavily with short zigzag strokes between the pumpkin stem and the lobes, creating a short passage of full intensity drawing.
Wuth Leaf Green, outline the veins in the leaves. Go heavy on the veins. When the point is worn down blunt draw around the outside edges with medium-heavy pressure. Draw a line of Leaf Green on the top and bottom of the leaf stem, going right over the light Indigo Blue shadow. Sketch a couple of lines in the pumpkin stem with Leaf Green and follow the other Outliner lines in Bark. We'll do shading with tonal layers in the next stage.
If you haven't been using it before, now is the time to start using an artist's hand bridge. Mine is a 12" long clear lucite bar with two smaller pieces on the ends that rest on the paper or board. If it doesn't fit on your drawing board or table, turn it upside down and let the smooth side glide over the art. You can use a piece of waxed paper as a hand barrier, but you need to put something waterproof under your hand because sweat can dissolve Inktense and move patches of color before you're aware it happened.
Step 6
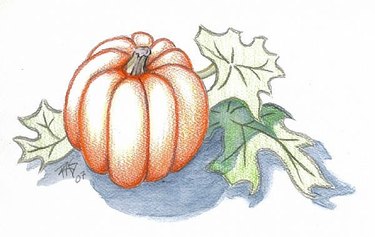
Wash the pumpkin stem with water, wick up any excess liquid with facial tissue or by blotting your brush dry and touching the wet area. Don't let it slop out of the pumpkin stem area. Wash the leaf stem separately and wick up any excess liquid. You can see that the Outliner lines did not dissolve in the previous shadow wash, and will not tint the wet washes with graphite the way using regular drawing pencils will spread, the Outliner has a special binder intended to be completely nonsoluble in water. That's all the wetting we'll do at this stage, we can work on tonal layer shading in areas that don't touch these two wet spots while they dry. Rinse your brush thoroughly and point it with your fingers, don't suck your brush to point it.
Shade the pumpkin with Tangerine. Flick strokes upward from the heavy outline to fill the shadow area on the lobe, letting them feather off at the ends of the strokes to make a shaded tonal layer. When this needs to be extended, use a light swinging stroke that feathers off at both ends -- bring your brush gradually down to the paper and press hardest at the middle, then lift as you leave the paper so it shades off in both directions. Practice this swinging feathered-ends shading stroke on scratch paper till you get it right, it's wonderful for creating shading and tonal layers and for filling in gaps in tonal layers without making overlap bands and blotches.
Fill the leaves with a flat tonal layer of Apple Green, which is lighter and brighter than Leaf Green.
Add a layer of Sun Yellow shading over the Tangerine shading to lighten the Tangerine more toward a pumpkin orange. You can let it trail up into the highlights a bit past the Tangerine shading, but it will all mix when we wash the pumpkin. Don't cover the big white highlights in the shading.
Work up from the bottom curves first, then do much shorter shading working outward from the center onto the lobes. Add more shading to the right side lobes than the left, but leave the highlights as shown. Do not shade in from the upper left outlines at all, leave them as shown. The water will make them shade inward anyway but not as far.
Finally, use Baked Earth to do a narrow shaded area around the base of the pumpkin stem, spiking it out along the lines of the ribs a little. At the bottom add a little Baked Earth shading to the darkest darks where ribs meet lobes.
Step 7
Wash the leaves one at a time, letting your wet brush run along the vein strokes and outer edges to pick up color and let that migrate into the lighter Apple Green tonal layer. Let natural irregularities develop in the mixture, like watercolor this is a spontaneous process. Do not wet any areas of different color next to each other, stay strictly out of the pumpkin until the leaves have completely dried. Do not soften the edges on the leaves, those should remain distinct.
Let the leaves dry completely. Instead of watching paint dry between all these wet steps, why not sketch something else in your sketchbook and plan your next Inktense works? I categorize dry Inktense pieces as drawings and washed Inktense pieces as paintings. Inktense work very well simply as colored pencils too, with their soft texture and strong colors they're excellent.
The dry stage of this pumpkin drawing could be adapted as an embroidery pattern or for any decorative purpose. Feel free to use my pumpkin design for other mediums, you have a royalty-free non exclusive right to copy it by hand in any artistic way you choose.
One way to tell whether a wet area is completely dry is to pick up your watercolor pad or block and look at it from the side. If any area is still bubbled up, it's still drying. It should dry flat even on a pad or taped-down sheet if you leave enough space around the painting, because you're not wetting large areas all at once.
Step 8

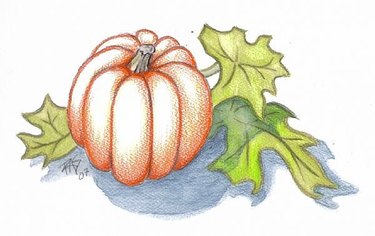
The final stage, washing the pumpkin. I strengthened the Outliner lines on the shadowed leaf, connecting one so that it didn't look as if a vein went backwards because the edge of the shadow crossed the fork of two veins. Closing the gap improved that leaf and strengthening another line helped. The shadows no longer look too strong and dark now that the leaves have strong values too.
Wash the pumpkin one lobe at a time, letting color float into the big white highlights from the edges. Use less water on the smaller lobes in the back. I started with those and worked around the pumpkin clockwise.
If you need more color, scribble on a scratch sheet with Tangerine or Sun Yellow or a mixture, use a wet brush and stir it up to paint wet into wet strokes. Work fast before it dries. For some areas I touched the wet brush to the point of Sun Yellow just to get a little color and go over highlights that were too pinkish.
When you are satisfied with the painting, rinse your brush thoroughly and carry it to the sink to wash it thoroughly with conditioning brush soap, exactly as if you were painting in India ink. I use "The Masters" Brush Cleaner cakes. Slosh the brush around on the cake until it's got foam worked into the hairs, then gently massage the foam in with your fingers and rinse thoroughly under the tap. Swipe it on white paper or porcelain to see that no color remains in the water, then point it with your fingers.
With proper care, even a good synthetic watercolor brush should last you for years and years. An expensive Kolinsky sable watercolor brush can last a lifetime.
You're done! When it's dry, select a precut mat and make the final composition decision of how much negative space to leave around your drawing. I found mine looks best in a 6" x 9 1/2" mat opening, but a 7" x 10" opening would also look good. This is one of many reasons to leave plenty of extra space between your art and the edge of the page, because sometimes an extra inch or two of negative space can make your composition striking.
Tip
Vary your pressure when sketching with the Outliner. Use lost and found lines to suggest a shape rather than outlining it completely. These are accent lines in the final artwork. Clean hands with Master's Artist Soap or Plumber's Goop if regular soap and water doesn't take out the stain, also stained clothing can be treated with Kiss-Off or other stain removers. Remember that Derwent Inktense is ink in a dry form and treat accordingly, it won't just rinse off like watercolor, gouache or watercolor pencils. Always leave plenty of space between your drawing or painting and the edges of the paper. You can change and improve your composition by deciding the final outlines of the picture area after you're done. Move various sizes of picture openings in cardboard or mat board over the art to decide before choosing or cutting the actual mat.
Warning
Don't try to work on the project until you've mastered the technique for that step. Light tonal layers, accurate outlines, variable-pressure curved lines and washing over water soluble colored pencils all take practice. Be sure to rinse and clean your brush immediately after washing over any Derwent Inktense drawing. Letting Inktense dry in the bristles is as nasty for a good brush as letting ink dry in it -- you won't be able to get it out again and it may ruin the brush. Do not leave brushes in a water jar point down. You can hang brushes into water from a spring coil or clip holder, but never let the weight of any brush rest on the hairs. They may be permanently bent and you'll lose the good point on your round watercolor brush. Use a good brush conditioner and cleaner to wash brushes, like a Master's Brush Cleaner cake. Derwent Inktense do not carry the AP Non Toxic label, so never point your brush by sucking on it or let pigment touch your lips or eyes. Treat any color medium as toxic unless clearly labeled Non Toxic, because many colors are created with heavy metal oxides that can cause permanent horrifying symptoms with even very slight doses. Be careful with any artist grade paint, ink or pencils unless clearly labeled nontoxic.
Video of the Day