Things You'll Need
Glass container
Hot glue
Zinc core wick
Gel wax
Stainless steel pots
Liquid dye made for gel candles
Essential oils
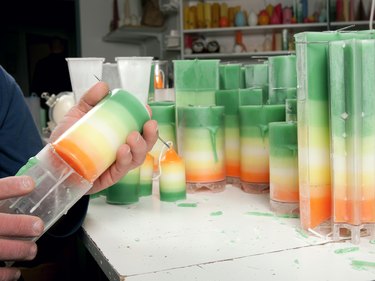
Gel candles, also known as jelly candles, are gaining in popularity because they burn longer than wax candles and are easy to make. The gel is made from mineral oil and a plastic polymer. Use your creativity to make candles in almost any shape, size and color. It's an enjoyable afternoon project that your whole family can all do together.
Clear Gel Candles
Step 1
Choose a container for your gel candle. Glass shows off the gel best, but you can use any non-flammable container. Plan to have the wick at least 1 1/2 inches away from the sides.
Video of the Day
Step 2
Dribble a spot of hot glue on the bottom of the container.
Step 3
Stick the wick tab onto the hot glue and let it cool. Use zinc core wick. Cotton will absorb too much gel.
Step 4
Cut the gel wax into small cubes. This will allow it to melt faster.
Step 5
Put the wax into a stainless steel or glass pot and turn the stove heat to medium. Monitor the temperature carefully with a thermometer. Your goal is 200 degrees F.
Step 6
Maintain a temperature of 200 degrees F until the gel is smooth and syrupy.
Step 7
Use a liquid dye made for gel candles for optimum effects. Water-base and paste dyes won't mix, and color blocks used for regular wax candles may make the gel cloudy.
Step 8
Add 1/4 teaspoon of essential oil or candle scent to the melted gel.
Step 9
Check the gel to ensure the color is consistent. If it's cloudy, try melting a couple more cubes of gel in it. This sometimes helps.
Step 10
Choose a level pouring surface where you can leave the candle to set.
Step 11
Preheat the container to 150 degrees F in an oven to keep bubbles to a minimum.
Step 12
Pour the wax into the container as if you're pouring beer -- down the side to prevent bubbles. The higher the pouring temperature, the fewer bubbles. Sometimes you want bubbles for effect, in which case you should let the gel cool to 175 degrees F before pouring.
Step 13
Pull the wick up straight and center it.
Step 14
Let the candle set for 4 hours.
Step 15
Trim the wick to 1/4 inch.
Embedded Objects
Step 1
Use anything that is not flammable: glass beads, marbles, glitter, sand, shells, colored aquarium gravel, crystals, pebbles, polished stones, artificial jewels or pearls, wax fruit, metal charms, etc.
Step 2
Dip the items in the hot gel to coat them before you add coloring. This will help keep bubbling down.
Step 3
Put in the objects that you want on the bottom before you pour. These can help camouflage the wick tab.
Step 4
Pour a layer of gel and add objects, repeating this in layers. Keep objects away from the wick and remember that the closer they are to the outside of the container, the easier they will be to see.
Tip
Alcohol-base scents such as vanilla may cause cloudiness.
Create original land or seascapes in the gel. Add plastic dinosaur fossils for the former, or colored seashells and toy fish for the latter.
Keep spills to a minimum. Gel is harder than wax to clean up.
Warning
Don't let the temperature of the gel wax exceed 230 degrees F. If the gel burns, it will stink and turn yellow or brown.
Avoid spilling or getting the gel wax on your stove element. The smell is truly horrid and it's not easy to remove the burned gel from these surfaces.
Avoid very narrow containers; a pool of melted gel can catch fire, and the flame may cause blackening of the glass if it's too close.
Video of the Day